Overview
PlanetScale provides an import tool in the dashboard that allows you to painlessly import an existing internet-accessible MySQL or MariaDB database with no downtime.You must be an Organization Administrator to use this feature.
Import process overview
The import workflow gives you visibility into every step of your database migration. You’ll see real-time progress, detailed logs, and replication metrics throughout. Here’s what the process looks like:- Create database - Set up your PlanetScale database
- Connect to external database - Add connection credentials and SSL/TLS settings
- Validate connection and schema - We check connectivity, server configuration, and schema compatibility
- Select tables - Pick which tables to import (all tables imported if foreign keys detected)
- Start workflow - Kick off the import
- Monitor import - Watch progress with real-time logs, per-table progress, and replication lag information
- Complete import - Finalize and detach from your external database
It’s recommended to avoid all schema changes / DDL (Data Definition Language) statements during an import on both your source database and the PlanetScale database. This includes
CREATE, DROP, ALTER, TRUNCATE, etc.Step 1: Create your PlanetScale database
1
Head to your PlanetScale dashboard and click on “New database” > “Import database”.
2
Give your imported database a name and select a region from the dropdown.We recommend using the same name as the database you’re importing from to avoid updating any database name references throughout your application code. If you’d prefer to use a different database name, make sure to update your app where applicable once you fully switch over to PlanetScale.
3
Click “Create database” to proceed to the import workflow setup.
Step 2: Connect to your external database
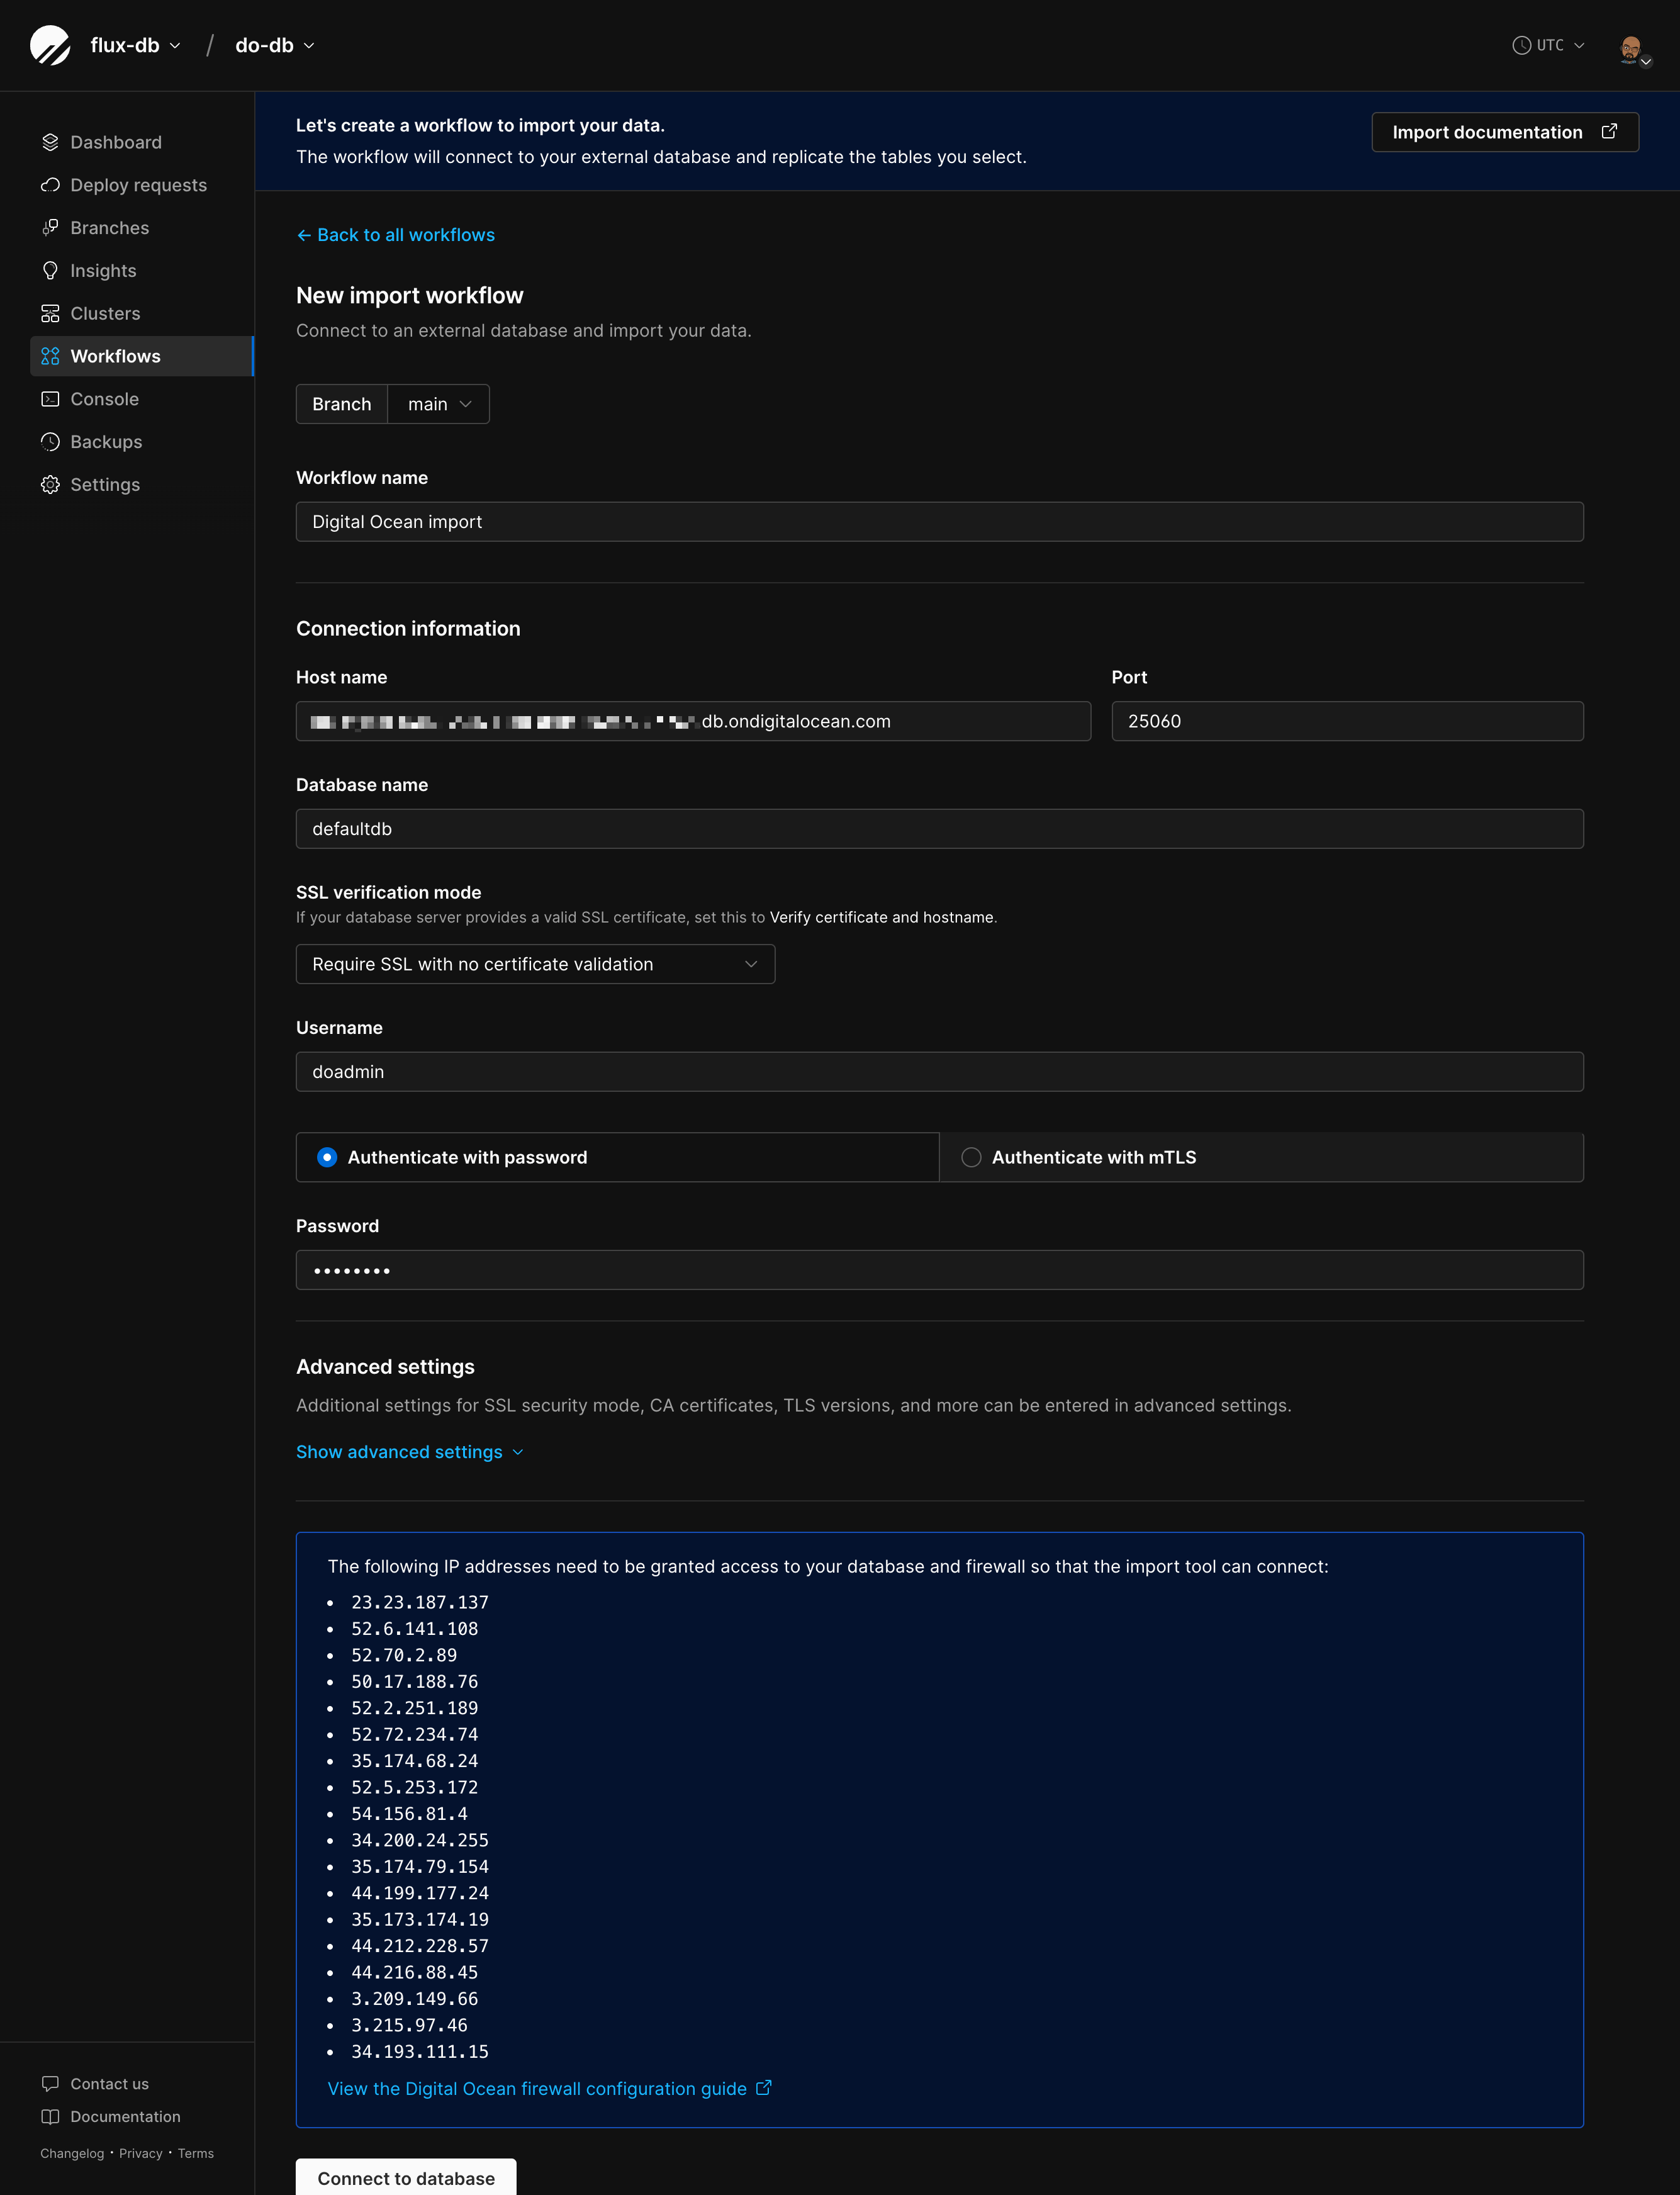
You’ll be taken to the import workflow page where you can configure the connection to your external MySQL or MariaDB database.Connection settings
Fill in your connection info: Host name - The address where your database is hosted. Port - The port where your database is hosted. The default MySQL port is3306.
Database name - The exact database name you want to import.
SSL verification mode - Choose from these options:
- Disabled - No SSL encryption (not recommended for production)
- Preferred - Use SSL if available, otherwise connect without SSL
- Required - SSL is required, but certificate is not verified
- Verify CA - SSL is required and the certificate is verified against the CA
- Verify Identity - SSL is required and the certificate hostname is verified
Required or higher.
For more information about certificates from a Certificate Authority, check out our Secure connections documentation.
Username - The username to connect with. This user needs proper permissions. See our import tool user requirements guide for the full list of required grants.
Authentication method
Pick your authentication method: Authenticate with password: Provide the password for the username you entered. Authenticate with mTLS (mutual TLS):- SSL client certificate - Certificate to authenticate PlanetScale with your database server
- SSL client key - The private key for the client certificate
Advanced settings (optional)
Click “Show advanced settings” for more options:- Import connections - Maximum number of concurrent connections for the import (max 100)
- Minimum TLS version - Choose from TLS 1.0, 1.1, 1.2, or 1.3
- SSL server name override - Override the server name for SSL certificate verification
- SSL CA certificate chain - If your database server has a certificate with a non-trusted root CA, provide the full CA certificate chain here
You must have binary logs enabled on the database you’re importing. See our provider-specific migration guides for instructions on enabling binary logging.
Step 3: Validate connection and schema
Once you’ve filled in your connection info, click “Connect to database”. PlanetScale will run some checks on your external database.Connectivity check
We’ll make sure we can connect to your database with the credentials and SSL/TLS settings you provided.Server configuration check
These server configuration values need to be set correctly for the import to work:
* Either
expire_logs_days or binlog_expire_logs_seconds needs to be set. If both are set, binlog_expire_logs_seconds takes precedence.
Schema compatibility check
We’ll look for any compatibility issues with your schema:- Missing unique key - All tables must have a unique, not-null key. See our Changing unique keys documentation for more info.
- Invalid charset - We support
utf8,utf8mb4,utf8mb3,latin1, andascii. Tables with other charsets will be flagged. - Table names with special characters - Tables with characters outside the standard ASCII set aren’t supported.
- Views - Views are detected but won’t be imported. You can create them manually after the import finishes.
- Unsupported storage engines - Only
InnoDBis supported. - Foreign key constraints - Detected and flagged for special handling (see below).
Handling validation errors
If validation fails, you’ll see error messages with links to troubleshooting docs. You have two options:- Fix the issues - Go back to your external database, fix the configuration or schema issues, and try connecting again. Contact support if you encounter trouble addressing the incompatibilities.
- Skip and continue - For certain failures, you can proceed anyway. Not recommended since this may cause the import to fail later.
Step 4: Foreign key constraints
If your database uses foreign key constraints, we’ll detect them during validation and automatically enable foreign key support.Important things to know
When importing with foreign keys:- All tables will be imported - You can’t select a subset of tables when foreign keys are present. This keeps referential integrity intact.
- Use a replica if possible - The foreign key import holds a long-running transaction on the source database, which can increase load. We recommend connecting to a replica instead of your primary.
- Import retries - If your import fails, it starts over from the beginning. Unlike regular imports, we can’t resume from where we left off.
Step 5: Select tables to import
After validation passes, you’ll see a workflow form with your source database on the left (with provider logo and table list) and PlanetScale on the right (with target keyspace and shard count). In Vitess a keyspace is the equivalent of a single, logical MySQL databases.Table selection
If foreign keys were detected:- All tables are automatically selected
- You can’t deselect individual tables
- You’ll see: “All tables will be replicated due to foreign key constraints usage”
- Select all tables or pick specific ones
- You can start with a subset of tables for testing if you want
Workflow validation
Before creating the workflow, click “Validate” to run pre-migration checks:- Safe migrations is enabled
- VSchema is valid
- Tables will be created automatically in the target keyspace (PlanetScale database)
- Enough storage is available
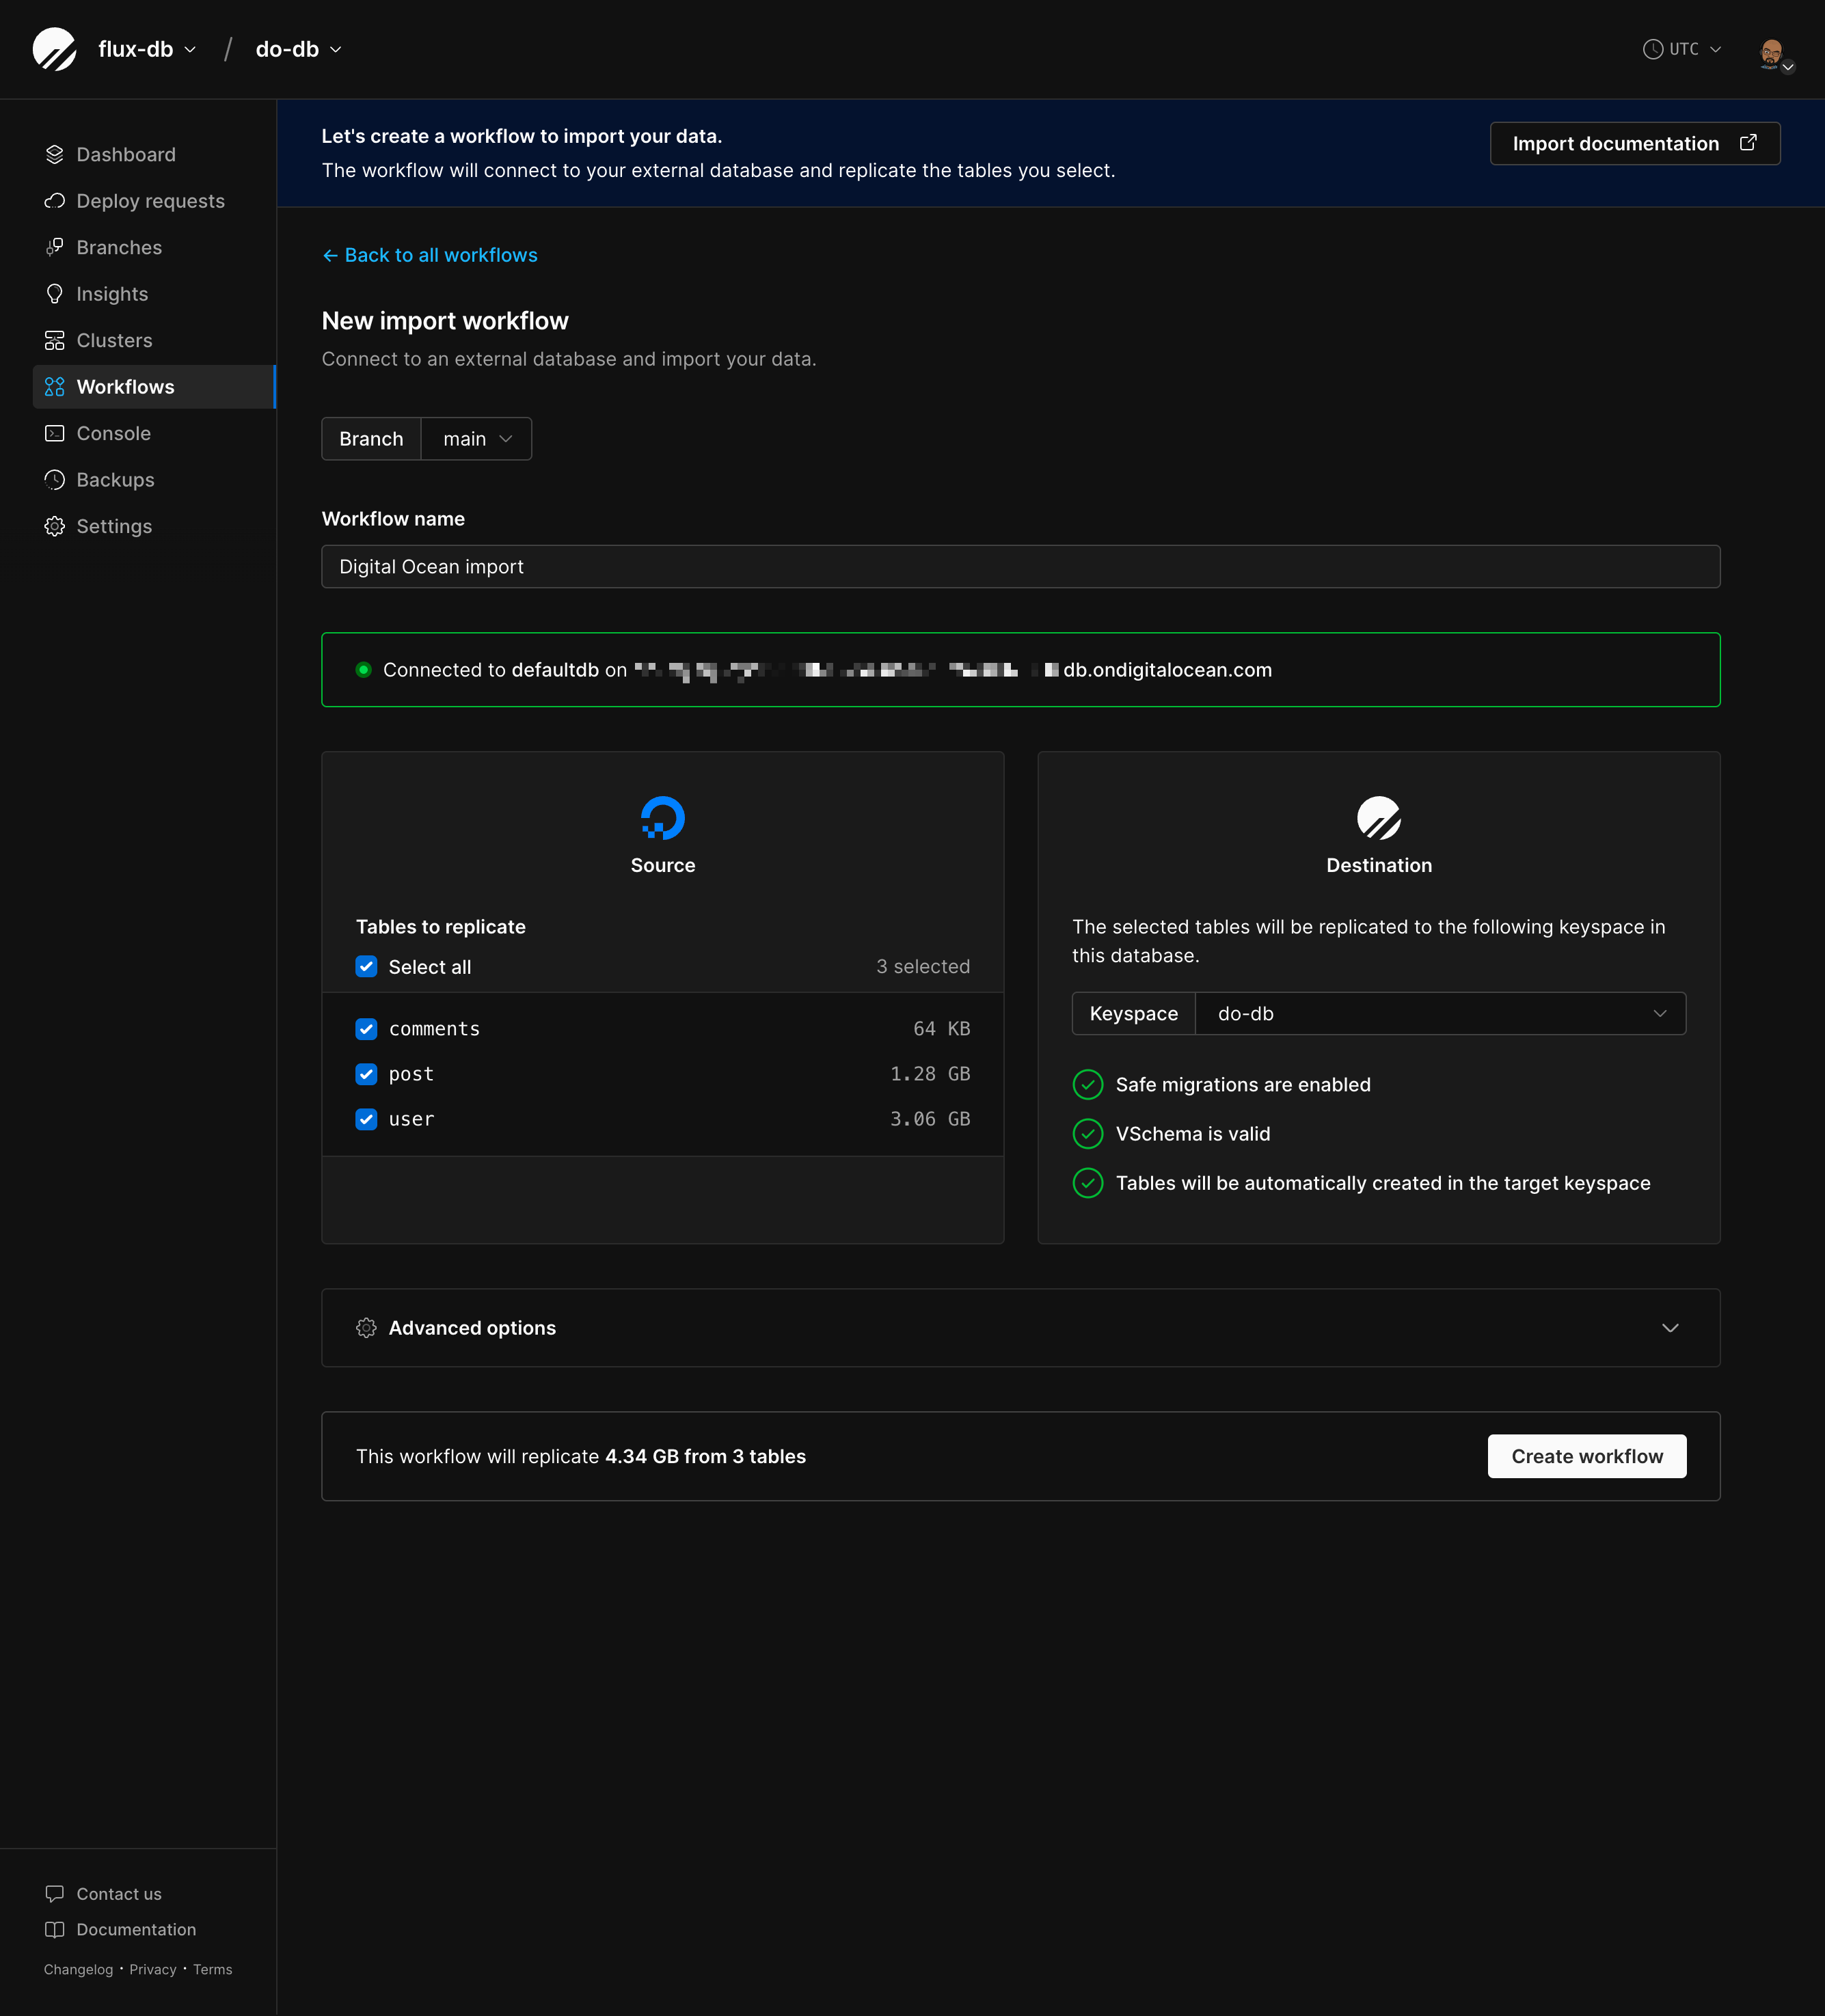
Advanced options
Click “Advanced options” to see additional settings that can optimize your import: Defer secondary index creation Checked by default. Creates secondary indexes (non-primary indexes) after copying data instead of during the initial copy.- Why this helps: Maintaining many indexes while inserting data is slow. By deferring index creation until after all data is copied, your import can be significantly faster (often 2-3x faster for tables with multiple indexes).
- When it’s disabled: Import will run slower. Automatically disabled for imports with foreign keys, since foreign key constraints require indexes to exist during the copy phase.
ALTER TABLE, ADD INDEX, etc.) occur on your external database while the import is running.
- STOP (default, recommended) - The workflow stops immediately when schema changes are detected. You’ll need to manually restart the workflow after reviewing the changes. This is the safest option because it lets you verify the schema changes won’t cause issues before continuing.
- IGNORE - Schema changes are skipped and won’t be applied to your PlanetScale database. Your import continues without interruption, but your schemas will diverge. Only use this if you’re confident you don’t need these changes or plan to apply them manually to your PlanetScale database later.
- EXEC - Schema changes are automatically applied to your PlanetScale database while the import continues running. If applying a schema change fails (for example, if it’s not compatible with Vitess), the workflow stops and you’ll need to restart it. Use this if you need schema changes to sync automatically but want safety checks.
- EXEC_IGNORE - Attempts to apply schema changes but keeps running even if they fail.
ImportantSchema changes during an active import can cause problems. This setting is a safety mechanism for unexpected changes, not a way to intentionally modify schemas mid-import. If possible, avoid making schema changes until the import completes.
AUTO_INCREMENT columns from an unsharded to a sharded keyspace, Vitess needs a place to store “sequence tables” that coordinate ID generation across shards. This setting specifies which unsharded keyspace should hold those sequence tables.
You can ignore this setting for external database imports.
Step 6: Start the import workflow
After validation passes. click “Create workflow” to start the import process. You’ll be redirected to the workflow monitoring page where you can track your import in real-time.Step 7: Monitor your import
The monitoring page shows you real-time progress of your import.Connection status
At the top, you’ll see:- A live connection indicator (green pulsing dot when connected)
- Your external database name and hostname
- Workflow info (name, who started it, when)
Visual replication flow
The main view shows data flowing from your external database to PlanetScale: Source keyspace (left):- List of tables being imported
- Progress donuts for each table during the copy phase (0-100%)
- Row counts per table
- Animated arrow showing data flow direction
- Current phase (“Copying data” or “Replicating data”)
- Replication lag graph with current lag in seconds
- Your PlanetScale shards (only one shard in most cases)
- Traffic serving status
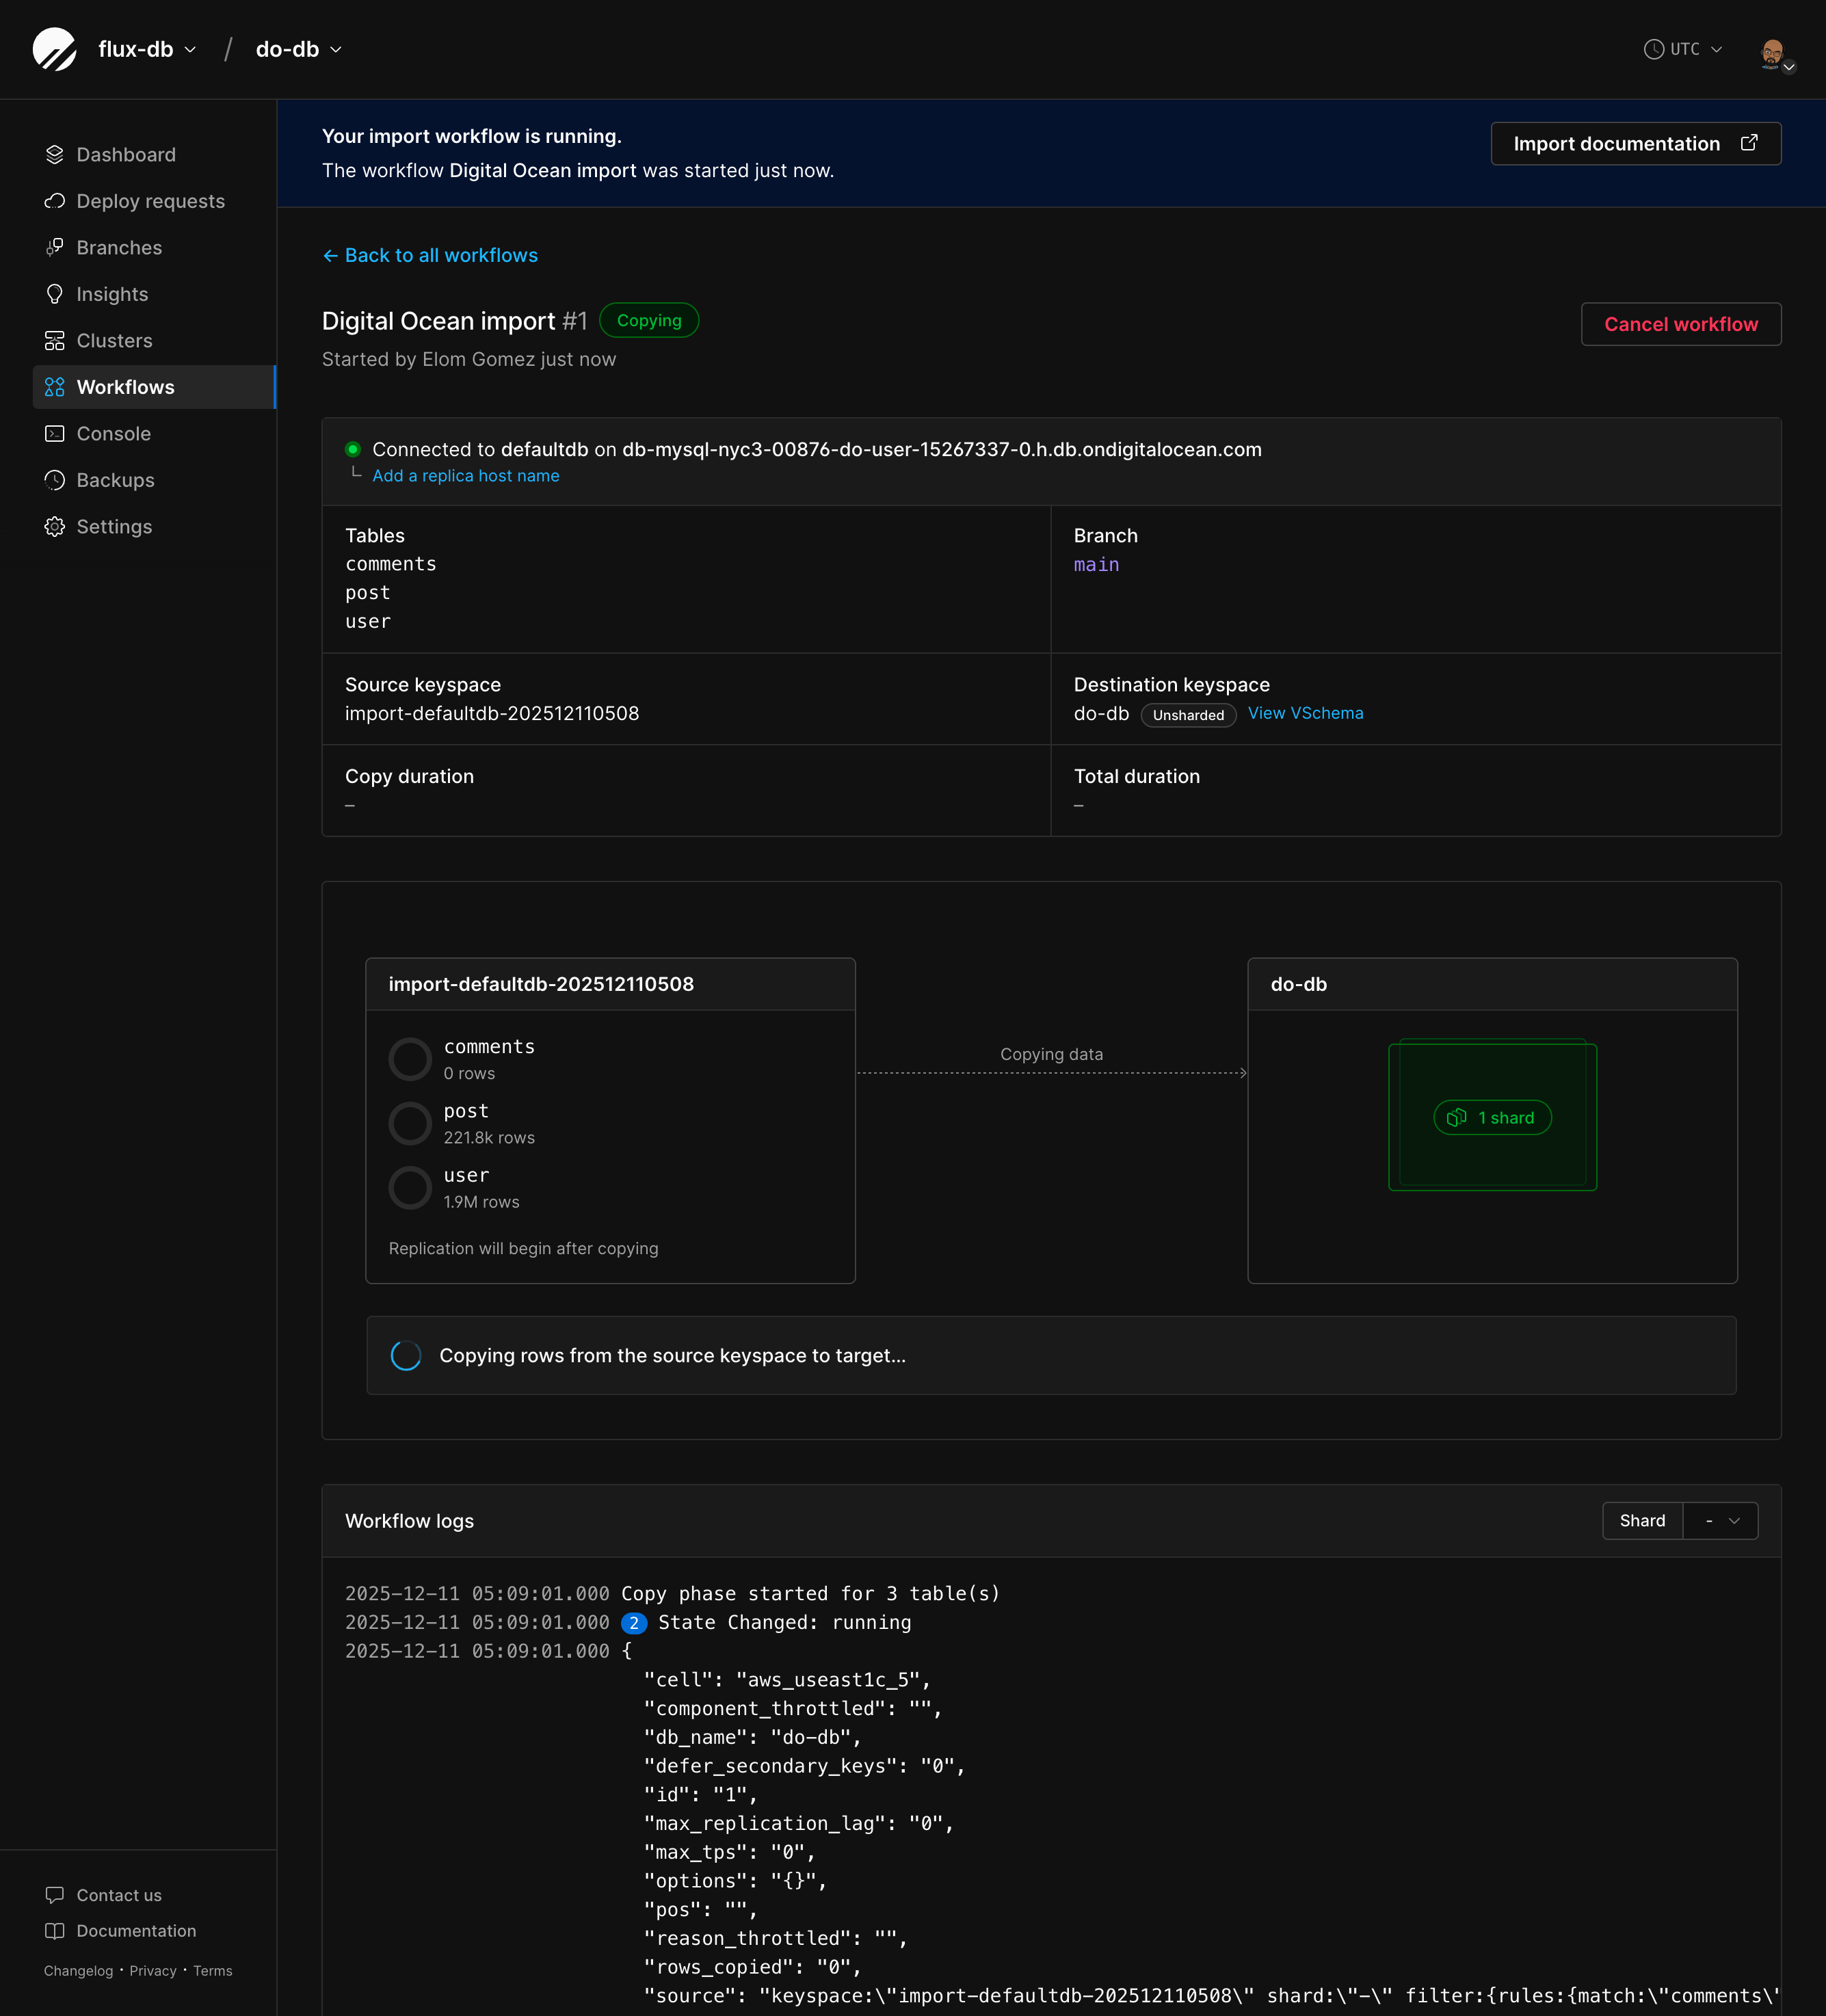
Workflow phases
Your import will go through these states:- Pending - Workflow created, not started yet
- Copying - Copying initial data (you’ll see per-table progress here)
- Running - Replicating changes to keep databases in sync
- Verifying data - Optional data verification
- Verified data - Verification complete
- Switching replicas - Moving replica traffic to PlanetScale
- Switched replicas - Replica traffic now on PlanetScale
- Switching primaries - Moving primary traffic to PlanetScale
- Switched primaries - Primary traffic now on PlanetScale
- Completed - Import done
- Error - Something went wrong, check error messages or logs
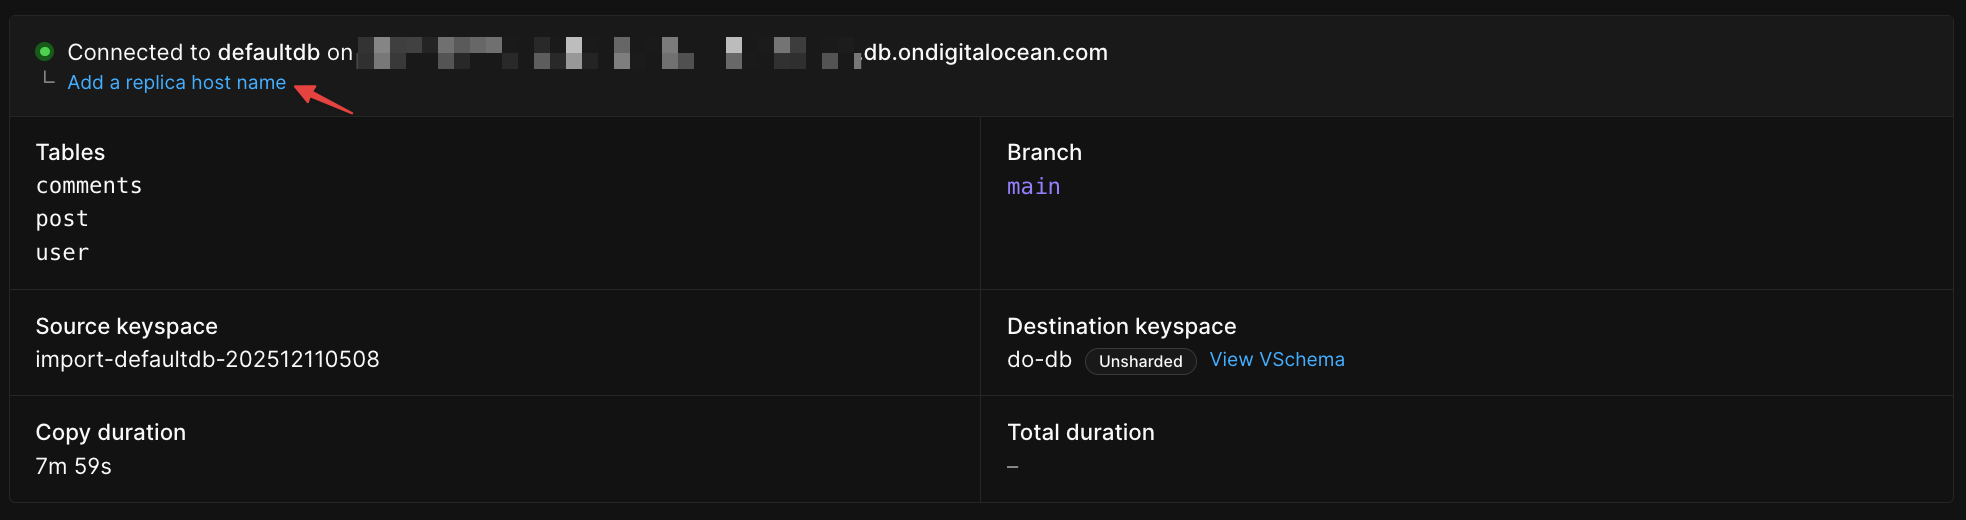
Adding a replica host name (optional)
If your external database has read replicas, you can route read traffic to them instead of your primary database. This helps reduce load on your primary during the import. How this works: If your application is configured to send read traffic to replicas, you can continue this pattern while testing PlanetScale. Adding a replica hostname allows PlanetScale to proxy traffic to your external replicas during the import. This is useful when you want to test PlanetScale with read traffic going to your replicas while writes continue to your primary.ImportantPlanetScale doesn’t automatically detect or route read-only transactions. You control which queries go to replicas through your application’s database connection configuration. PlanetScale simply acts as a proxy, forwarding the traffic you send to replica connections through to your external replica databases.
1
Click “Add a replica host name” below your primary connection info
2
Enter the hostname of your read replica (e.g.,
replica.myserver.example.com)3
Click “Add” to save
- Reduces load on your primary database during the copy phase
- Especially useful for large imports or high-traffic databases
- The replica must have the same data as your primary (replication lag should be minimal)
Verify data (optional)
Once the initial copy completes and replication catches up, you can optionally verify that your data matches between the external database and PlanetScale. Click “Verify data” on the workflow monitoring page to run a comparison. This checks that the copied data is identical between your external database and PlanetScale, giving you confidence before switching traffic.Switching traffic
Once you’ve verified your data, you can control how traffic is routed between your external database and PlanetScale:- Switch replica traffic - Serve read queries from PlanetScale while writes still go to your external database. This is an optional intermediate step that lets you test read traffic separately.
- Switch primary traffic - Serve both reads and writes from PlanetScale. This switches all traffic at once, so you don’t need to switch replica traffic first.
- Complete - Finalize the migration
You can skip directly to switching primary traffic if you prefer. Switching primary traffic handles both reads and writes simultaneously, so switching replica traffic first is optional.
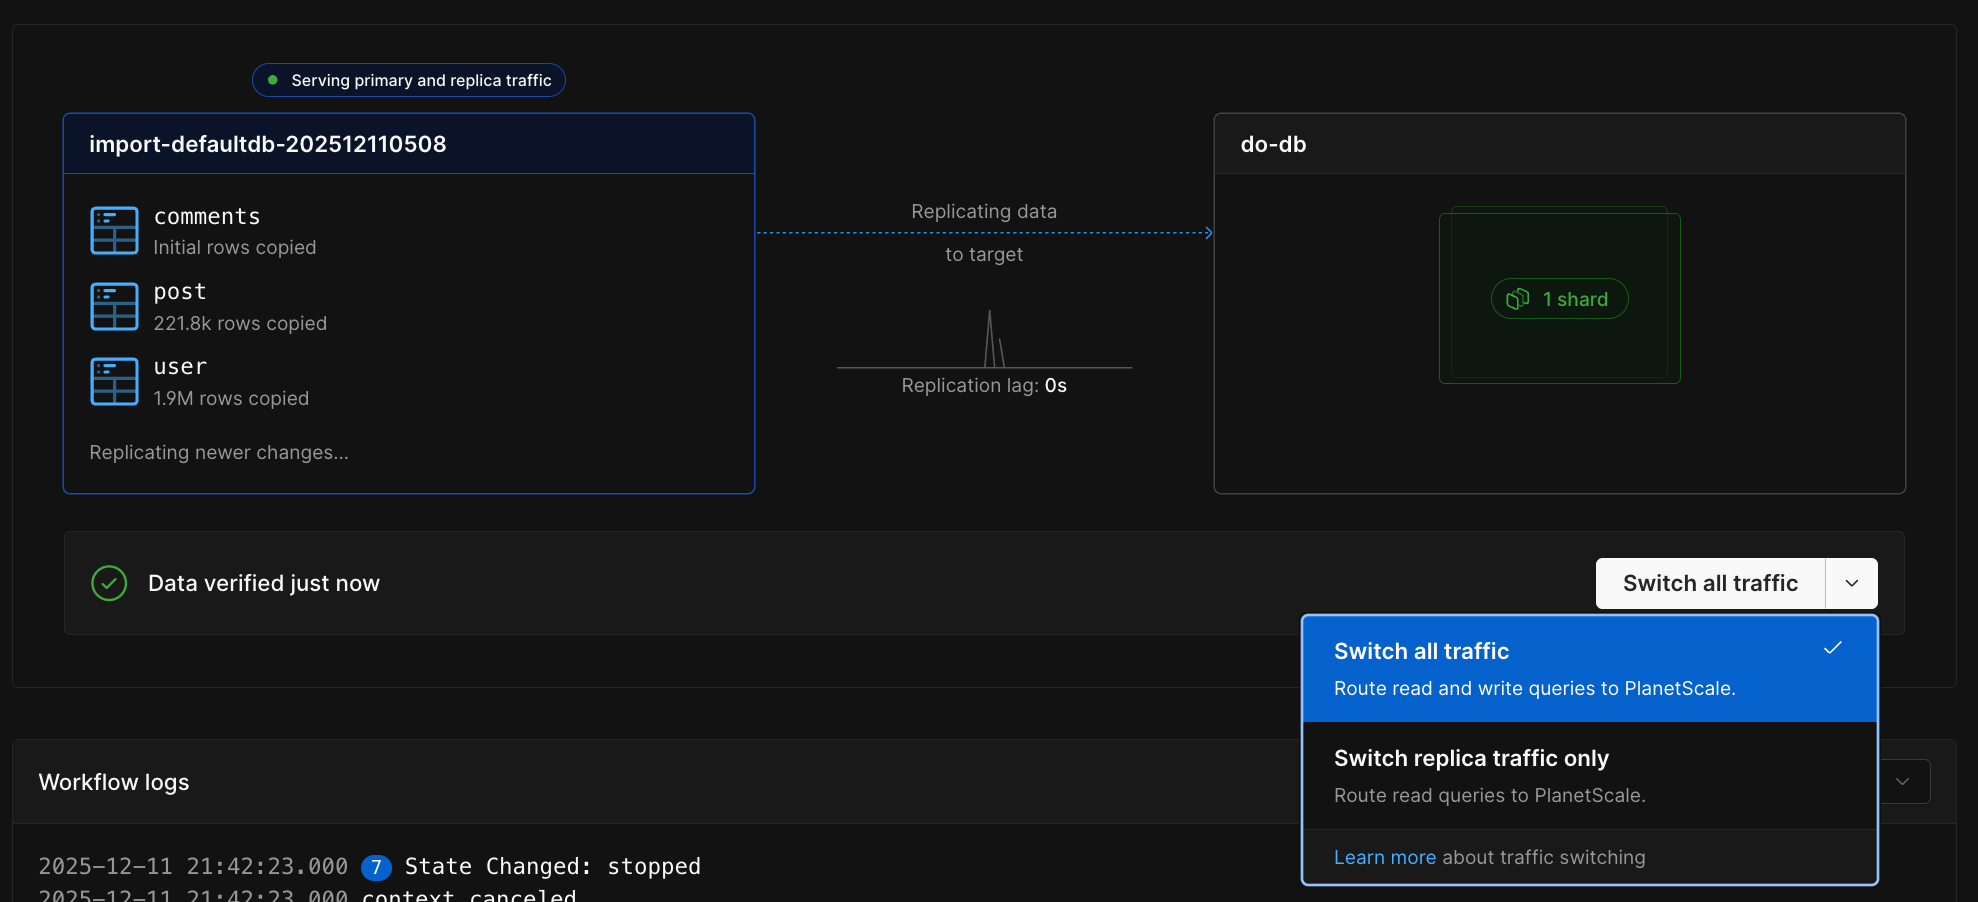
Monitoring replication lag
The lag graph shows how far behind PlanetScale is from your external database. During the initial copy, lag will be high. Once the copy finishes and replication catches up, lag should drop.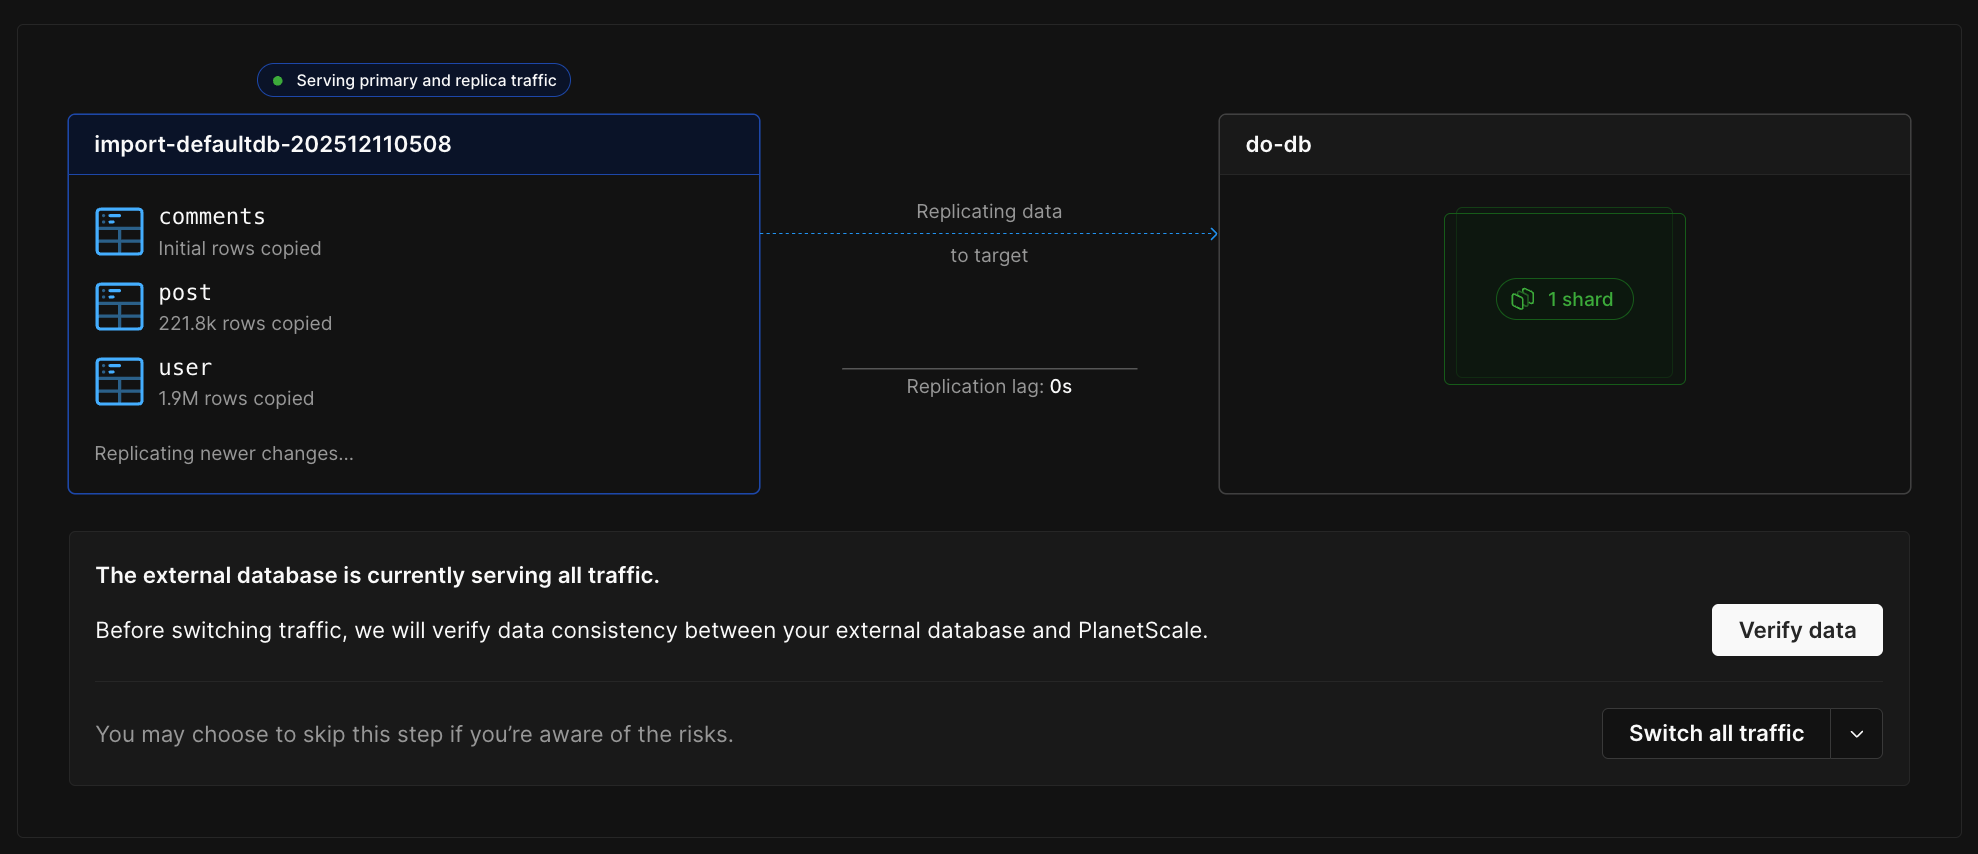
Step 8: Complete the import
Once you’ve switched all traffic to PlanetScale and verified everything is working:1
Monitor your application for any issues. Check:
- Application logs for errors
- Replication lag (should be near zero)
- Error tracking tools
- Application performance metrics
2
When you’re confident everything is working correctly, click “Complete workflow” on the workflow monitoring page.
3
PlanetScale will detach your external database and the connection will be closed.
- Replication from PlanetScale back to your external database stops
- The connection to your external database is closed
- All external database credentials are removed from PlanetScale
- The workflow is marked as complete
Next steps
You just migrated your database to PlanetScale. Here are some things you can do next:- Create a development branch - Use branching in your development workflow.
- Create a deploy request - Test schema changes in dev branches before pushing to production.
Provider-specific migration guides
For detailed instructions on preparing your external database for import, see our provider-specific guides:- Amazon Aurora
- AWS RDS for MySQL
- Azure Database for MySQL
- DigitalOcean MySQL
- Google Cloud SQL
- MariaDB