

Overview
This document will demonstrate how to migrate a database from AWS Relational Database Services (RDS) to PlanetScale.This guide assumes you are using MySQL on Amazon RDS. If you are using Amazon Aurora (MySQL compatible) on RDS, follow the Amazon Aurora migration guide. Other database systems (non-MySQL or MariaDB databases) available through RDS will not work with the PlanetScale import tool.
Prerequisites
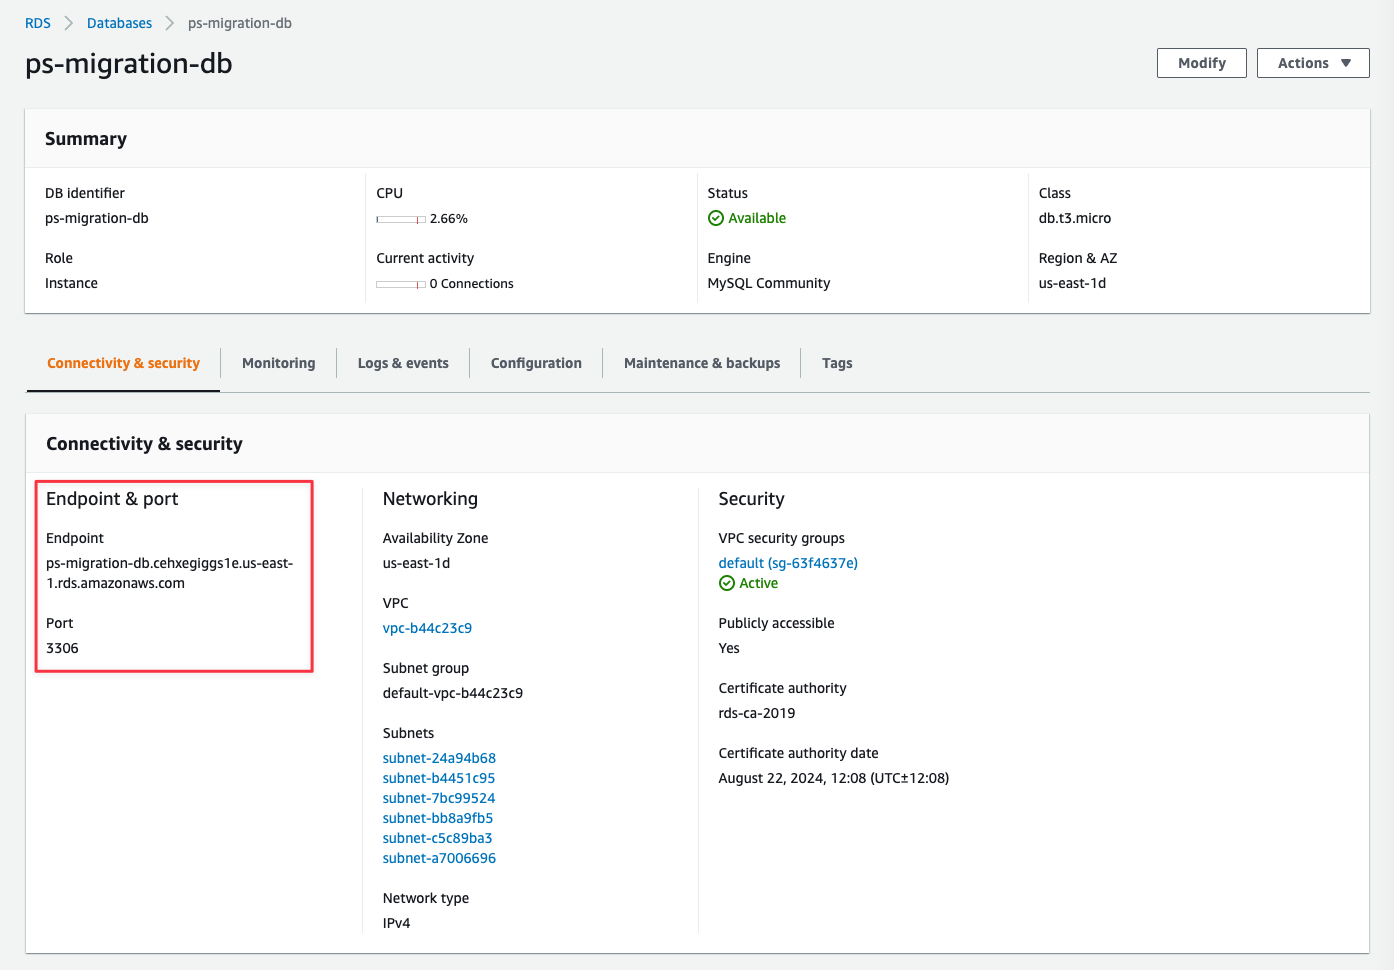
Gather the following information from the AWS Console:- Database endpoint address - Located in “Connectivity & security” tab of your database instance
- Port number - Typically 3306
- Master username and password - Your RDS root credentials
Step 1: Configure server settings
Your RDS database needs specific server settings configured before you can import. Follow these steps to configure GTID mode, binlog format, and sql_mode.Check your current parameter group
Your Amazon RDS database is either using the default DB parameter group (e.g., default.mysql8.0) or a custom one. You can view it in the “Configuration” tab of your database instance.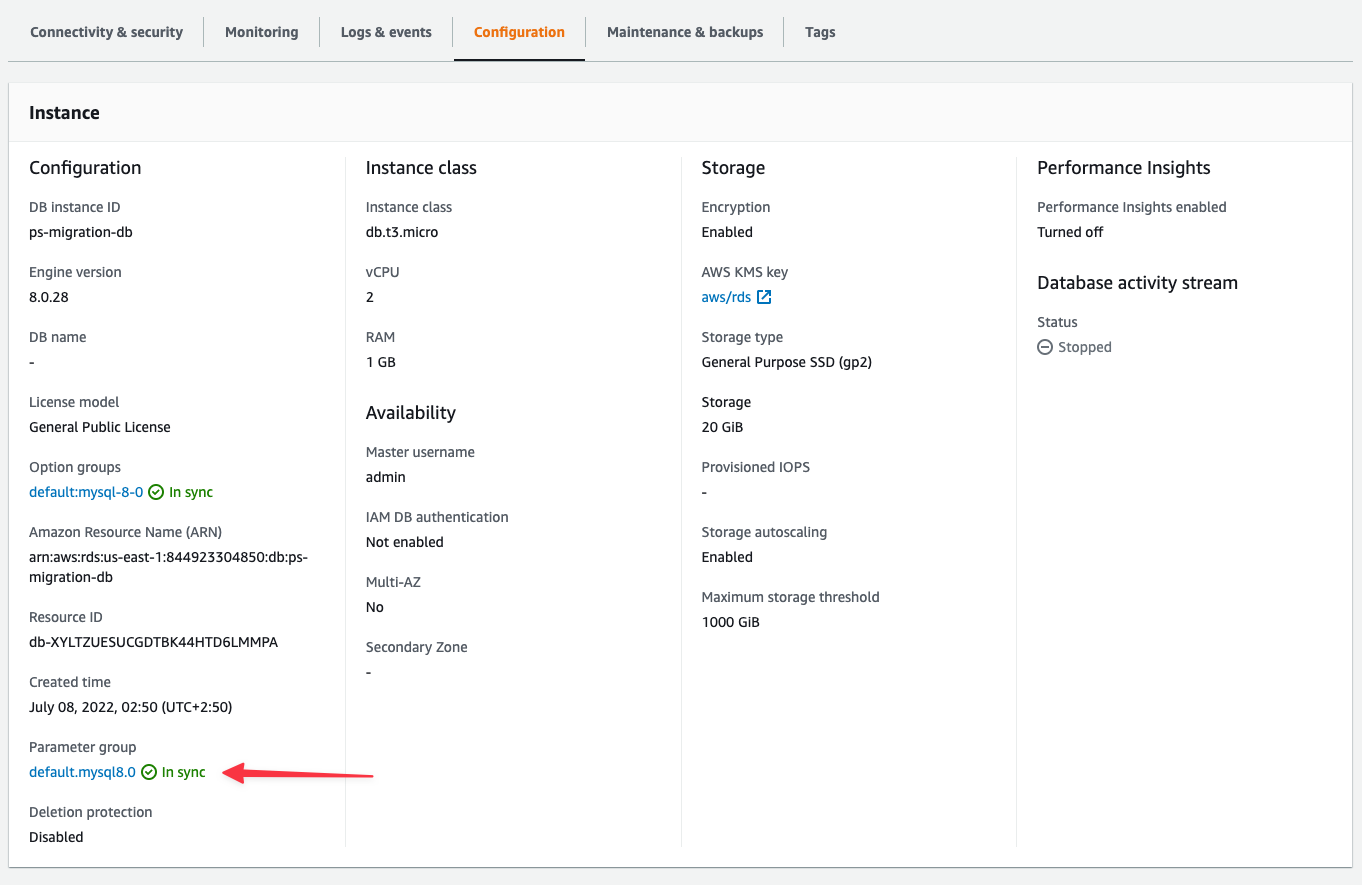
Configure the parameter group
1
If you are using the default DB parameter group, you’ll need to create a new parameter group to reconfigure settings.To create a parameter group, select “Parameter groups” from the left nav and then “Create parameter group”.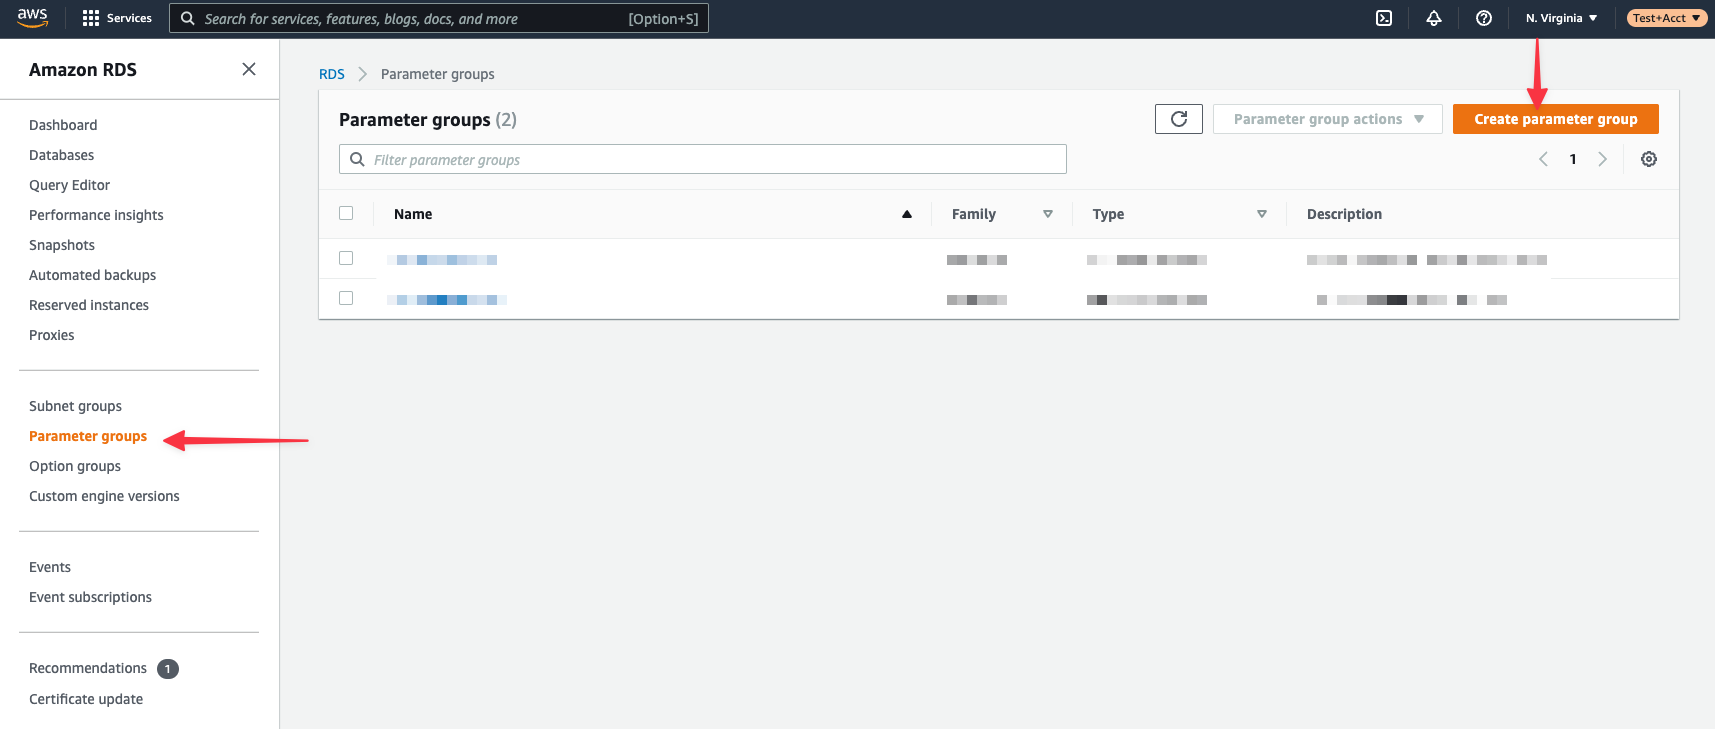
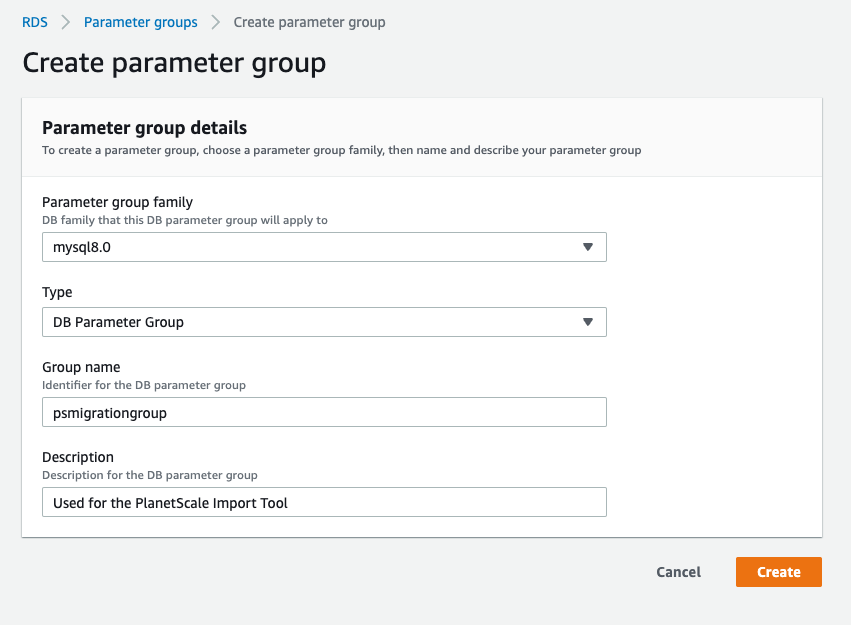
- Parameter group family: mysql8.0 (or your MySQL version)
- Type: DB Parameter Group (Note: Not “DB Cluster Parameter Group” type)
- Group name: psmigrationgroup (or your choice)
- Description: Parameter group for PlanetScale migration
2
Edit the settings in your custom DB parameter group. Select your parameter group from the list.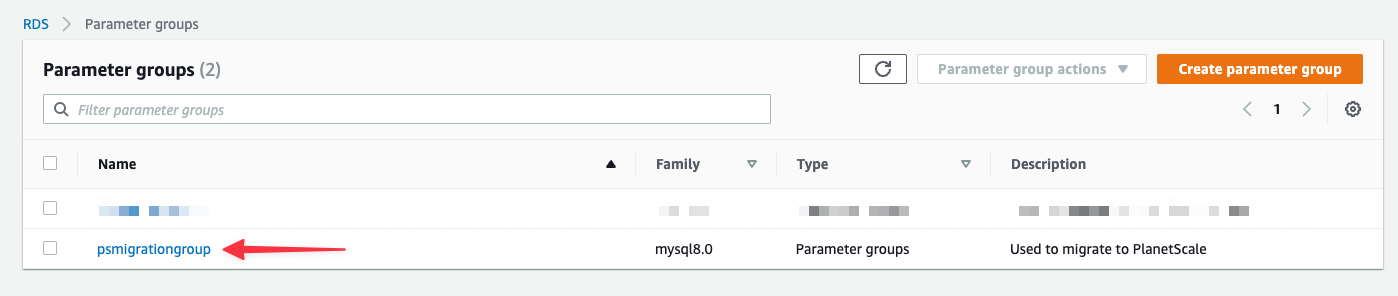
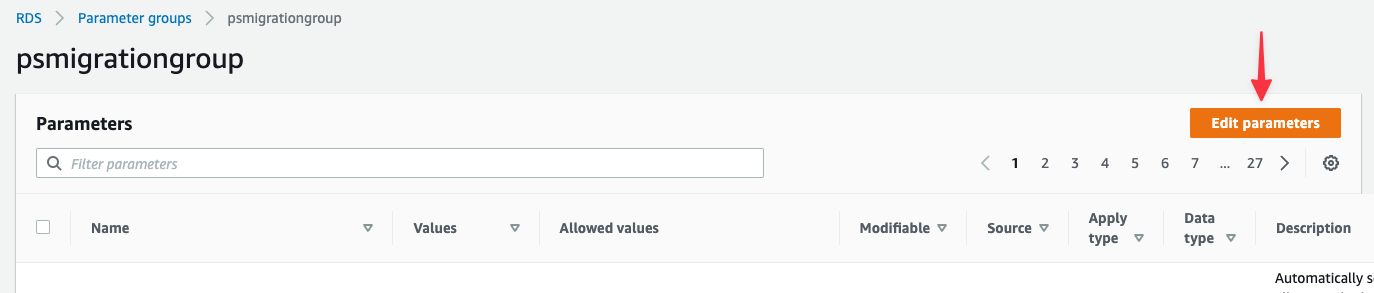
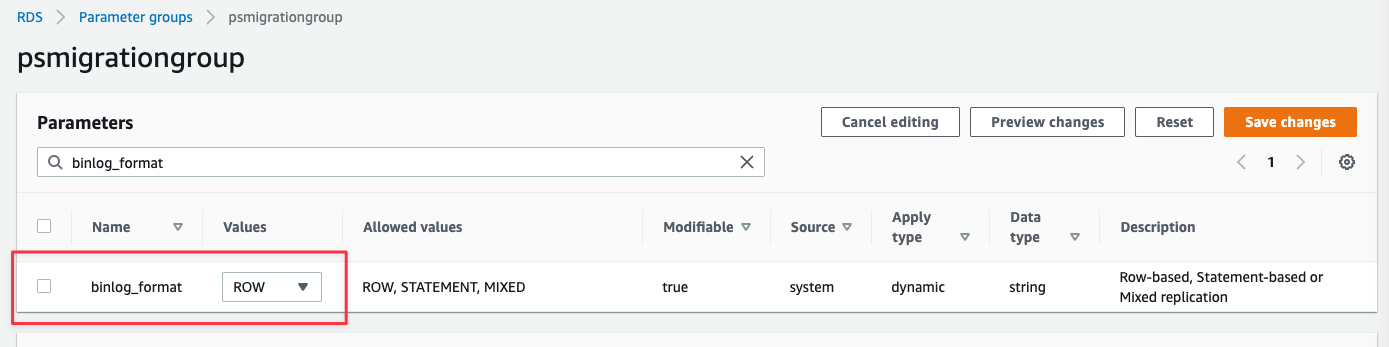
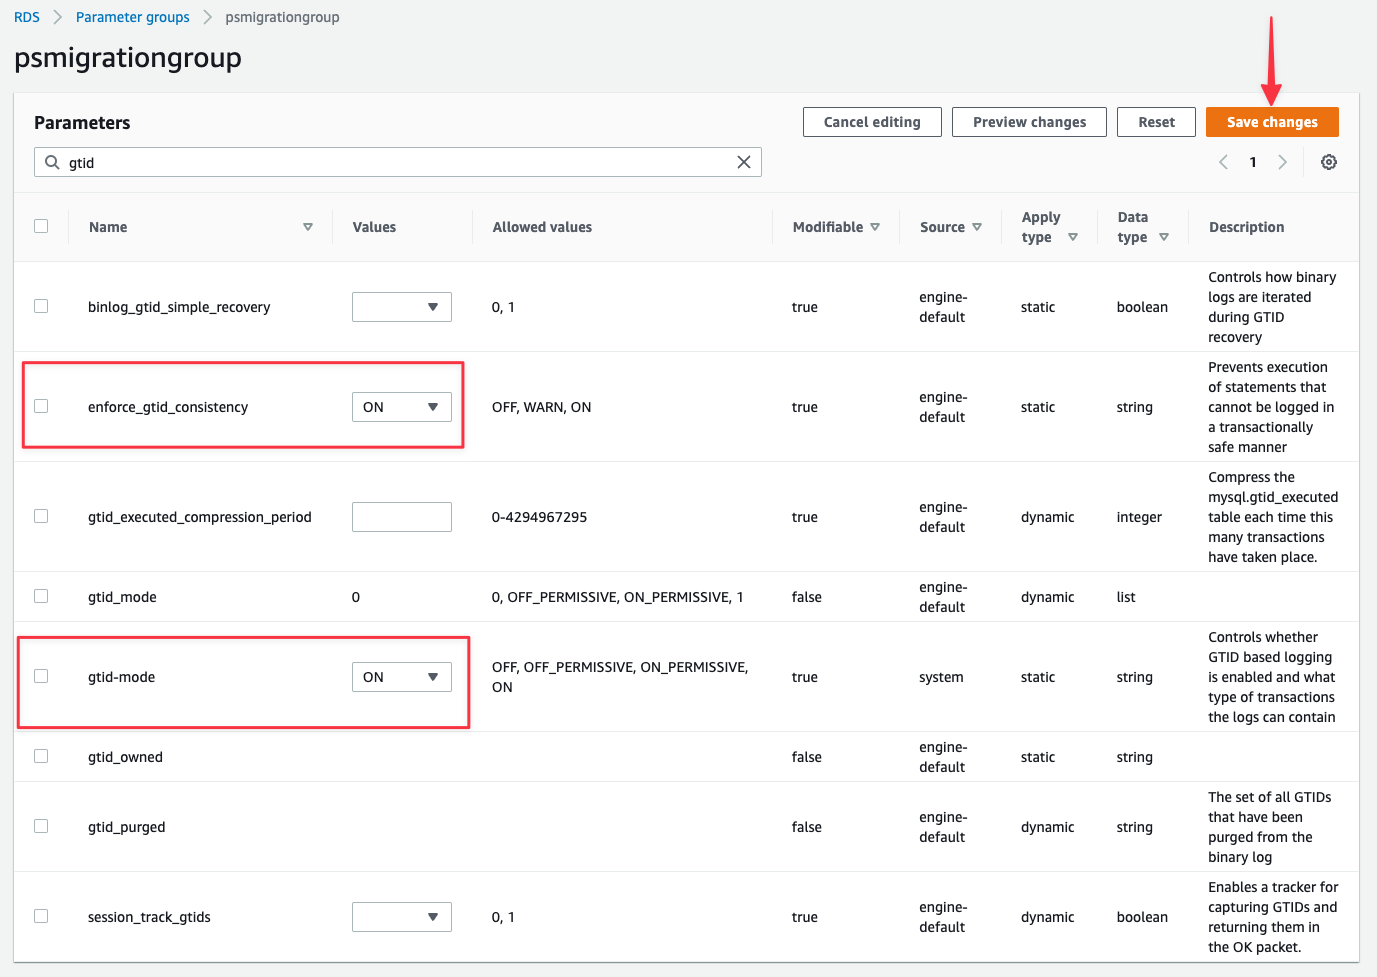
- binlog_format: ROW
- gtid-mode: ON
- enforce_gtid_consistency: ON
- sql_mode: NO_ZERO_IN_DATE,NO_ZERO_DATE,ONLY_FULL_GROUP_BY
3
Associate the parameter group to your database. Select “Databases” from the left nav, check the select box next to your database instance, and click “Modify”.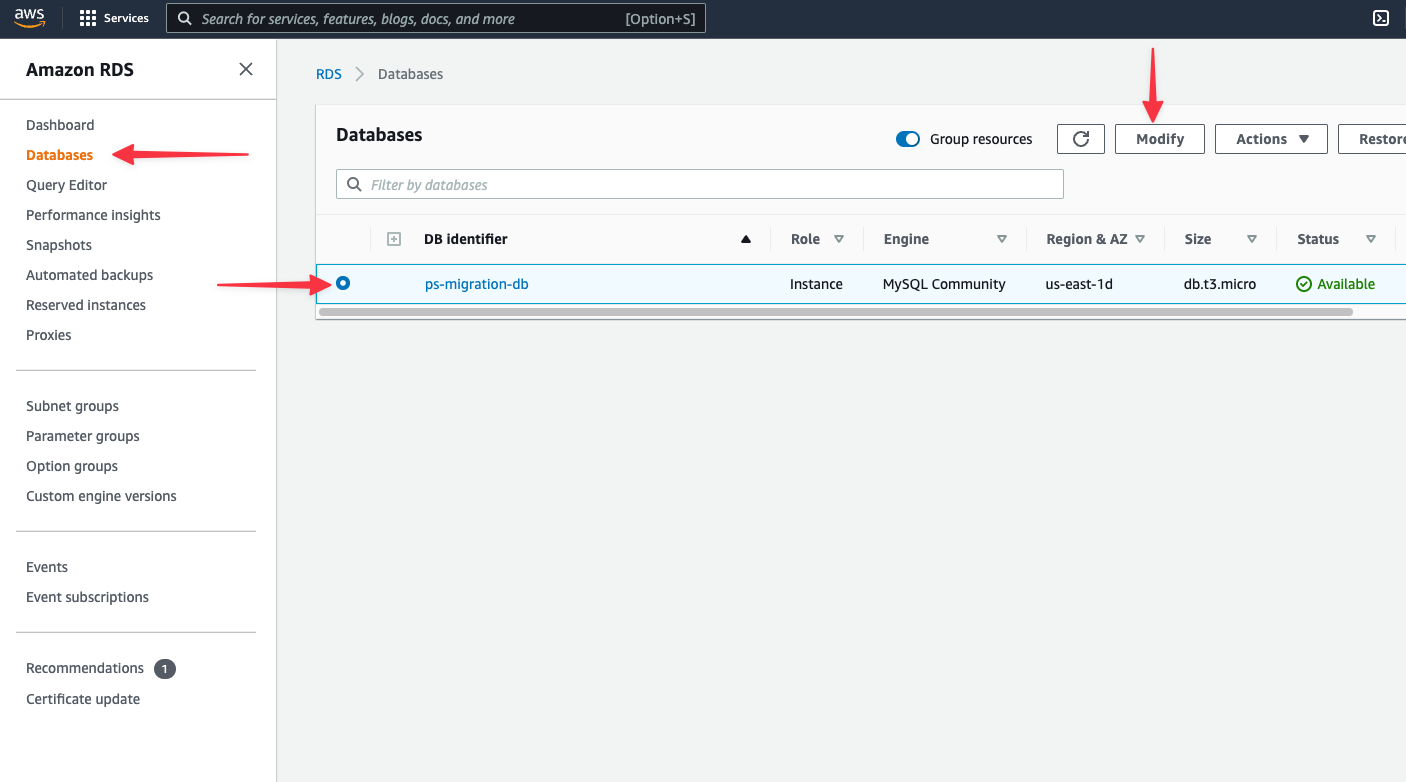
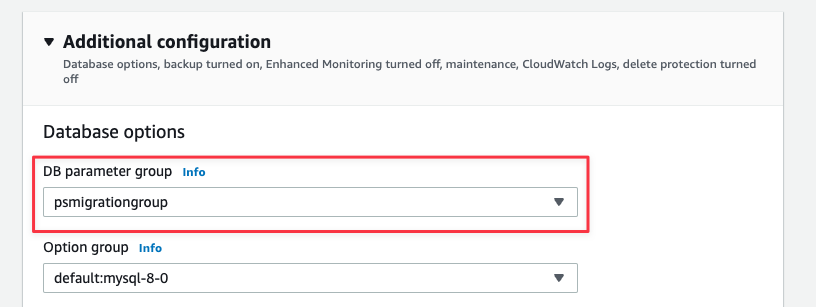
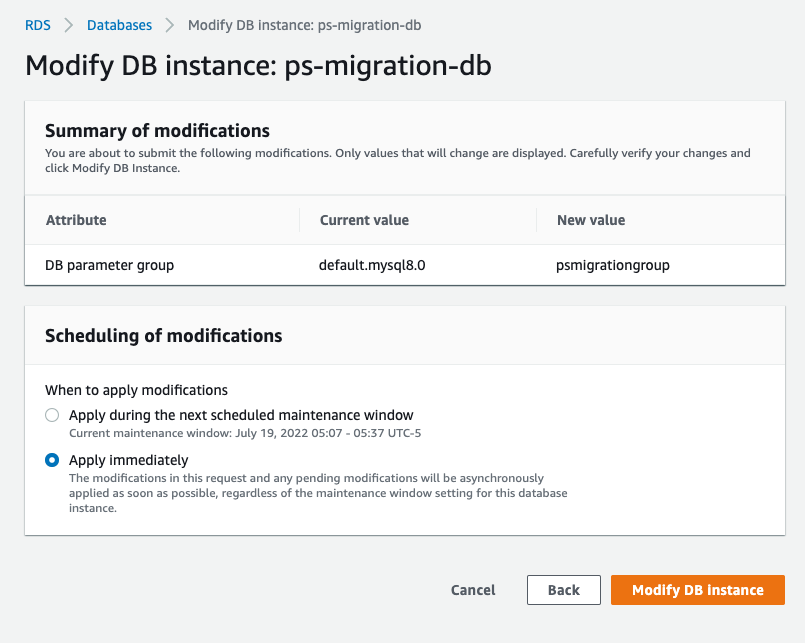
- Apply during the next scheduled maintenance window - Applied during maintenance window
- Apply immediately - Applied now, but requires manual reboot
4
Reboot your database instance to apply the settings. Click “Actions” > “Reboot”.You’ll be presented with a page to confirm the database you want to reboot. Click “Confirm” and the database will begin rebooting.If you opted to apply changes immediately, monitor the status on the “Configuration” tab. The page does not automatically update, so refresh to check status.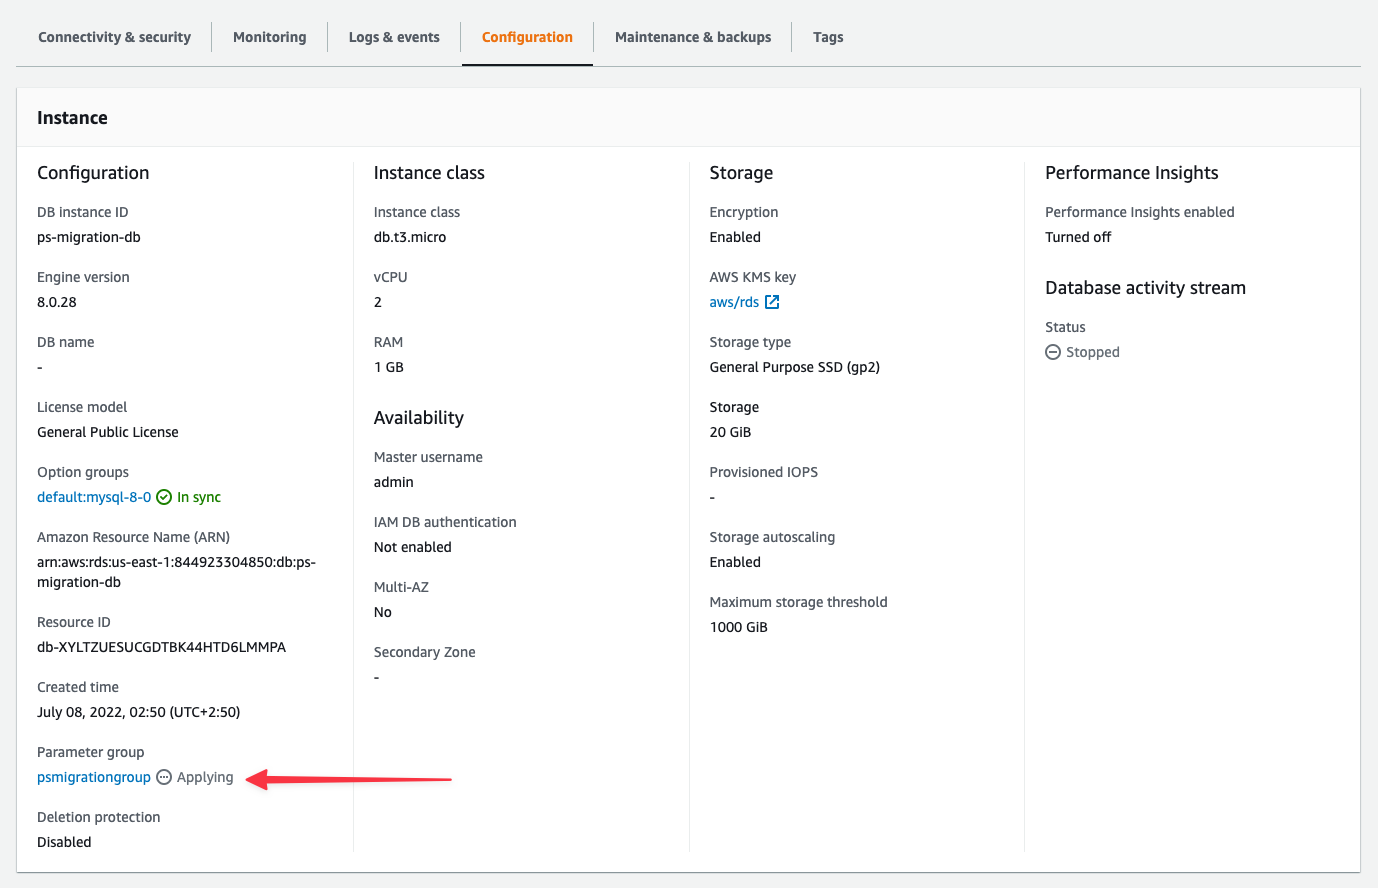
Step 2: Enable binary logging
Binary logging must be enabled for the import to work. On RDS, binary logging is tied to automated backups. To enable binary logging, enable automated backups by setting the backup retention period to any value greater than zero days. Verify binary logging is enabled:Step 3: Configure binlog retention
Set the binary log retention period to ensure logs aren’t purged during the import. For most cases, 48 hours is sufficient, but larger imports may need more time. Set the retention period using themysql.rds_set_configuration() procedure:
Step 4: Ensure database is publicly accessible
PlanetScale needs to connect to your RDS database over the internet. Check that your database is publicly accessible. In your database instance, go to “Connectivity & security” tab. Under “Security”, check if Publicly accessible is set to “Yes”. If it says “No”, you’ll need to modify the database settings to enable public access. If you cannot make the database publicly accessible, contact us to discuss alternative import options.Step 5: Create a migration user
Create a dedicated user with limited privileges for the import process. Connect to your RDS database using the MySQL command line with your master credentials:<SUPER_STRONG_PASSWORD>- Password for the migration_user account<DATABASE_NAME>- Name of the database you’re importing
Step 6: Configure RDS security group
Allow PlanetScale to connect by adding PlanetScale’s IP addresses to your security group. The specific IP addresses depend on your PlanetScale database region. These will be shown during the import workflow on the Connect to external database step. See the Import public IP addresses page for more details.Add IP addresses to security group
Navigate to “Connectivity & security” tab of your database instance and click the VPC security group link.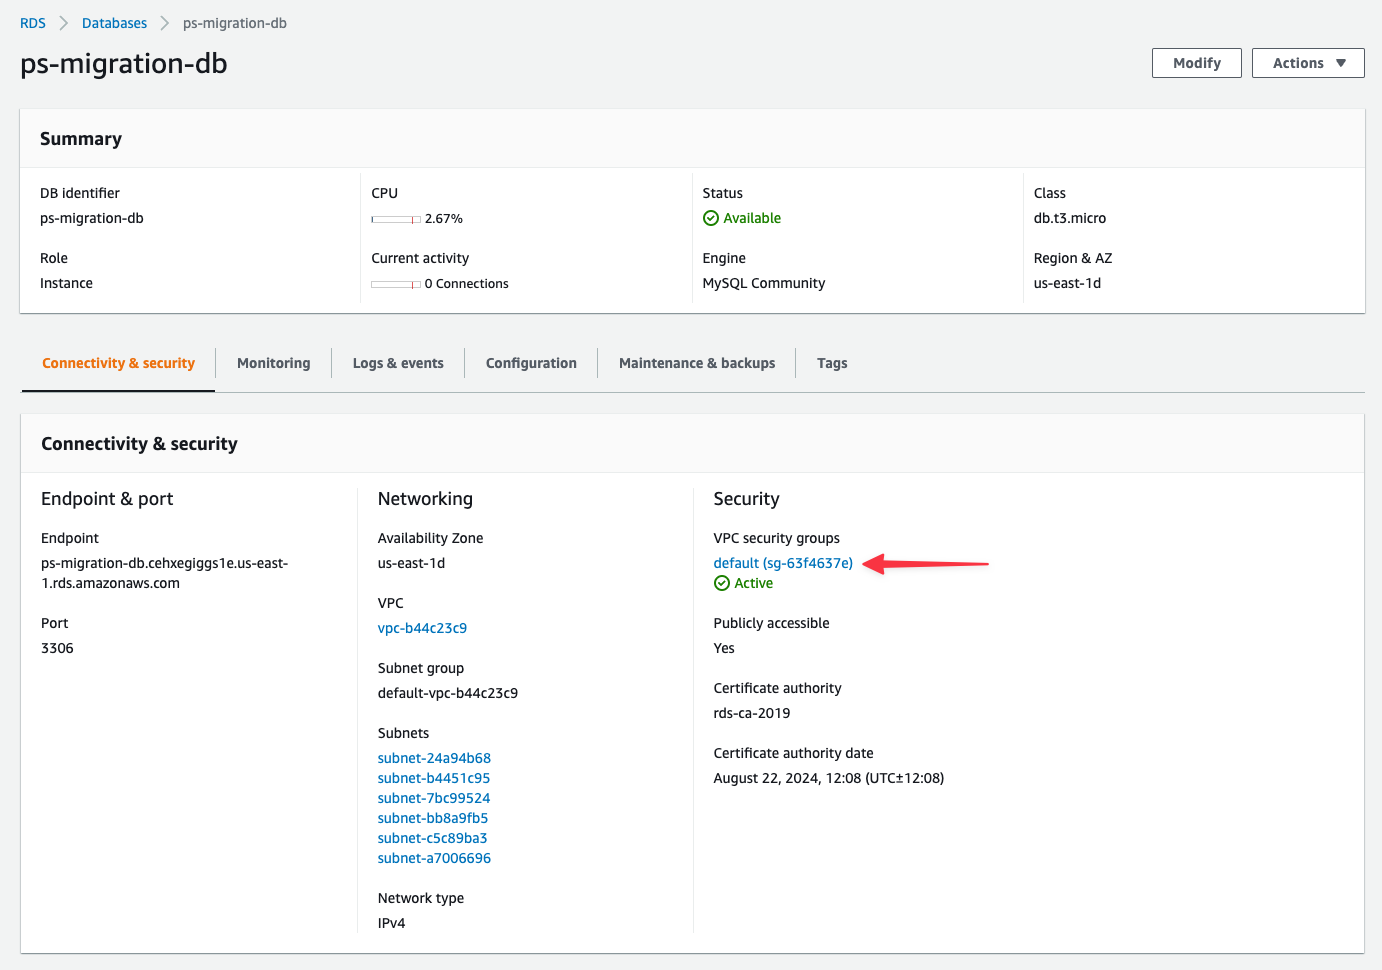
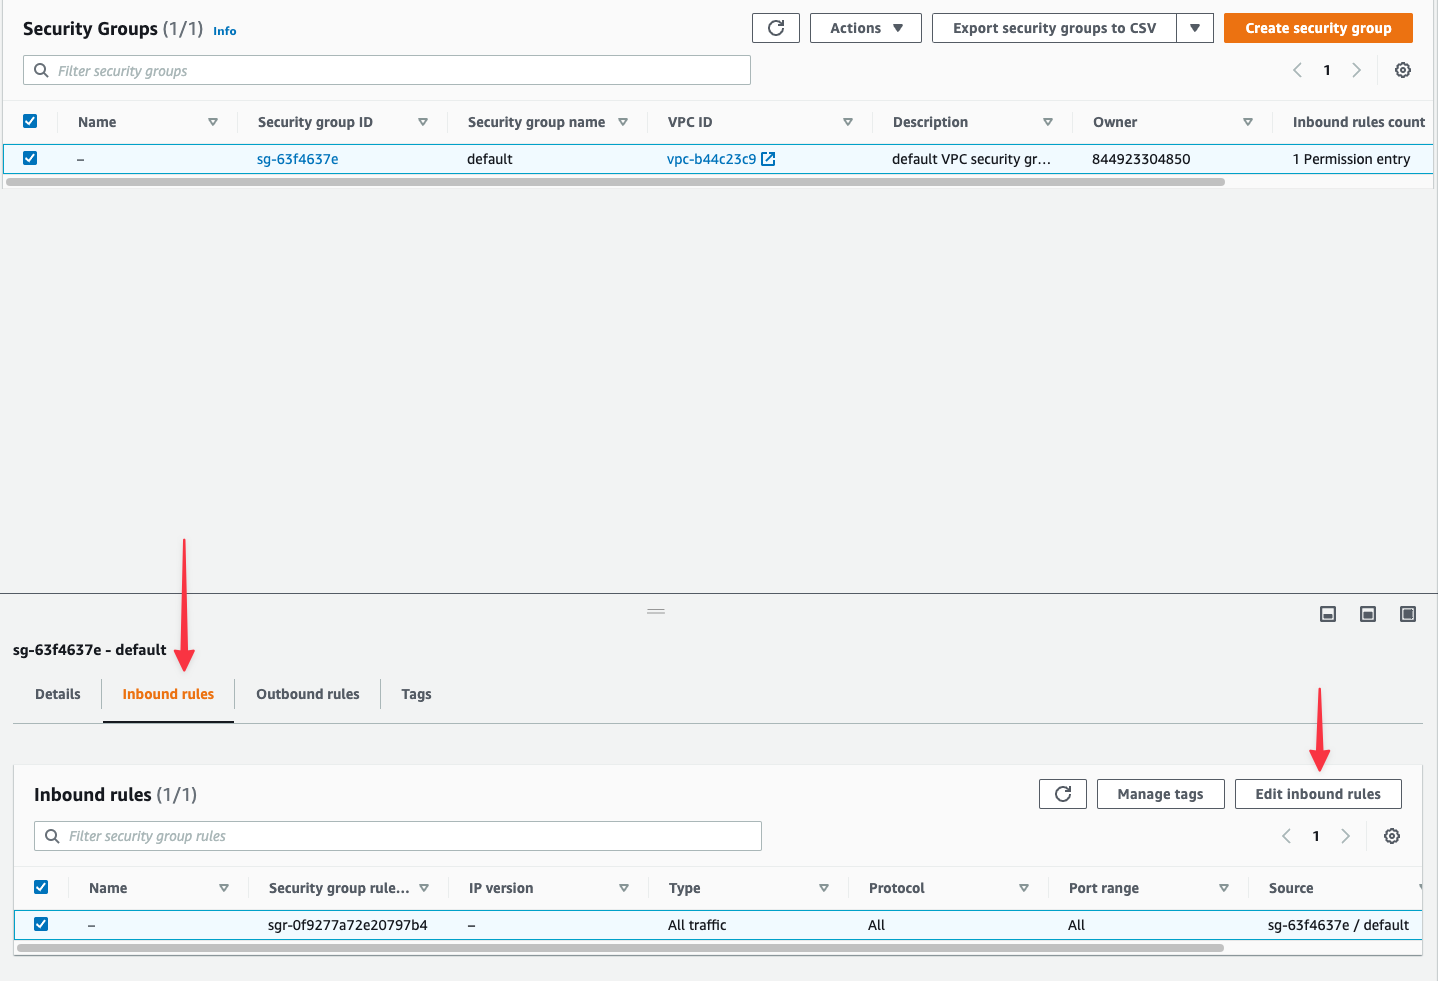
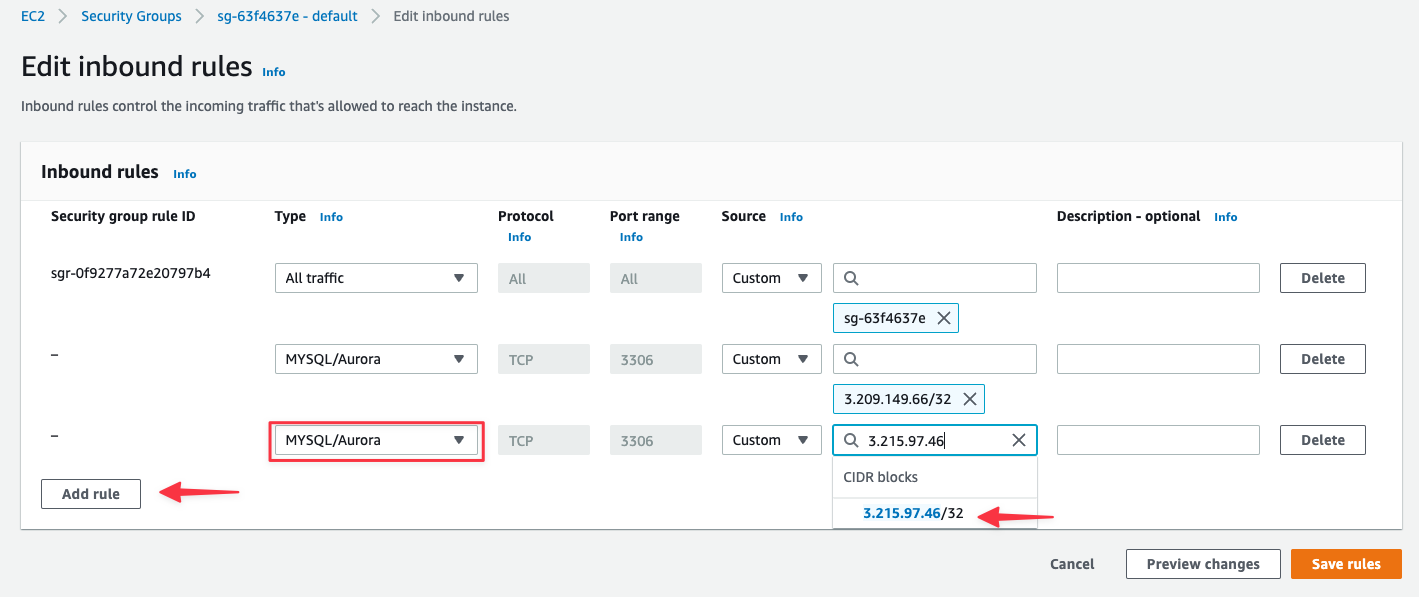
- Type: Select
MYSQL/Aurora - Source: Enter the first PlanetScale IP address (AWS will format it as
x.x.x.x/32)
Importing your database
Now that your RDS database is configured, follow the Database Imports guide to complete your import. When filling out the connection form in the import workflow, use:- Host name - Your RDS endpoint address (from Prerequisites)
- Port - 3306 (or your custom port)
- Database name - The exact database name to import
- Username -
migration_user - Password - The password you set in Step 5
- SSL verification mode - Select based on your RDS SSL configuration
- Creating your PlanetScale database
- Connecting to your RDS database
- Validating your configuration
- Selecting tables to import
- Monitoring the import progress
- Switching traffic and completing the import