In the previous post of this two-part series, we familiarize ourselves with Temporal, a deterministic workflow processing framework that lets you run stateful workflows in a more fault-tolerant way.
One of the most significant decisions Temporal users make when running Temporal in production is determining the appropriate persistence layer. People often assume that they can only scale in Temporal by using a No-SQL option like Cassandra. This post will address why PlanetScale doesn't require you to make scalability trade-offs for operational complexity so you can take full advantage of PlanetScale's scalability improvements over a single MySQL instance.
Sharding MySQL with PlanetScale
We built PlanetScale on top of Vitess so that we could harness its ability to scale massively — through horizontal sharding. Vitess provides an abstraction over MySQL and retains the benefits of a relational database by enabling missing functionalities.
To visualize how PlanetScale delivers resiliency, scalability, and performance improvements over a single MySQL instance, let’s examine what’s happening behind the scenes with Vitess.

Vitess is a database technology that can create the illusion of a single MySQL database when, in reality, the database may be composed of multiple shards, each backed by their own MySQL instance. In the case of sharding, the VTGate layer transparently routes queries to the necessary shards.
- VTGate is a stateless entry point to your cluster that knows all application logic coded into vSchema.
- VSchema is an abstraction layer that presents a unified view of the underlying keyspaces and shards. It contains the information about the sharding key for a sharded table.
- Vitess adds a sidecar process that scales alongside your cluster and allows for connection requests to be queued up. This sidecar process is also known as VTTablet and keeps the underlying MySQL processes safe from a memory management standpoint, allowing you to keep adding workers as needed to scale the application.
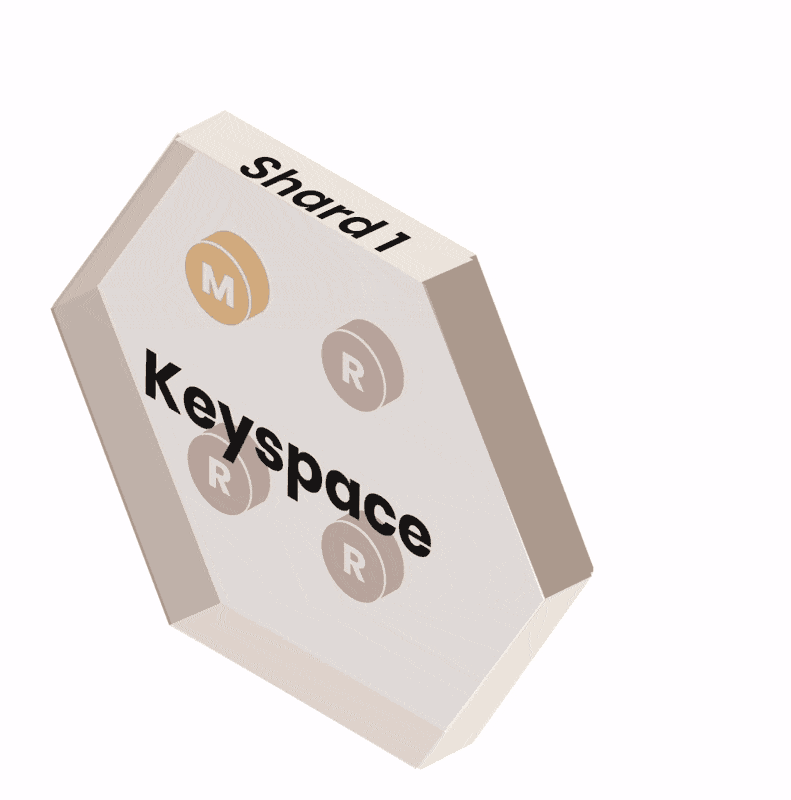
- A shard is a subset of a keyspace. A keyspace is a logical database. If you’re using sharding, a keyspace maps to multiple MySQL instances; if you’re not using sharding, a keyspace maps directly to a single MySQL database in a single MySQL instance. In either case, a keyspace appears as a single database from the application's viewpoint.
All sharded keyspaces in PlanetScale have a vSchema and are sharded by keyspace ID ranges. The keyspace ID is a concept internal to Vitess, and your application does not need to know anything about it. To set up sharding in PlanetScale, we work with you to configure the vSchema with a Primary Vindex. Mapping to a keyspace ID, then to a shard, gives us the flexibility to reshard the data with minimal disruption because the keyspace ID of each row remains unchanged through the process. Changing the number of shards happens transparently to the application and user, so no application changes are required if you want to add more shards.
If you’re interested in reading more about Sharding in PlanetScale and Vitess, Our team recently published content demonstrating our ability to shard predictably and handle large query volumes in the One Million QPS blog. We also released content related to Connection Pooling and our Global Routing Infrastructure.
Sharding in Temporal
Similar to PlanetScale, Temporal leverages horizontal partitioning by calculating a hash for each identifier and allocating it to a specific shard based on the hash value. Shards are represented as a number from 1 to N. However, to achieve consistency requirements with other persistence layers – Temporal serializes all updates belonging to the same shard, so all updates are sequential. As a result, the latency of a database operation limits the maximum theoretical throughput of a single shard.
Tuning the History Shard Count (numHistoryShards) in Temporal is a critical and required configuration of a Temporal cluster. The configured value assigned in this step directly impacts the system's throughput, latency, and resource utilization. Getting this configuration right for your setup and performance targets is essential for production, and the value is immutable after the initial cluster deployment. You must set this value high enough to scale with this Cluster's worst-case peak load.
Schema in Temporal is generally well-designed, and because the tables don't rely on each other – configuring the vSchema (In PlanetScale) for Temporal databases is a fairly simple process. For most Temporal tables, you will find either shard_id or range_hash defined within the Primary Key. This maps directly to the Primary Vindex we use as our Sharding Key when we create our VSchema.
Behind the scenes
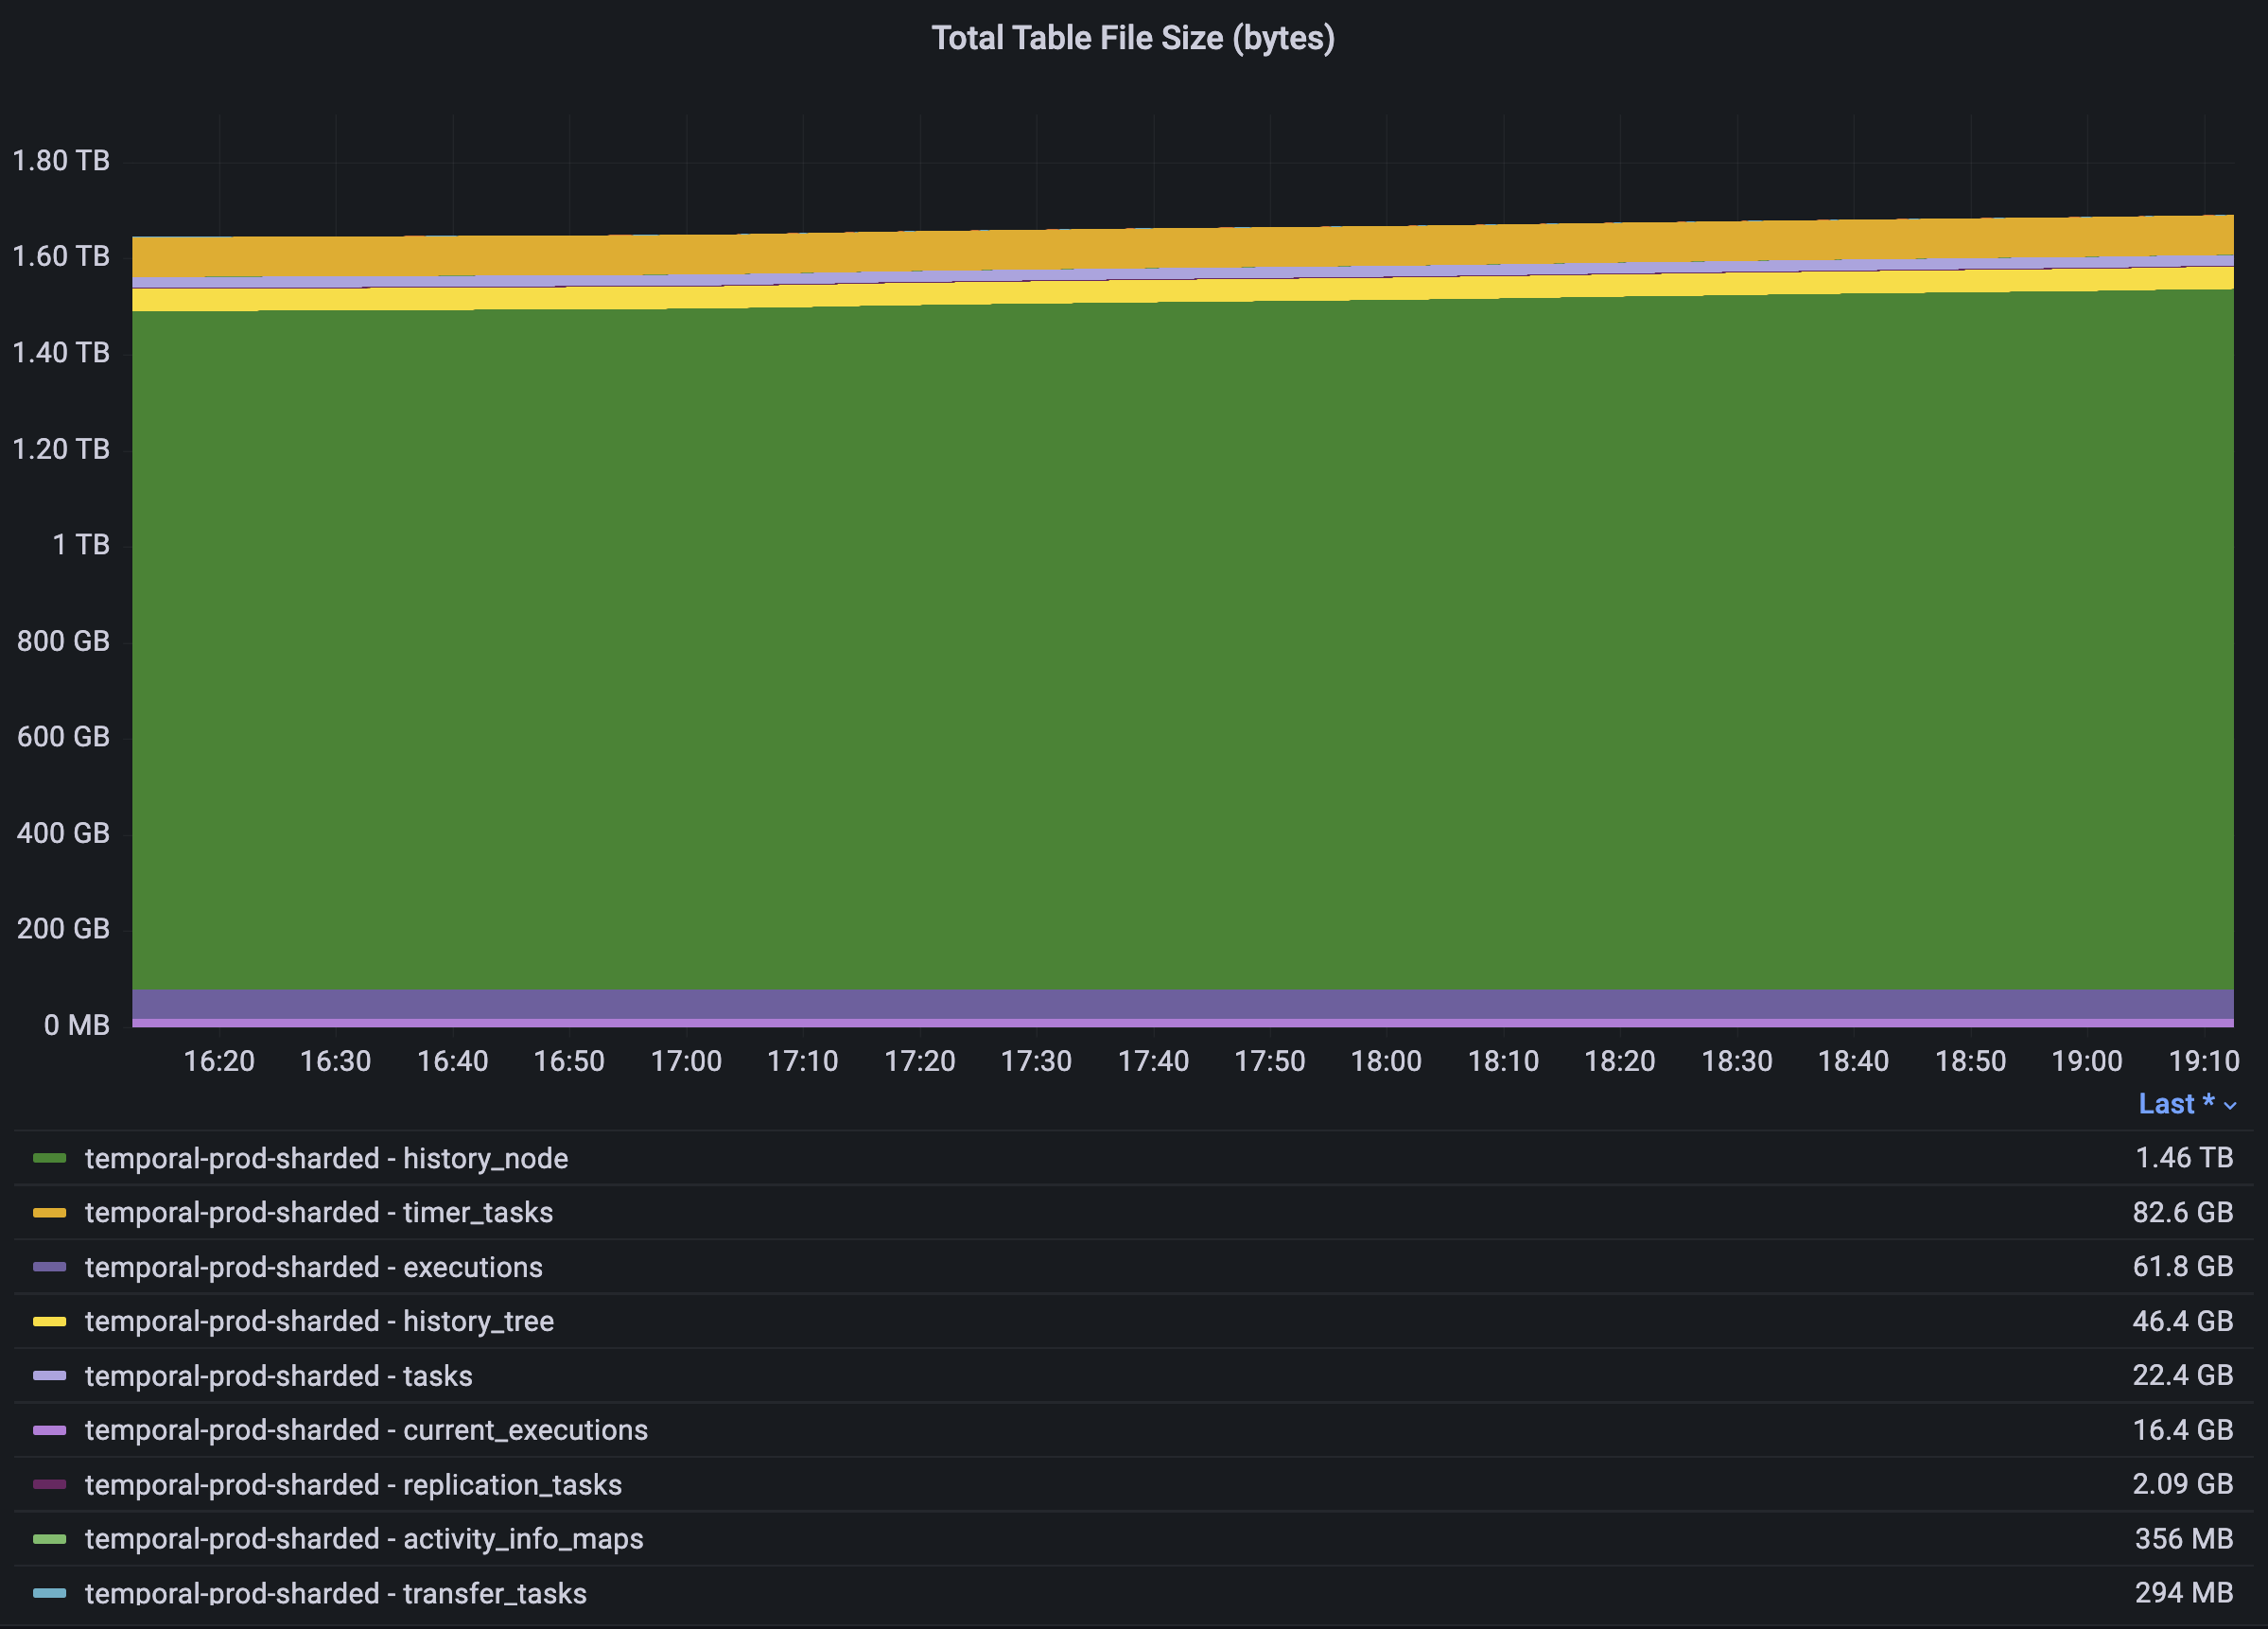
Temporal is a very write-intensive application; it's easy to accumulate several terabytes of bin logs during application updates and upserts. In addition to this, some tables grow faster and have more traffic than others. This section will cover how we defined the vSchema and routing rules for one of our customers sharding Temporal today. One thing to note is that we approach sharding differently for each use case, and this customer example isn't how we shard all our customers today.
In the graph below, you can see that there are two keyspaces for their Temporal production workloads. One of those keyspaces is sharded, and the other is unsharded. The storage size across these two keyspaces varies, but the larger tables are on the sharded keyspace.
For this specific customer, we defined a vSchema to an unsharded keyspace with existing tables since they already had their Temporal workload connected to PlanetScale. The vSchema for the unsharded keyspace looks something like this since we only need to define the table name:
{
  "tables": {
    "buffered_events": {},
    "cluster_membership": {},
    "cluster_metadata": {},
    "cluster_metadata_info": {},
    "namespace_metadata": {},
    "namespaces": {},
    "queue": {},
    "queue_metadata": {},
    "request_cancel_info_maps": {},
    "schema_update_history": {},
    "schema_version": {},
    "signal_info_maps": {},
    "signals_requested_sets": {},
    "timer_info_maps": {}
  }
}
To move the rest of the tables to a new sharded keyspace, we applied a different vSchema. Since this keyspace needed to be sharded, we first had to specify sharded=true and include the Predefined Vindexes we wanted to use with no tables. In the vSchema below, you can see that we defined xxhash as the Vindex or specific sharding function.
{
  "sharded": true,
  "vindexes": {
    "xxhash": {
      "type": "xxhash"
    }
After that, we started the MoveTables process for all tables using the Vindex syntax. Once the MoveTables process completes, the routing rules stay in place. Then we manually switched traffic from the unsharded source keyspace to the new sharded keyspace using the --SwitchTraffic command. In the rest of the vSchema for the sharded keyspace below, you’ll see that the ColumnVindex or Sharding key is defined from the shard_id or range_hash columns in the Temporal Schema. For this reason, we also specified the column name within the ColumnVindex and hashing function.
},
  "tables": {
    "activity_info_maps": {
      "columnVindexes": [
        {
          "column": "shard_id",
          "name": "xxhash"
        }
      ]
    },
    "current_executions": {
      "columnVindexes": [
        {
          "column": "shard_id",
          "name": "xxhash"
        }
      ]
    },
    "executions": {
      "columnVindexes": [
        {
          "column": "shard_id",
          "name": "xxhash"
        }
      ]
    },
    "history_node": {
      "columnVindexes": [
        {
          "column": "shard_id",
          "name": "xxhash"
        }
      ]
    },
    "history_tree": {
      "columnVindexes": [
        {
          "column": "shard_id",
          "name": "xxhash"
        }
      ]
    },
    "replication_tasks": {
      "columnVindexes": [
        {
          "column": "shard_id",
          "name": "xxhash"
        }
      ]
    },
    "replication_tasks_dlq": {
      "columnVindexes": [
        {
          "column": "shard_id",
          "name": "xxhash"
        }
      ]
    },
    "shards": {
      "columnVindexes": [
        {
          "column": "shard_id",
          "name": "xxhash"
        }
      ]
    },
    "task_queues": {
      "columnVindexes": [
        {
          "column": "range_hash",
          "name": "xxhash"
        }
      ]
    },
    "tasks": {
      "columnVindexes": [
        {
          "column": "range_hash",
          "name": "xxhash"
        }
      ]
    },
    "timer_tasks": {
      "columnVindexes": [
        {
          "column": "shard_id",
          "name": "xxhash"
        }
      ]
    },
    "transfer_tasks": {
      "columnVindexes": [
        {
          "column": "shard_id",
          "name": "xxhash"
        }
      ]
    },
    "visibility_tasks": {
      "columnVindexes": [
        {
          "column": "shard_id",
          "name": "xxhash"
        }
      ]
    }
  }
}
Conclusion
Our PlanetScale Infrastructure team has also recently implemented Temporal workflows internally to automate manual human tasks for Vitess releases. In addition, we have customers using it in production in sharded environments.
Over the most recent holiday selling period (Black Friday and Cyber Monday), one of our customers sustained record numbers of QPS and IOPS with no interruptions. In the graphs below, you can see daily breakdowns of peak load traffic for their Temporal databases in production.
QPS for Temporal for the week: 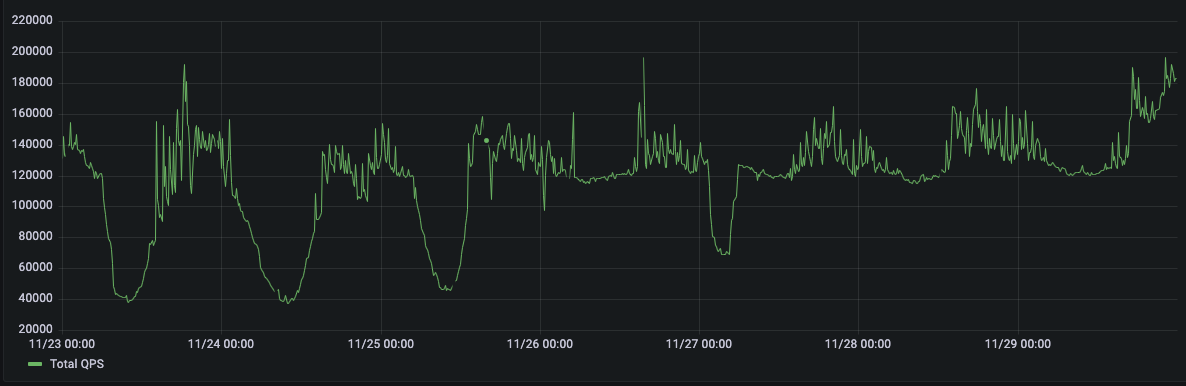
QPS for Temporal BF (Thursday): 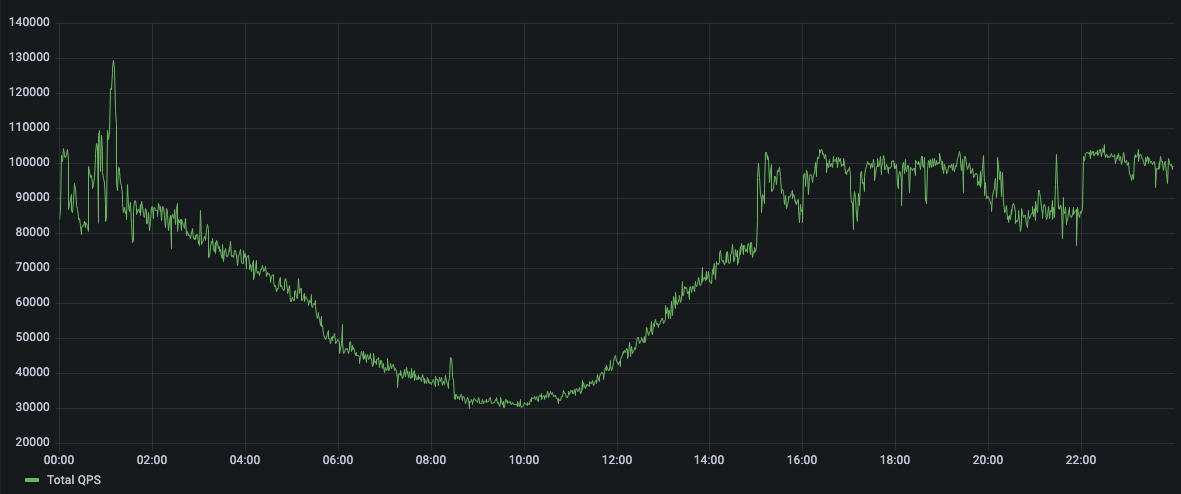
QPS for Temporal BF (Friday): 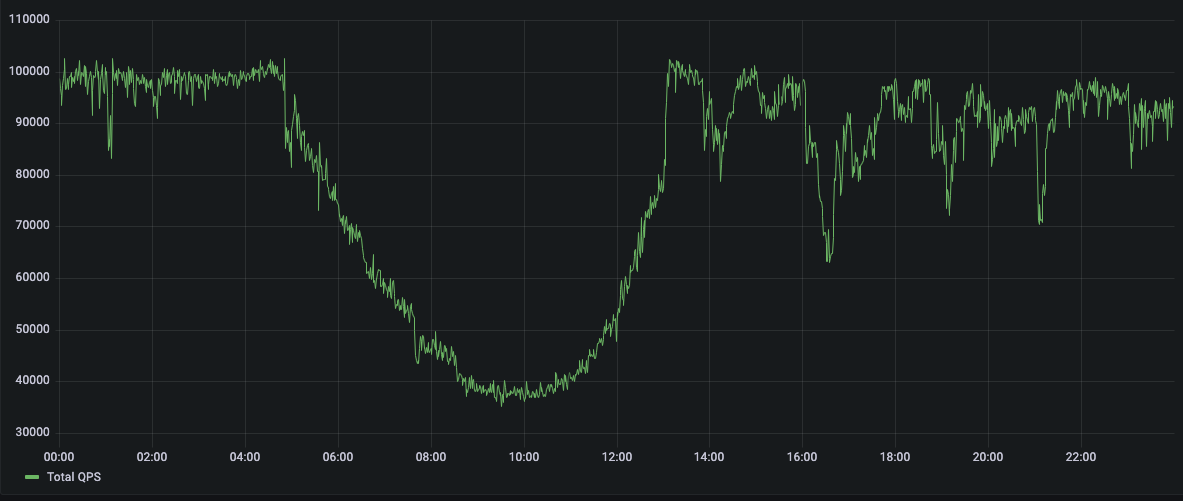
QPS for Temporal Cyber-Monday (Monday): 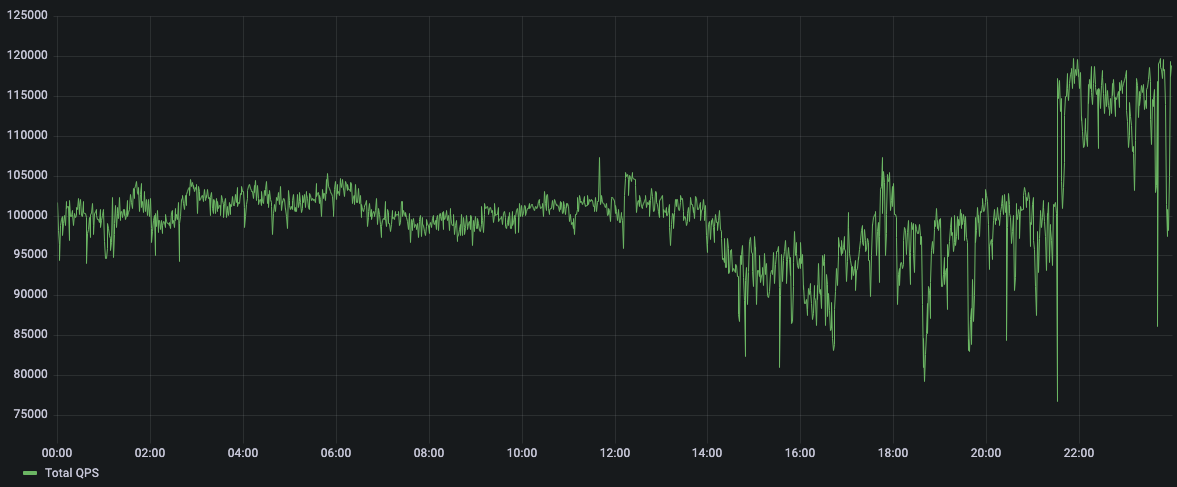
QPS for Temporal Cyber-Monday (Tuesday): 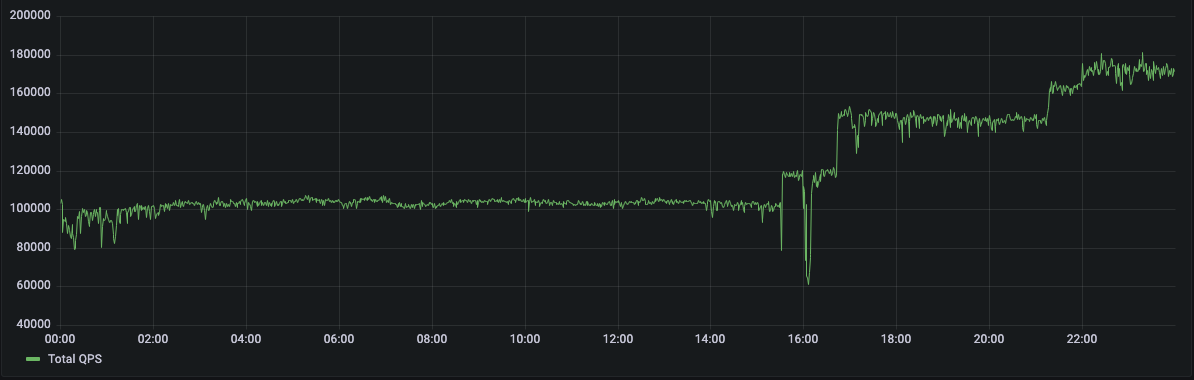
Unlike other NoSQL bindings for Temporal, sharding a database in PlanetScale doesn’t create more potential failure points or add more complexity than it’s worth. You reduce the impact of node failures and increase write and read throughput. Writes and reads are distributed across many machines making millions of QPS possible. The days of compromising operational simplicity for scalability when choosing a data persistence layer for Temporal are behind us.