Overview
Most developers are fully aware that it is bad practice to store sensitive information in code. If your codebase is accessed by an unauthorized user, that individual now has the means to use whatever that info was trying to protect. For instance, if you were to store your PlanetScale connection string in the codebase, anyone with access to the code can now directly access your database and wreak all sorts of havoc.
One simple way to avoid this is to use environment variables so that sensitive information can be stored in the system that runs the code, as opposed to the code itself. If you are building backend services in AWS, there is actually a way to secure those environment variables even further by encrypting them using a managed key in the AWS KMS service. This article explains what KMS is and how you can use it within a Lambda function.
To follow along with this tutorial, you’ll need the following:
- A PlanetScale account.
- The PlanetScale CLI is installed and configured, or a pre-existing database and connection string.
- Go, as well as a basic understanding of the language (although the code samples are heavily commented on even if you aren’t familiar with Go).
- An AWS account.
Warning
Please note that we will be creating resources in AWS which cost real money. Resources may be covered under the free tier for AWS users, so check your AWS plan.
As this is a security-focused topic, it's also recommended that you understand the AWS Shared Responsibility Model.
What is KMS
AWS Key Management Service (KMS) is a service provided by AWS that allows you to manage cryptographic keys from a single location. It lets you easily generate symmetric or asymmetric keys, or upload keys you’ve generated yourself, that can be used to encrypt and decrypt data.
When considering the AWS security model, it allows you to dictate not only what information is secured using those keys, but also what services in AWS can access the keys to decrypt information that was previously encrypted using AWS Identity and Access Management (IAM) policies. It’s also designed in such a way that AWS employees have no access to those keys, so not even the individuals working within AWS can decrypt your sensitive information.
Tutorial overview
It is recommended to encrypt your environment variables (such as your PlanetScale connection strings) with a system like KMS to ensure maximum security. Let’s take a look at how to do this using a Lambda function. Here is an overview of what we’ll look at in the rest of this article:
- You’ll start by creating a Lambda function that reads some data from a PlanetScale database.
- Then you’ll create a managed key in KMS.
- Next, the environment variable that stores the connection string will be encrypted, which will cause the function to error.
- Finally, you’ll update the code to decrypt the connection string, and test reading data from the database again.
The database used for this project will contain a single table called recipes that has the following structure:
+-------------------------+--------------+------+-----+---------+----------------+
| Field                   | Type         | Null | Key | Default | Extra          |
+-------------------------+--------------+------+-----+---------+----------------+
| id                      | int          | NO   | PRI | NULL    | auto_increment |
| name                    | varchar(100) | YES  |     | NULL    |                |
| est_time_to_make_in_min | int          | YES  |     | NULL    |                |
| description             | varchar(100) | YES  |     | NULL    |                |
+-------------------------+--------------+------+-----+---------+----------------+
If you wish to follow the same structure, the following SQL commands can be used to create the table in your database and seed some data. These can be run using the PlanetScale CLI, or in the Dashboard using the Console tab.
CREATE TABLE recipes (
  id INT PRIMARY KEY AUTO_INCREMENT,
  name VARCHAR(100),
  est_time_to_make_in_min INT,
  description VARCHAR(100)
);

INSERT INTO recipes (name, est_time_to_make_in_min, description) VALUES
	('Goatsnake Pizza', 60, 'Lots of deliciousness'),
	('Clutch Pizza', 45, 'This is a pretty awesome pizza too'),
	('Pepperoni Pizza', 30, 'Spicy stuff!');
Create the Lambda function
Start by creating a new folder on your computer to hold the Go project. Open a terminal in that directory and run the following command to initialize the project, replacing $PROJECT_NAME with an arbitrary name for the project:
go mod init $PROJECT_NAME
Create a file named main.go and add the following code. The code is commented so you’ll understand what's going on:
package main

import (
	"database/sql"
	"encoding/json"
	"log"
	"os"
	"github.com/aws/aws-lambda-go/lambda"
	_ "github.com/go-sql-driver/mysql"
)

// The Recipe model will hold the data for a record pulled from the database.
type Recipe struct {
	Id            int
	Name          string
	EstTimeToMake int
	Description   string
}

// Sets up the connection to the PlanetScale database.
func GetDatabase() (*sql.DB, error) {
	db, err := sql.Open("mysql", os.Getenv("DSN"))
	return db, err
}

// The function that will be called when the Lambda function is invoked.
func handler() {
	// Get a database connection
	db, err := GetDatabase()
	if err != nil {
		panic(err)
	}

	// Run the query to fetch all recipes
	query := "SELECT * FROM recipes;"
	res, err := db.Query(query)
	if err != nil {
		panic(err)
	}

	// Loop through the results, placing them in an array of the Recipe struct
	var recipes []Recipe
	for res.Next() {
		var r Recipe
		res.Scan(&r.Id, &r.Name, &r.EstTimeToMake, &r.Description)
		recipes = append(recipes, r)
	}

	// Convert the results to a JSON string and log out that string.
	jbytes, err := json.Marshal(recipes)
	if err != nil {
		panic(err)
	}
	log.Printf("Returned recipes: %v", string(jbytes))
}

// The main entry point for the Lambda service.
func main() {
	lambda.Start(handler)
}
Now head back to the terminal and run the following command to install any missing dependencies:
go mod tidy
Next, you’ll need to build the function and zip up the binary so it can be uploaded to the Lambda service. You’ll need to set the environment variables for GOARCH and GOOS so the compiler creates the appropriate binary for a Lambda environment. Run one of the following commands (depending on your operating system) to create a binary in a dist folder:
// Mac/Linux
GOARCH=amd64 GOOS=linux go build -o dist/main .

// Windows
$Env:GOARCH="amd64"; $Env:GOOS="linux"; go build -o dist/main .
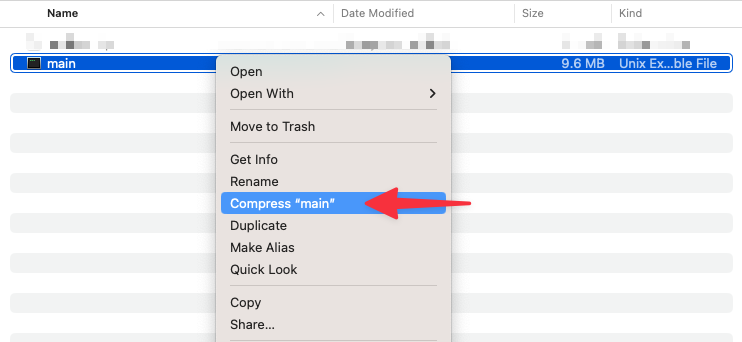
The last step before uploading the function to AWS is to add the binary that was created into a zip file since this is what the Lambda service expects. On a Mac, you can right-click the main file and compress it to create that file.
Set up and test the Lambda function in AWS
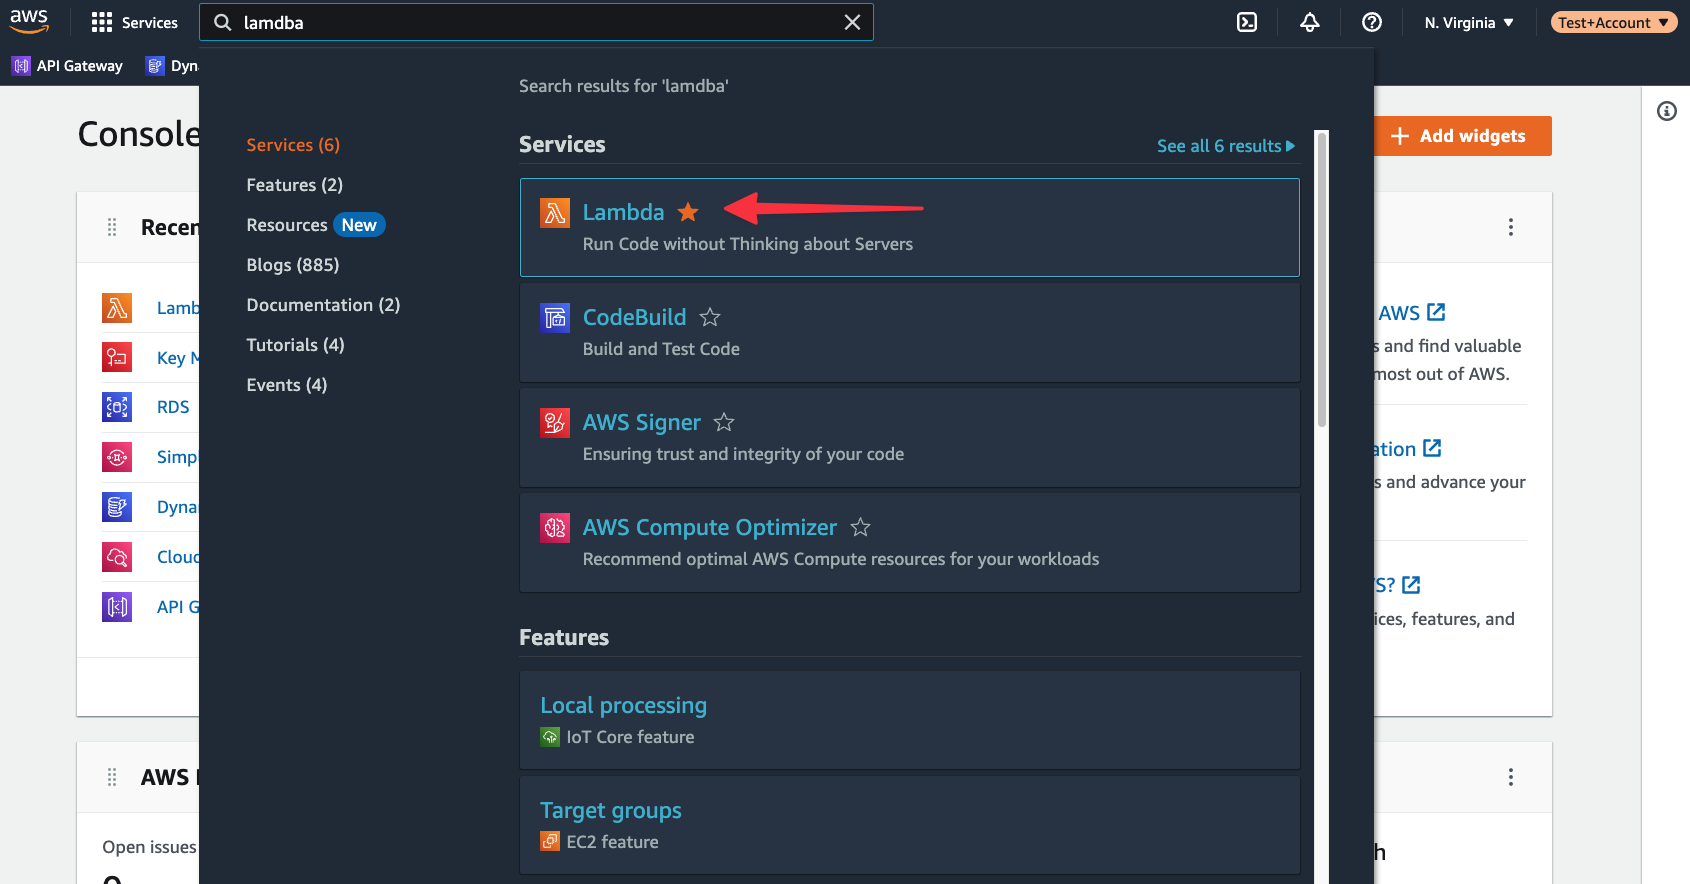
The next step is to configure a Lambda function in AWS and upload the zipped folder from the previous section. In AWS, use the global search to find “Lambda”, and select it from the list of results.
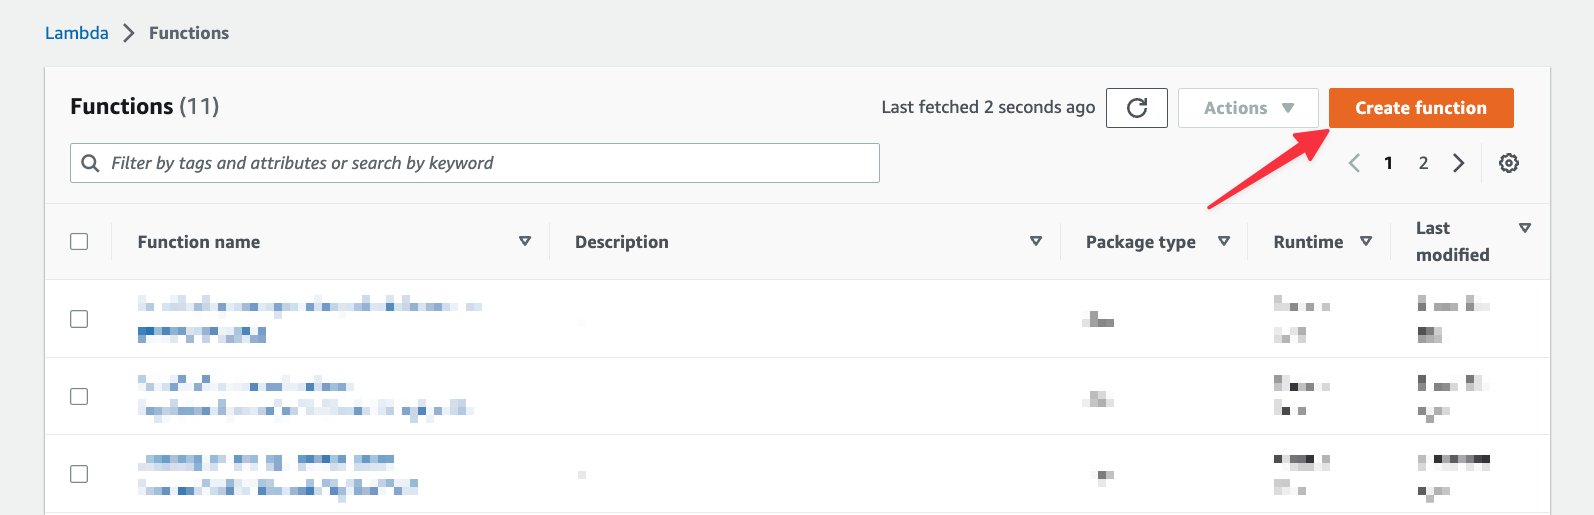
Click on "Create function" to start the wizard to create a Lambda function.
Give the function a name and change the "Runtime" to Go 1.x. Leave the rest of the defaults and click "Create function" at the bottom of the form.

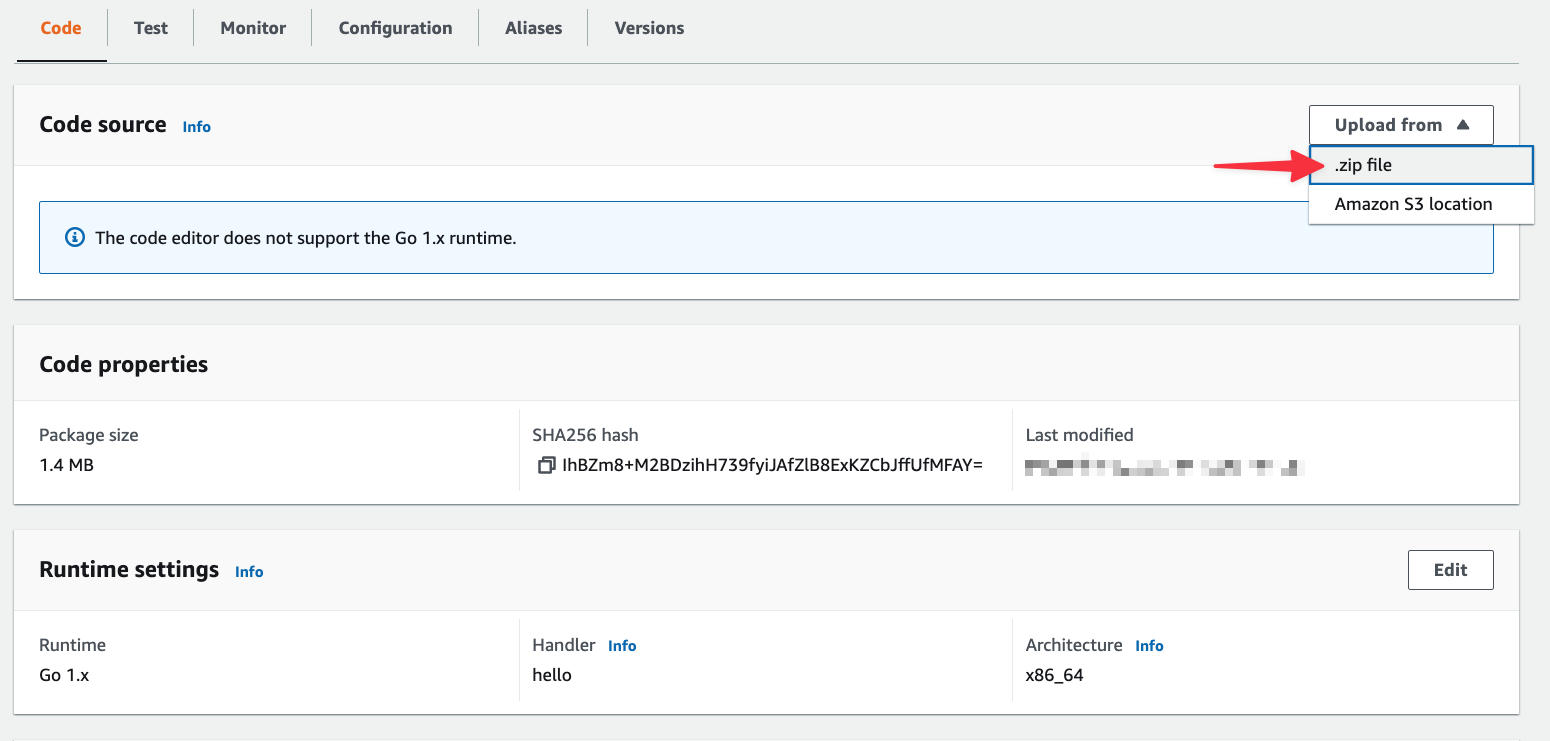
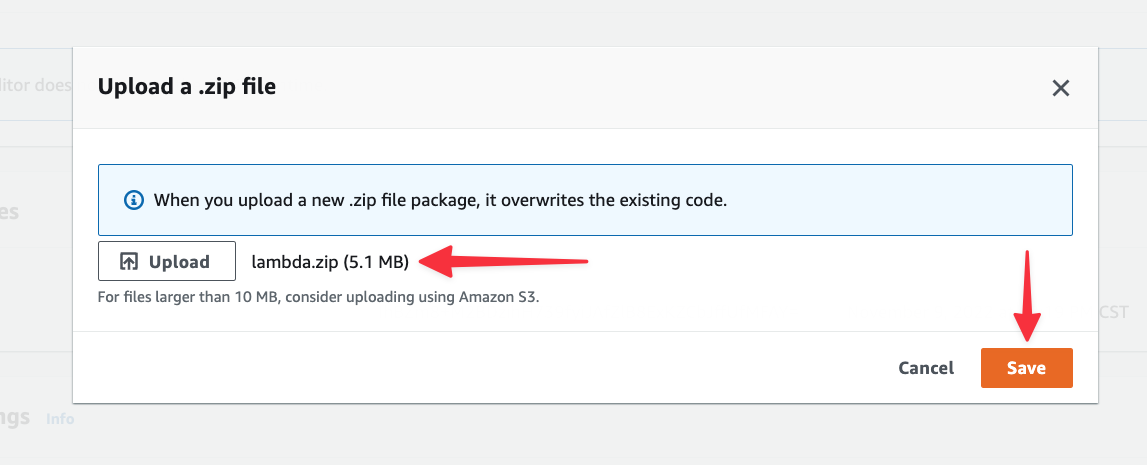
Once the function has been created, you’ll need to upload the zip file created in the previous section. From the "Code" source section, select "Upload from" > ".zip file".
In the next modal, click the "Upload" button and select the zip file from your computer. Click "Save" once you’ve selected it.
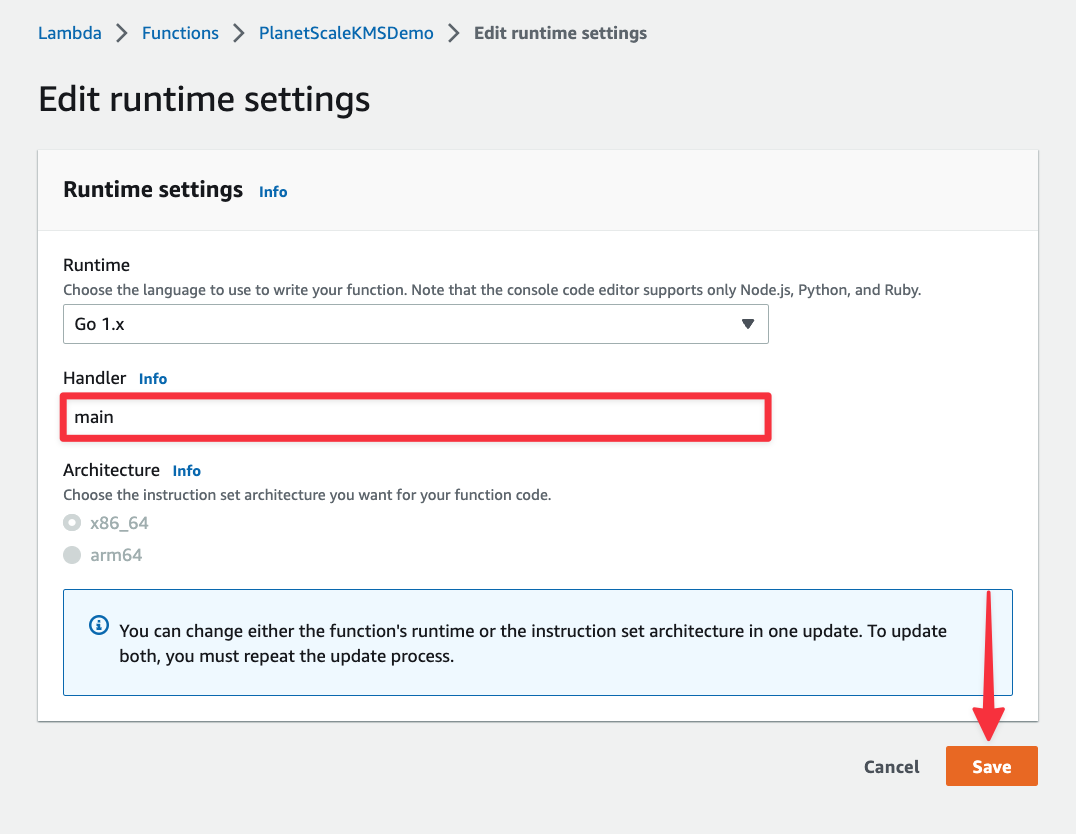
Next, you’ll need to change the default handler from hello to main, which is the name of the binary that was built for Lambda. Under Runtime settings, click "Edit".
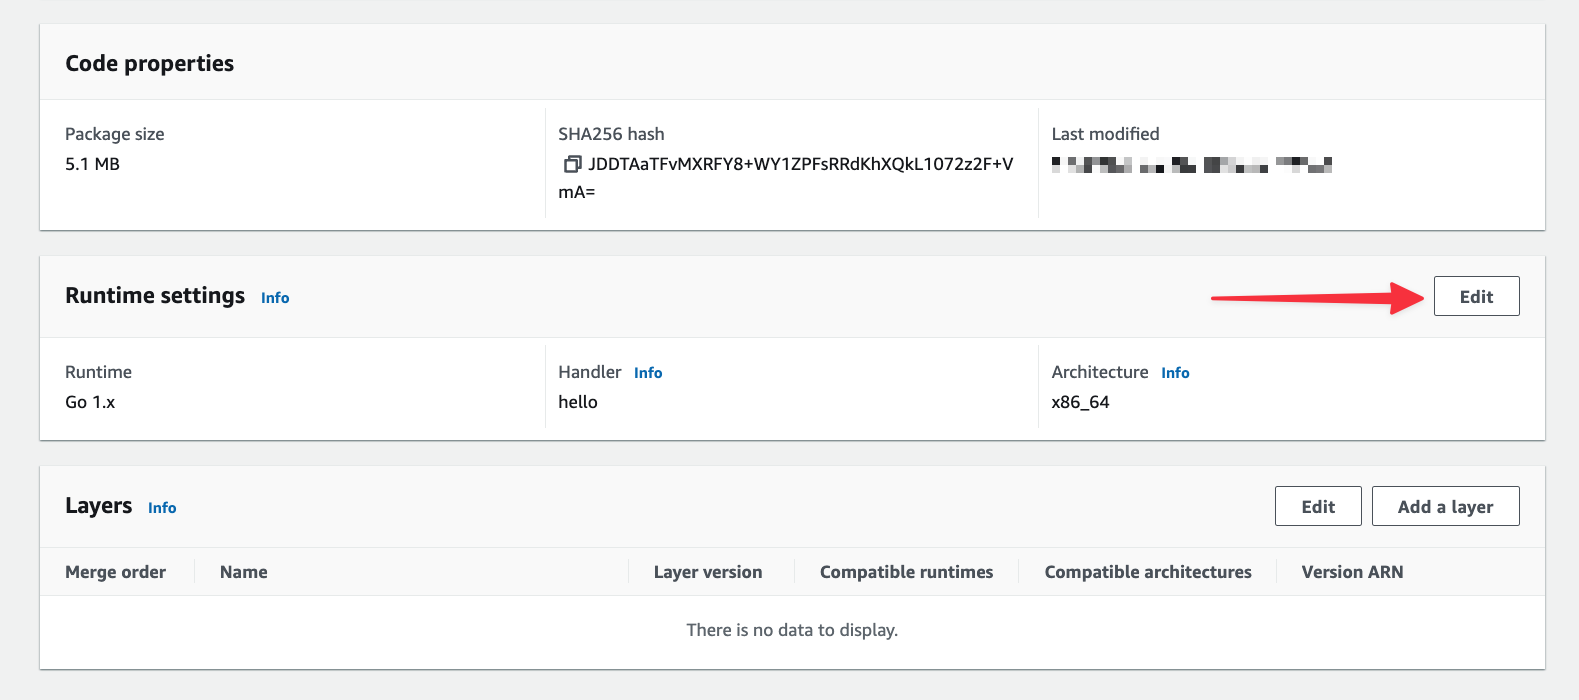
Change the Handler field to “main” and click "Save".
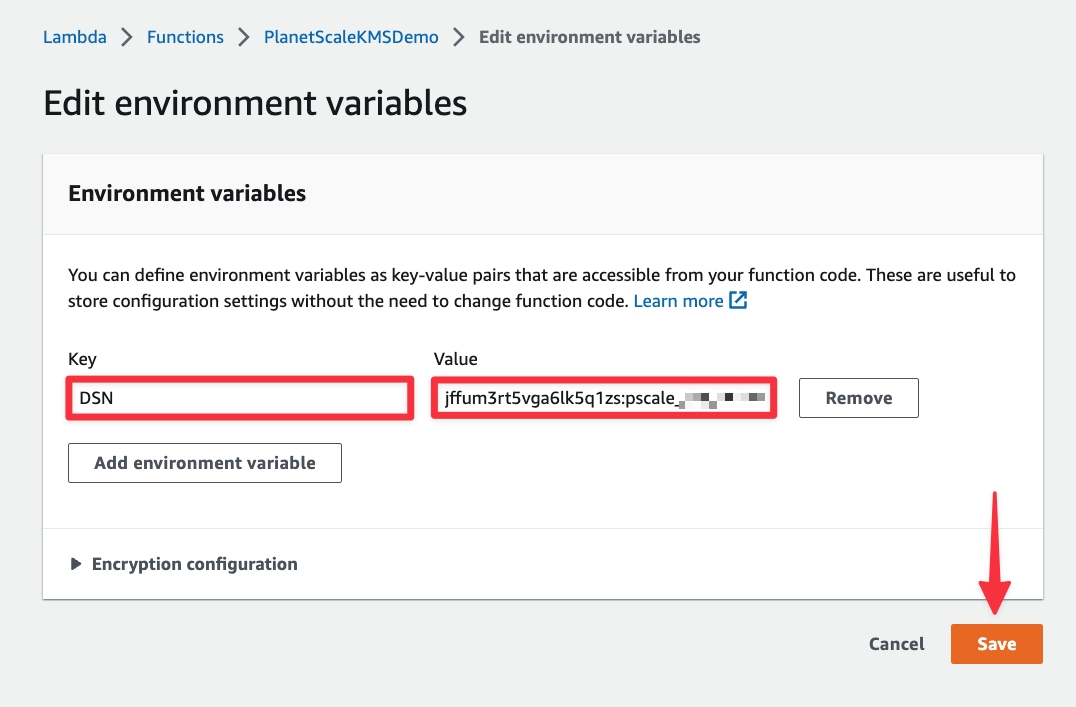
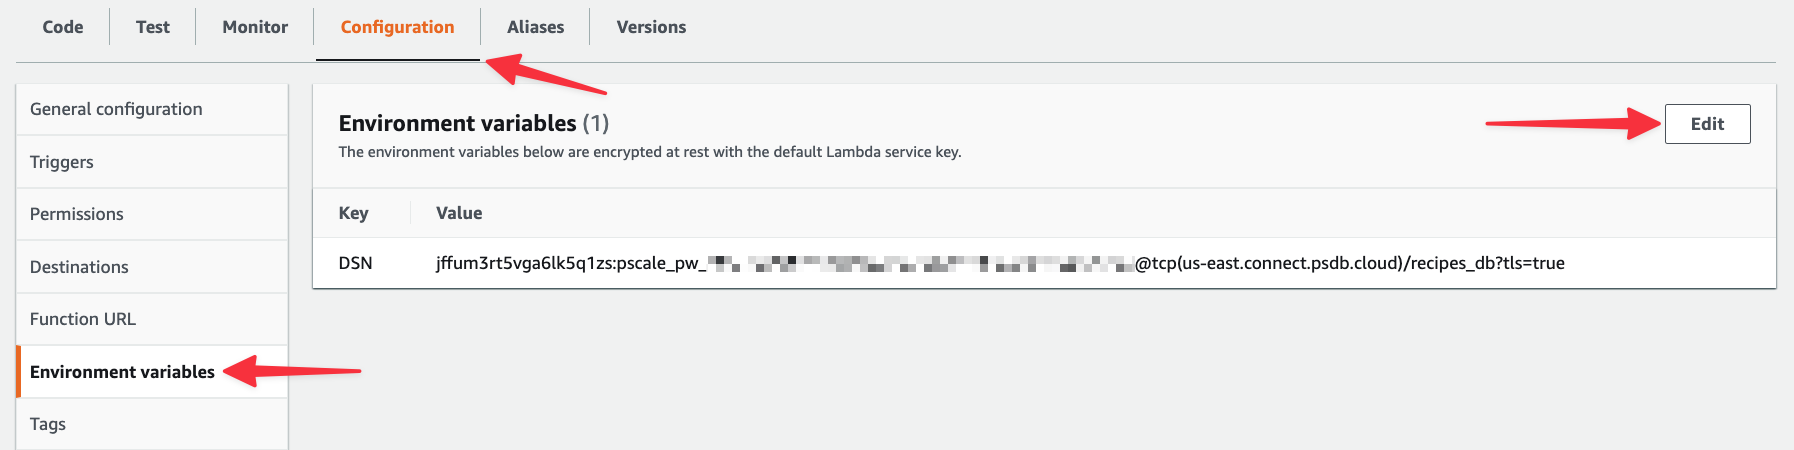
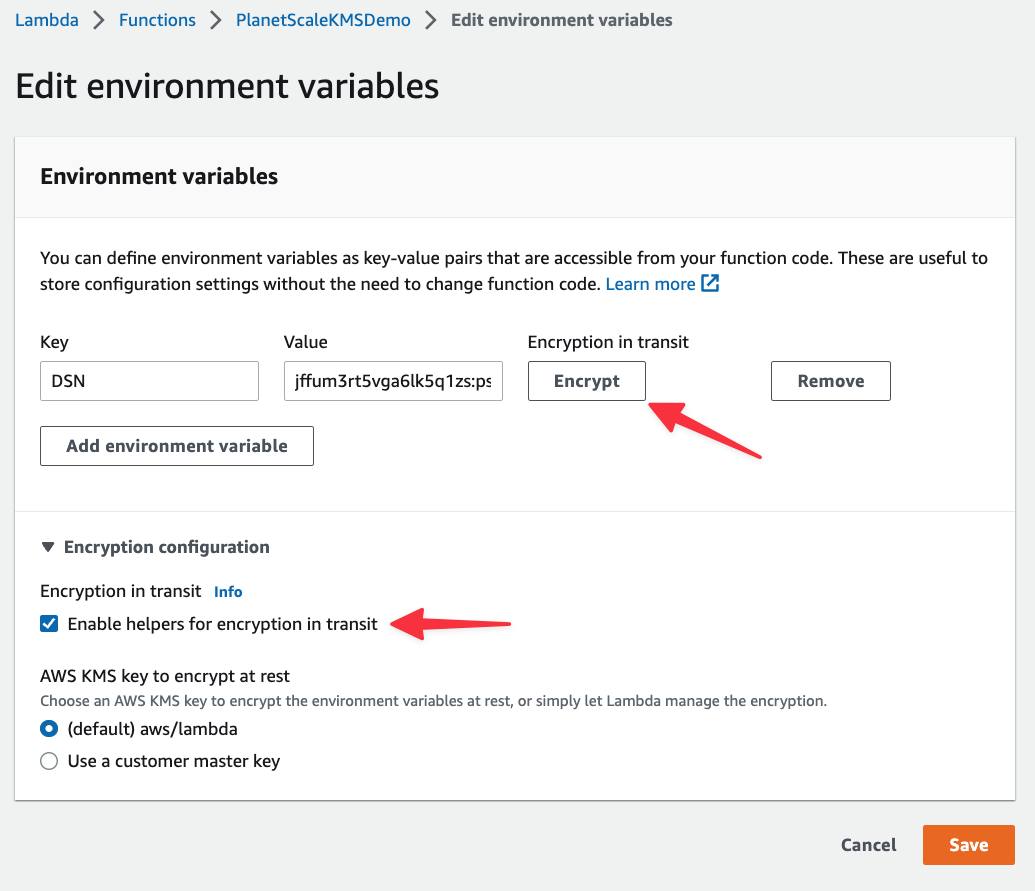
Next, select the "Configuration" tab > "Environment variables" > "Edit".
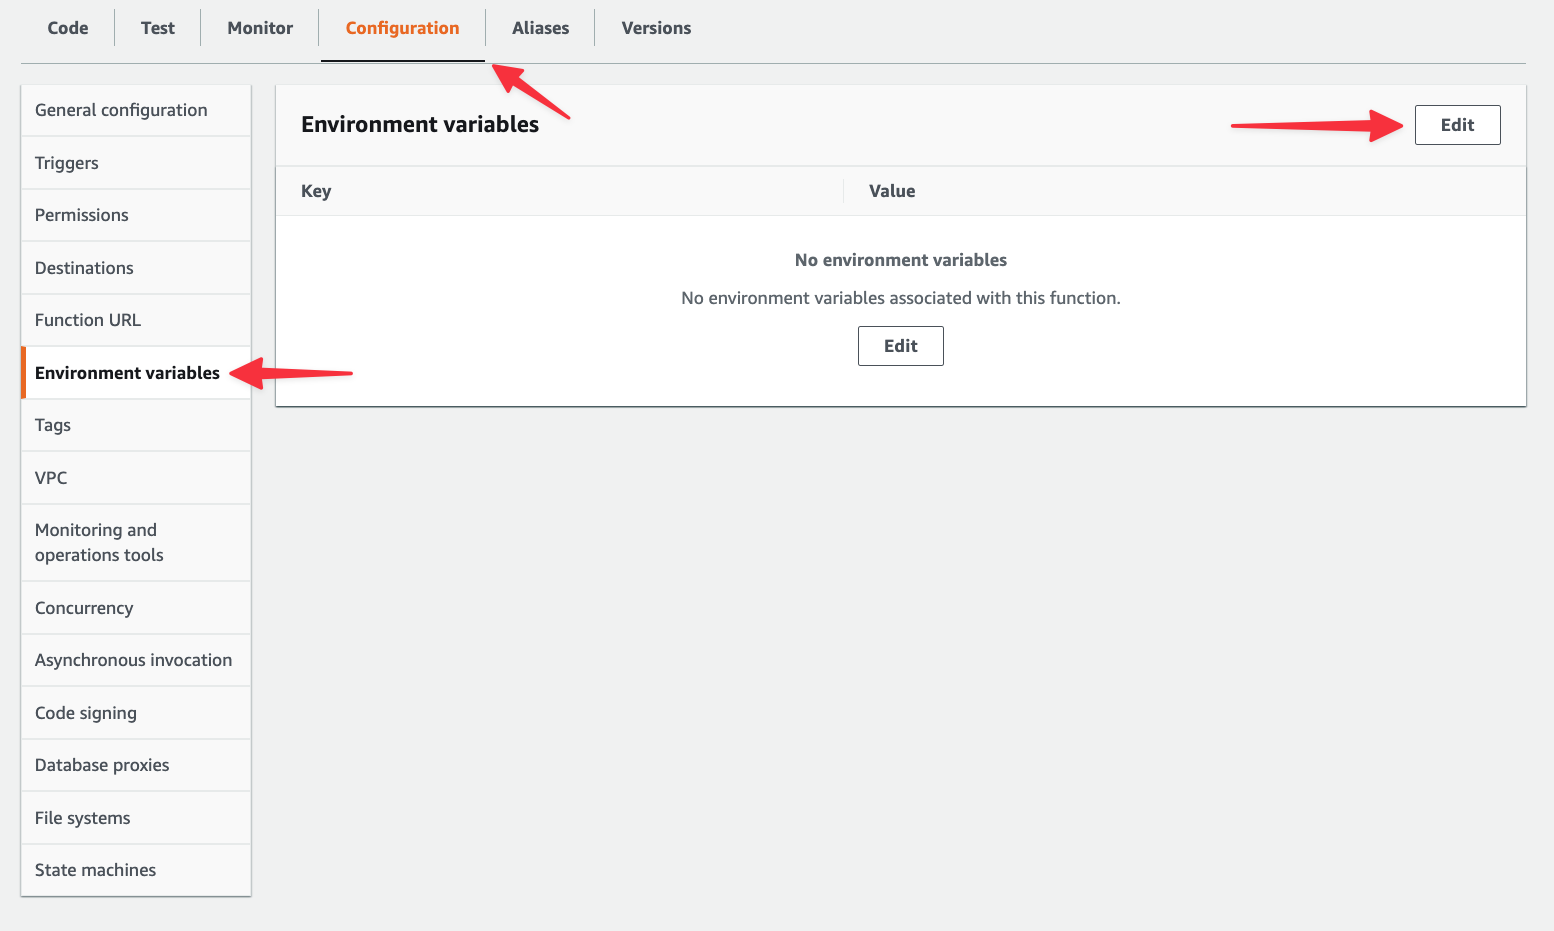
Create an entry named “DSN” and paste in the connection string for your PlanetScale database. You can find this in your PlanetScale dashboard by clicking "Connect", clicking the "Connect with" dropdown, and selecting "Go". Once you have it, paste it in and click "Save".
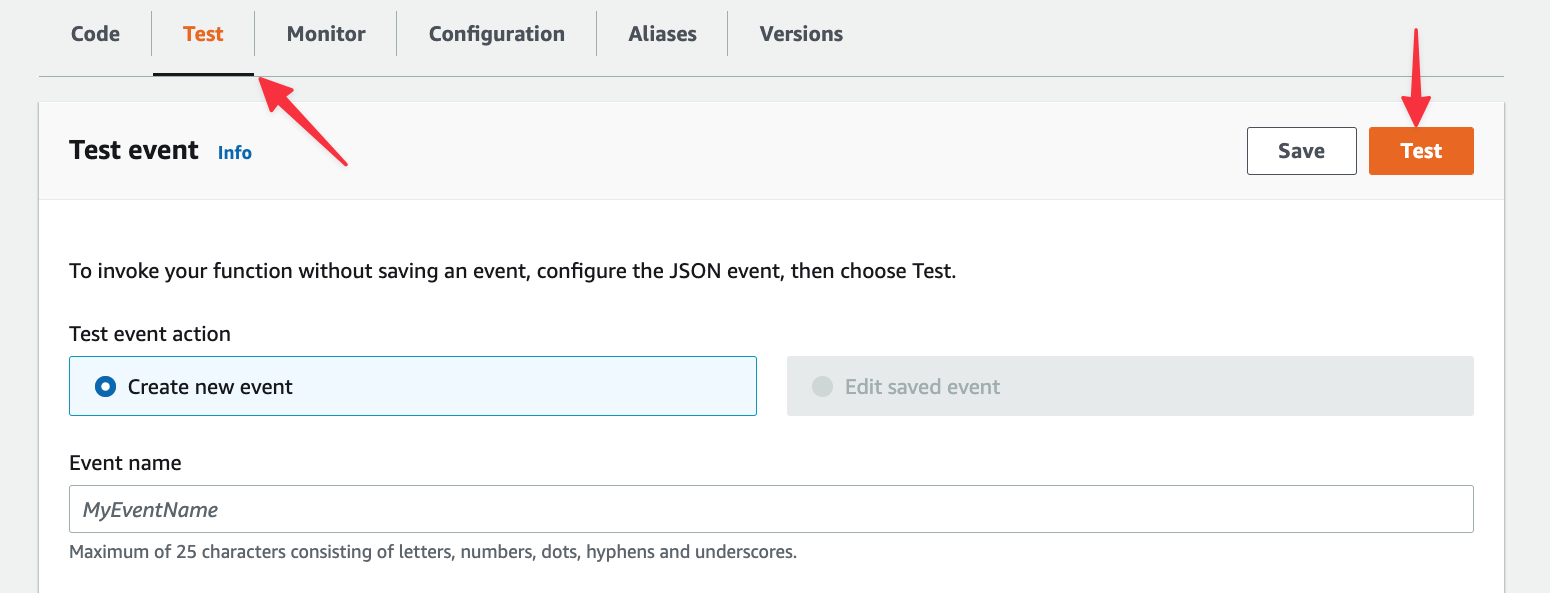
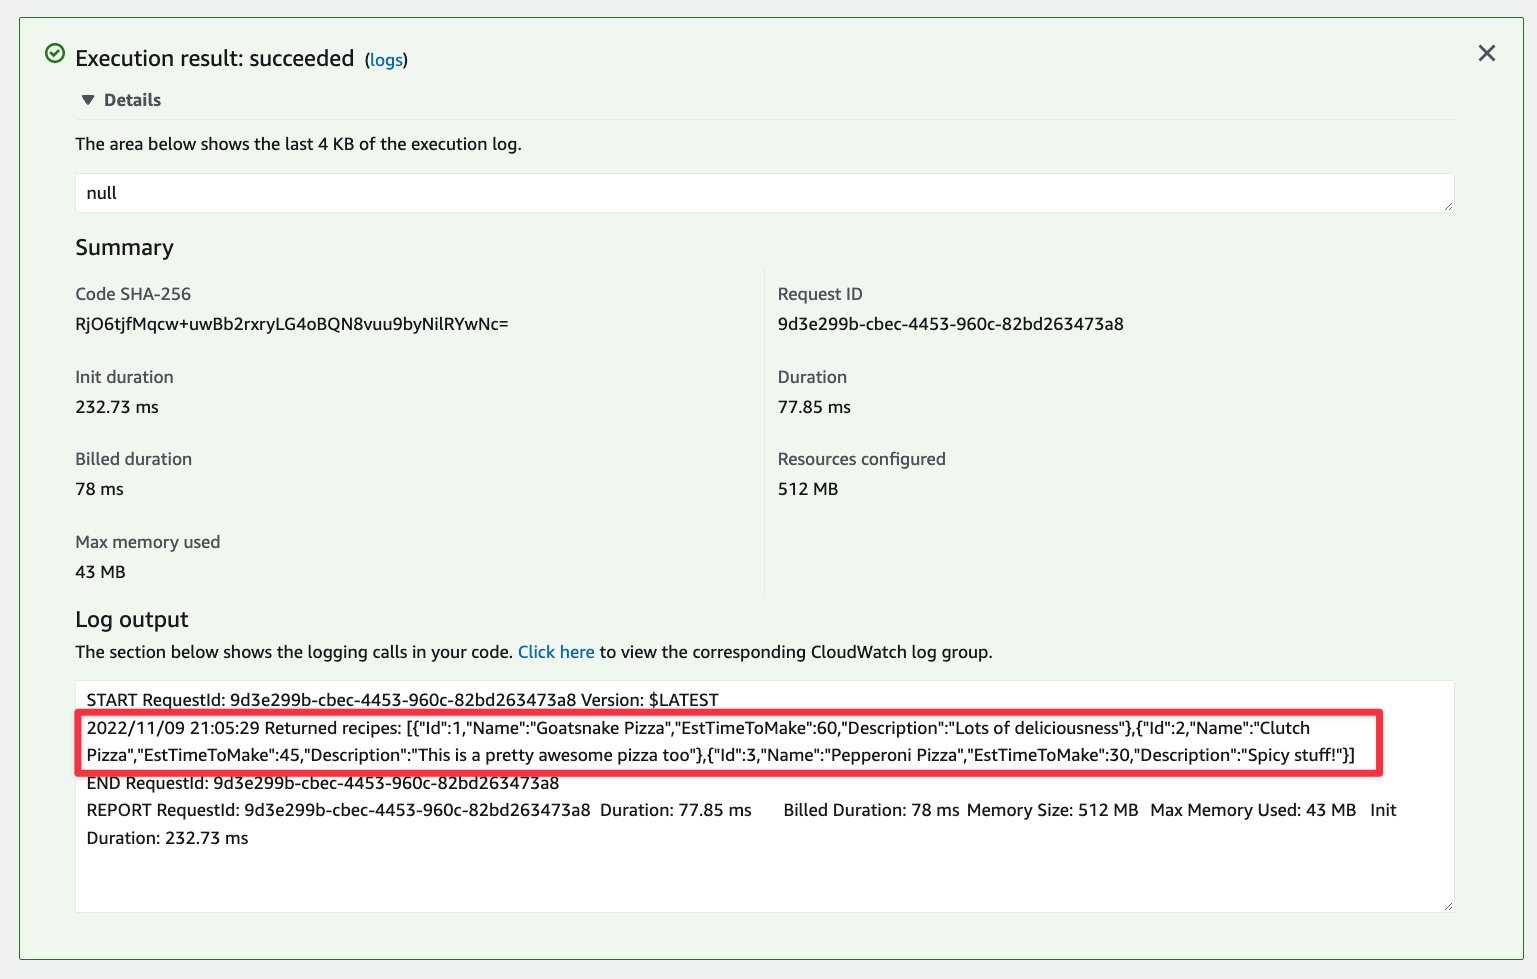
Finally, lets test the function and see if we get data back from the database. Select the "Test" tab, then click the "Test" button.
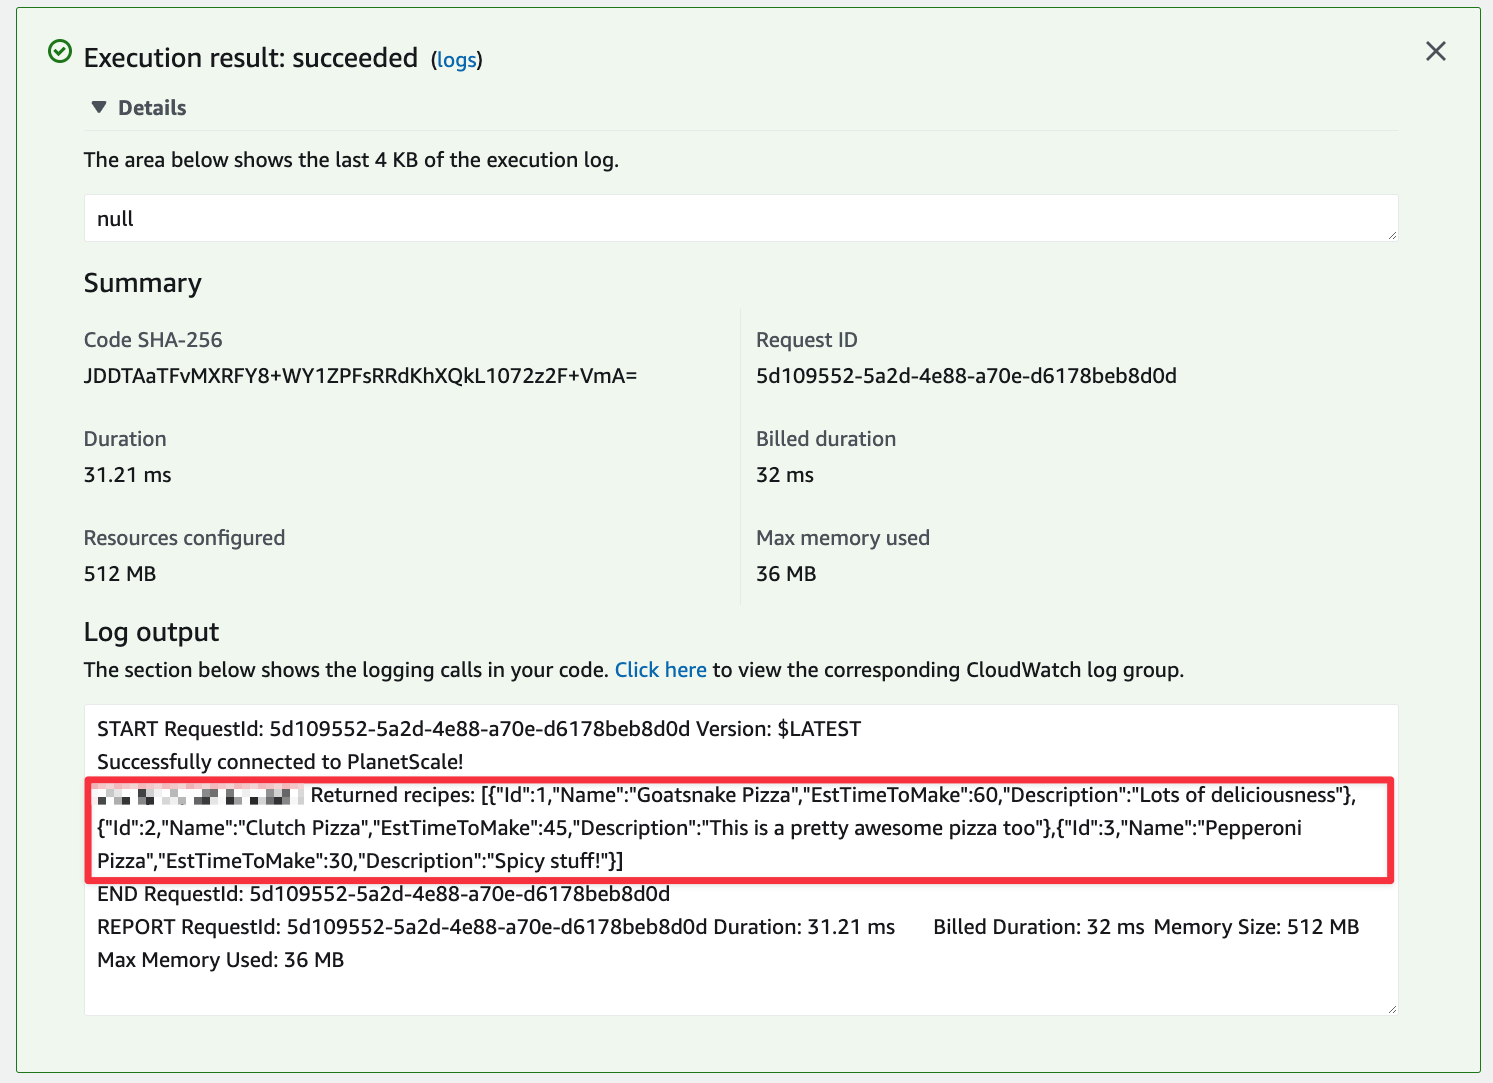
The view should update and display an alert box called Execution result. If you followed all of the previous steps correctly, the box should be green. Expand it and you should see the records from the database under Log output.
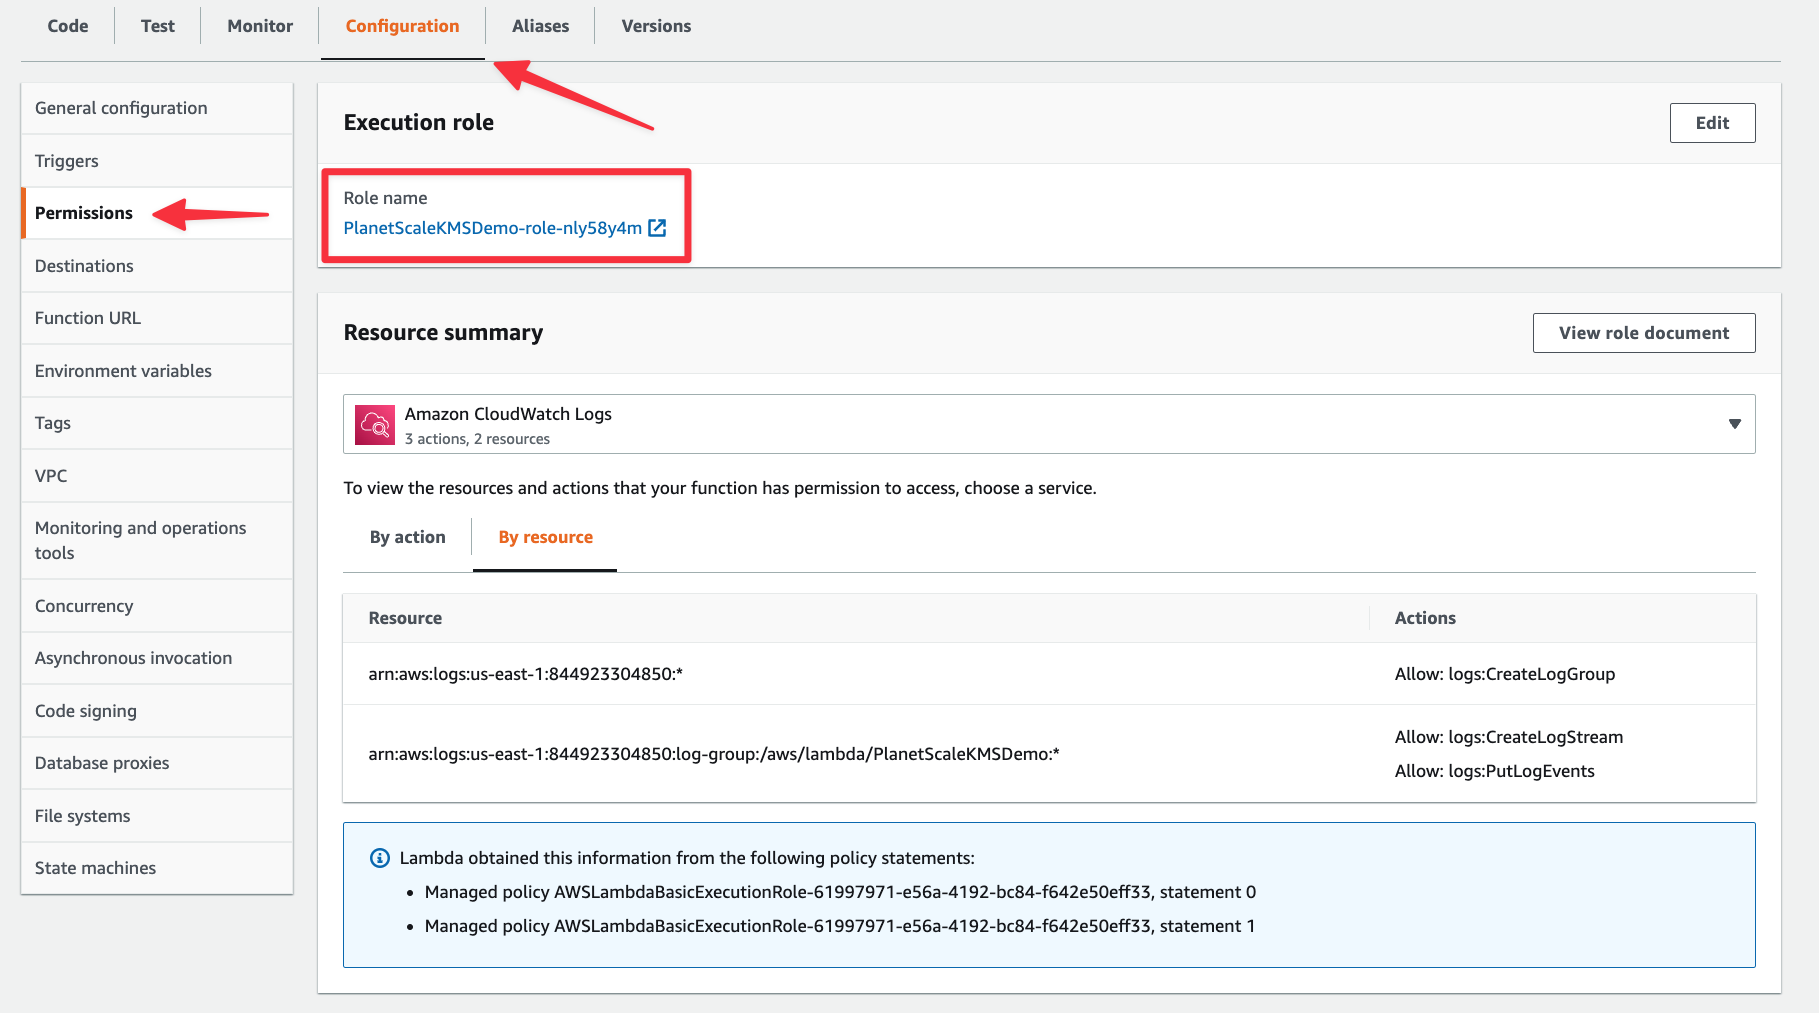
Now lets see how to encrypt our connection string with a KMS key. Before moving on from Lambda, you’ll need to grab the execution role for this Lambda. You can find that in the "Configuration" tab under "Permissions". Take note of it as you’ll need it in the next step.
Create a customer managed key in KMS
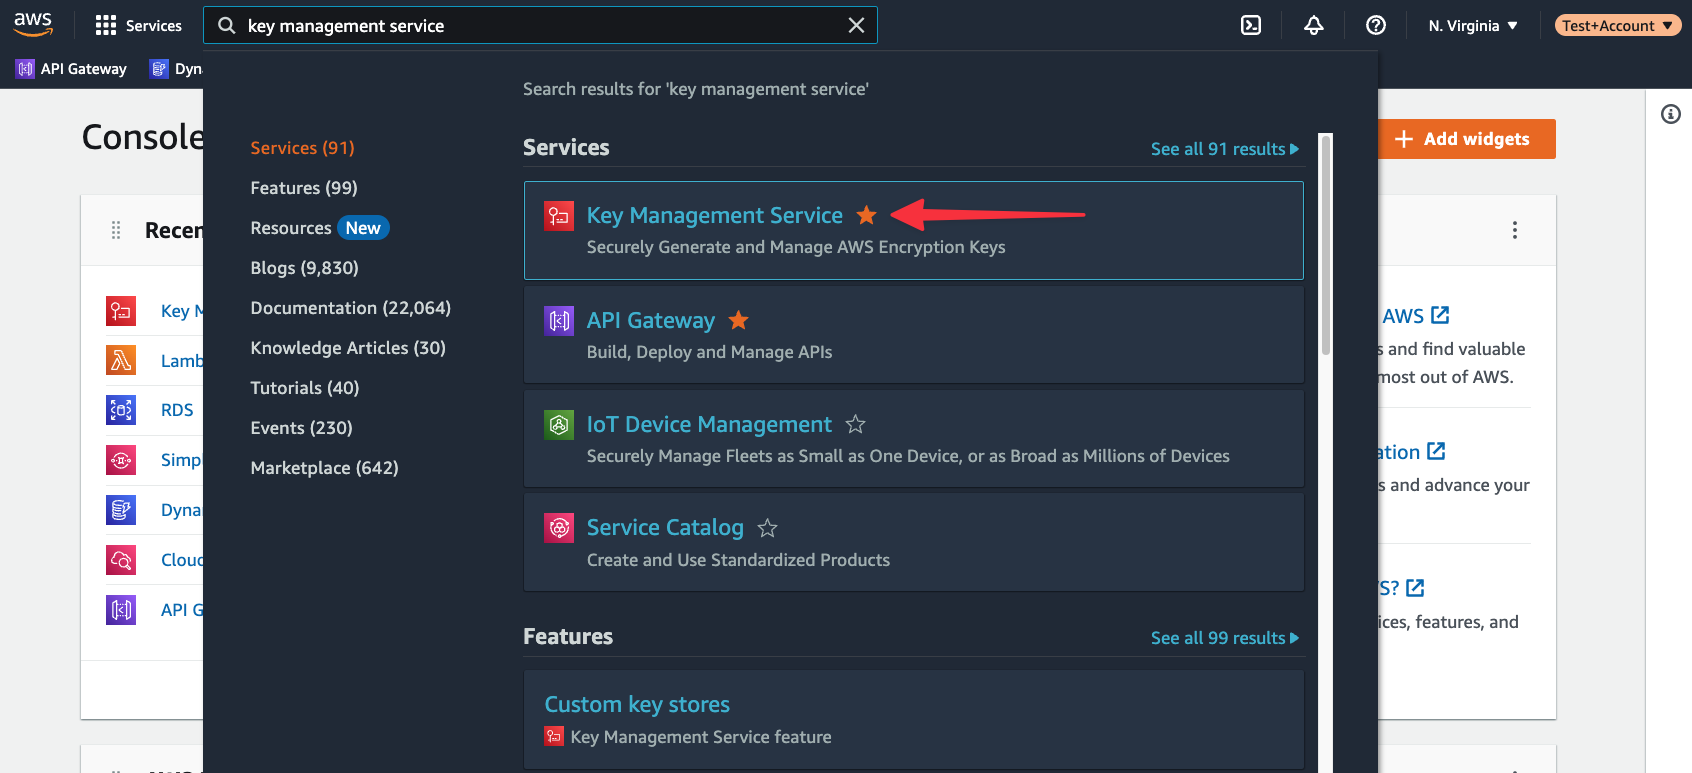
Start in the AWS console and use the global search to find “key management service”. Select it from the list of available services.
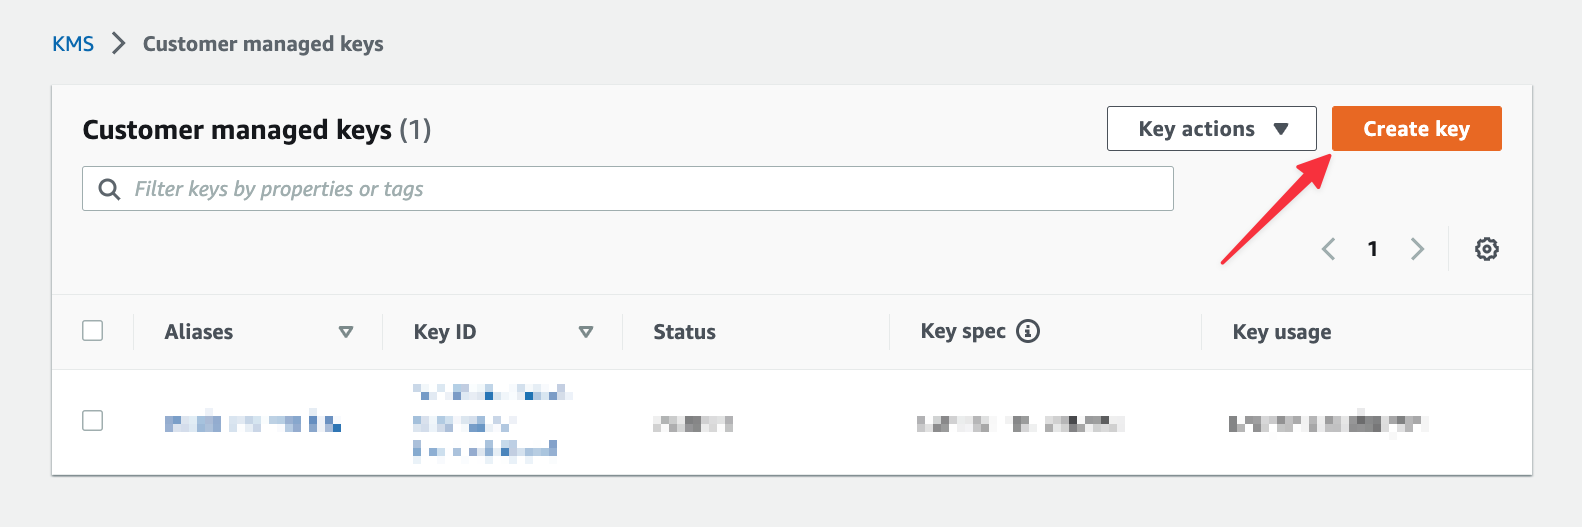
If you do not see a button to create a key immediately, select "Customer managed keys" from the left navigation first. Click "Create key".
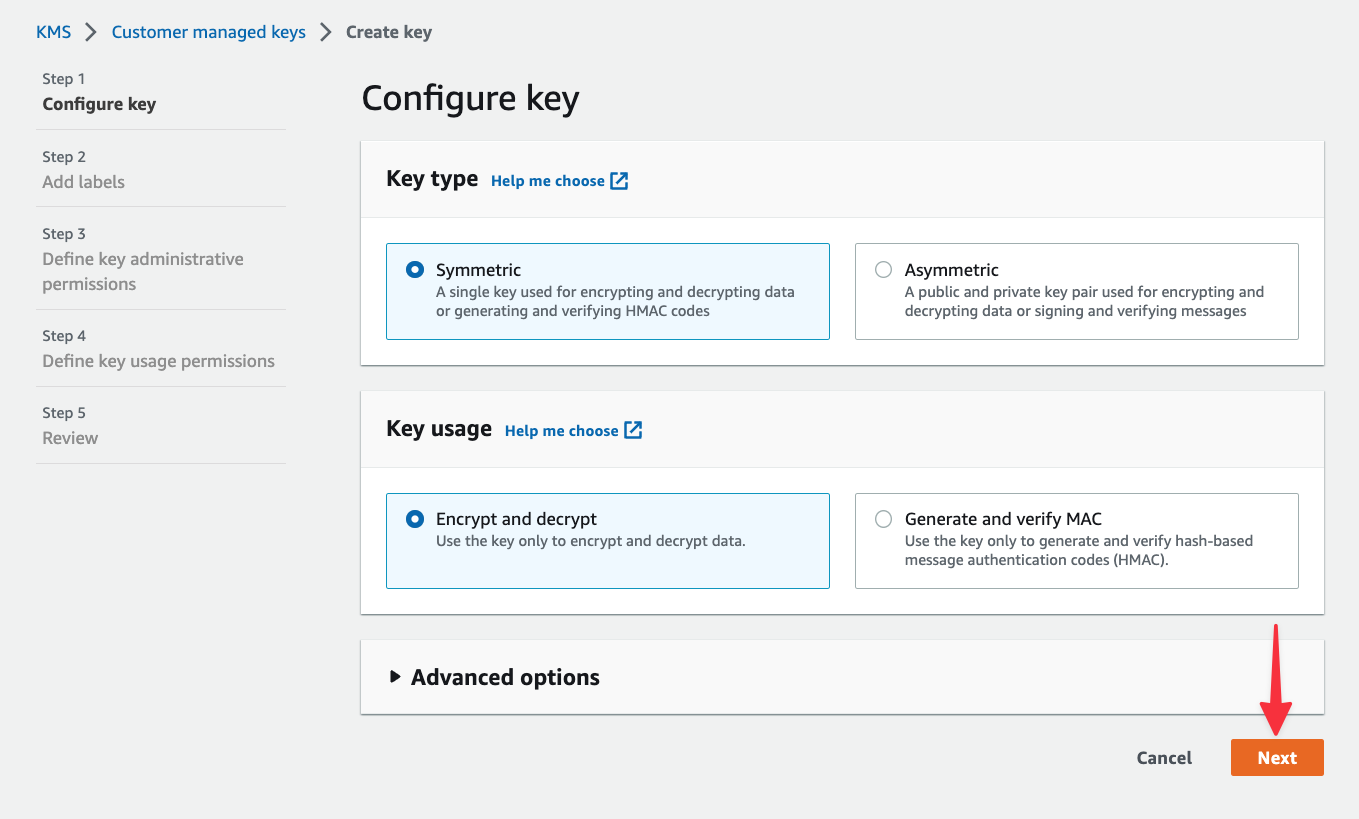
As mentioned earlier, AWS lets you create symmetric and asymmetric keys. Both options can be used to encrypt and decrypt data, but asymmetric keys are useful if you need to download the public key for signing other artifacts outside of AWS. Since we’re only working within AWS, leave "Symmetric" selected and click "Next".
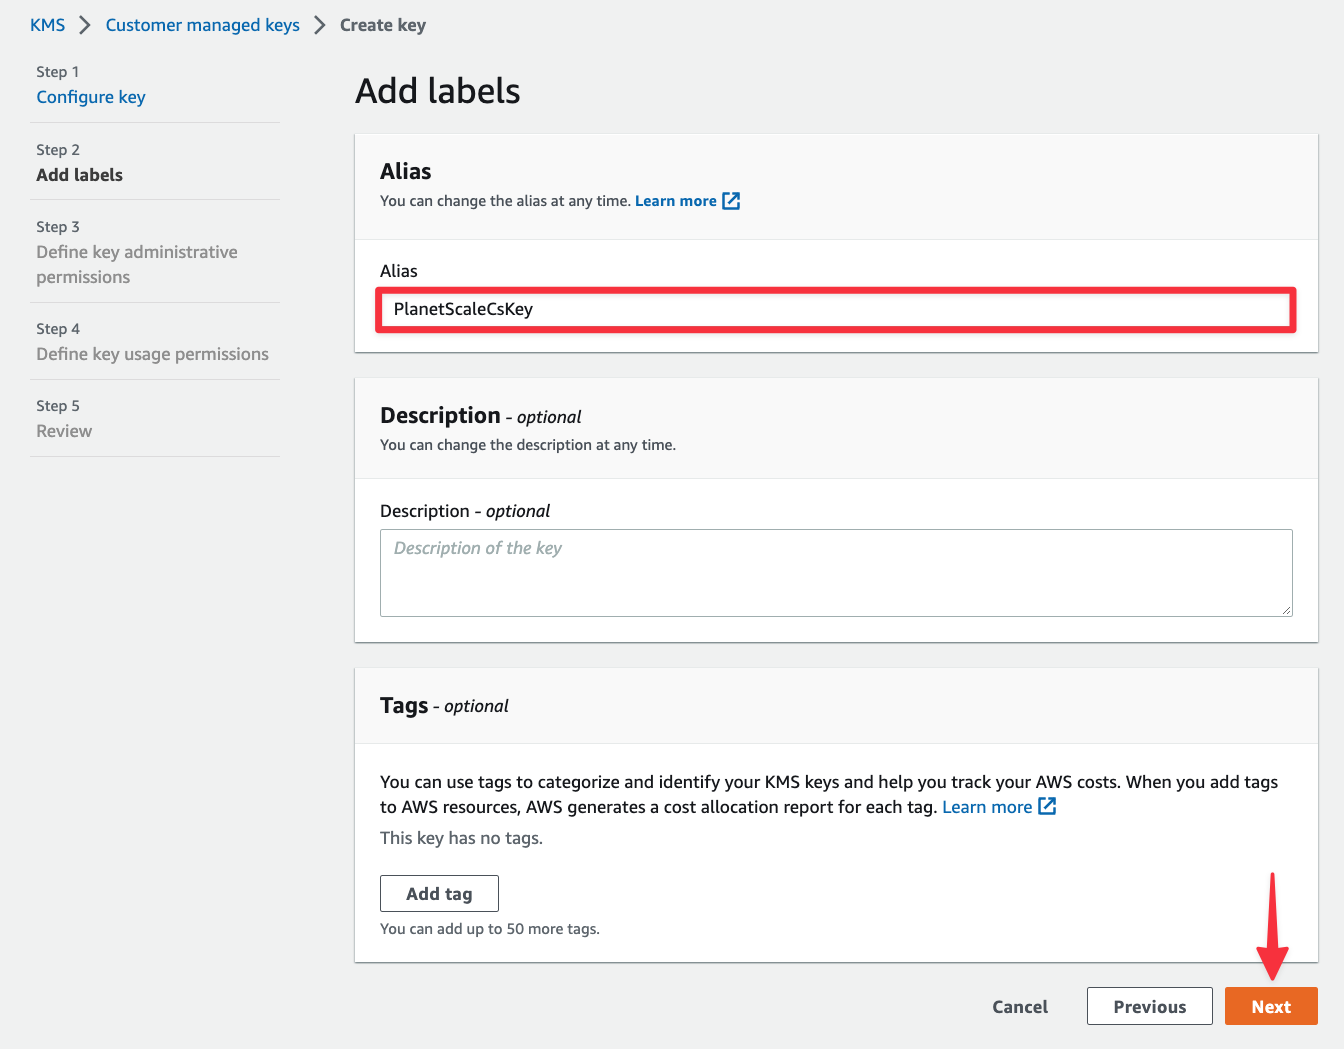
In the next view under Alias, give the key a display name for your reference and click "Next".
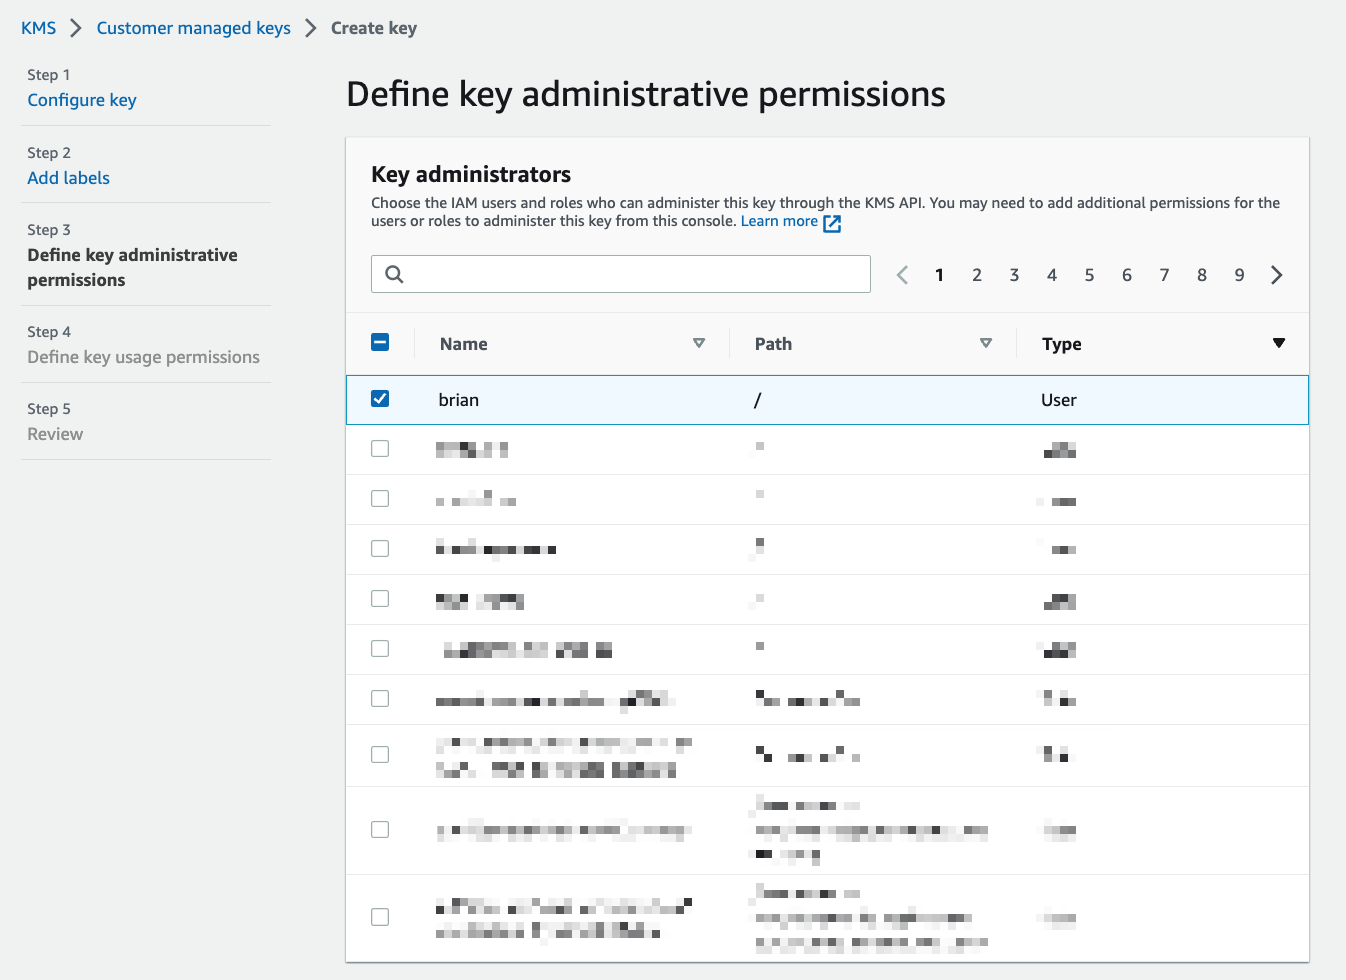
Now you need to configure the key administrators, which can be an IAM user, group, or role. Key administrators are users that are allowed to make changes to the key from the AWS console or APIs. For this tutorial, select your own IAM user account. Scroll down and click "Next".
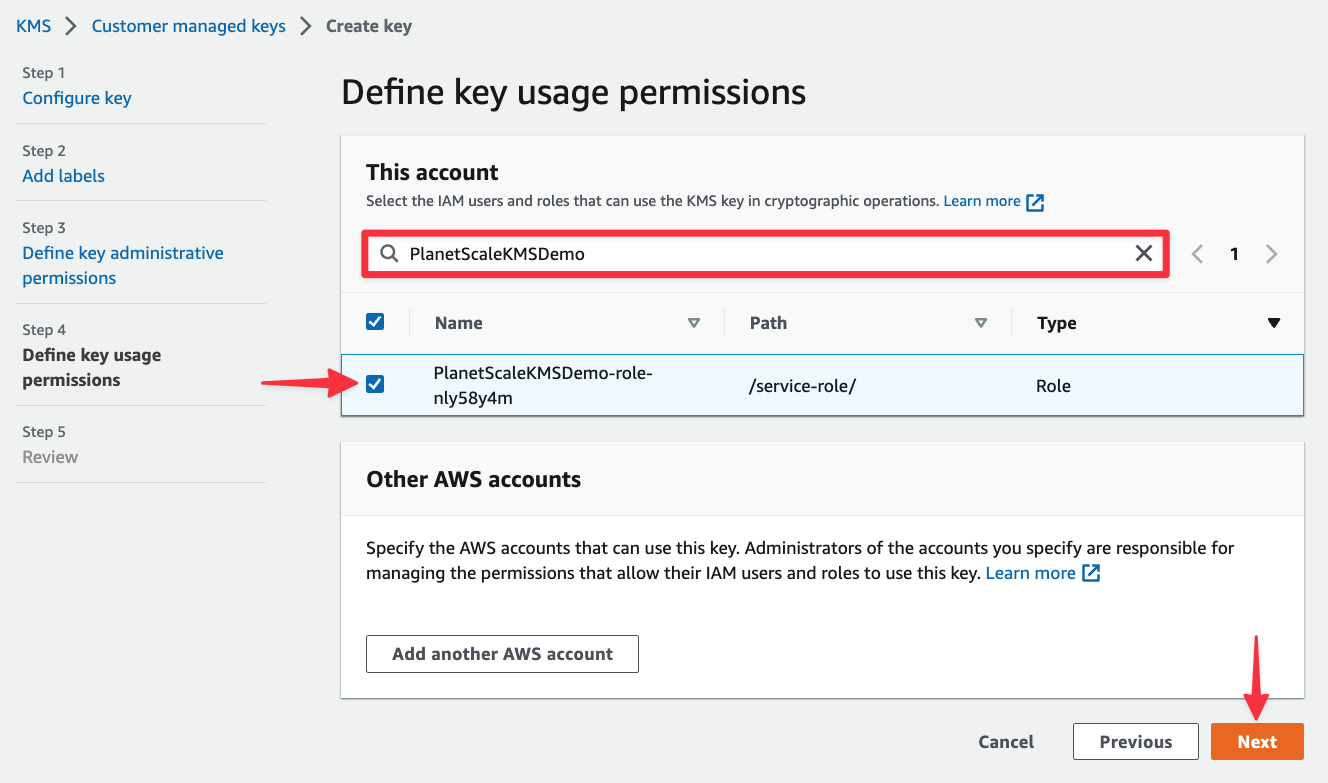
The next view will let you select IAM users, groups, or roles that are allowed to access your key in KMS. Type the name of the execution role for your Lambda function from the previous section and select it from the list. Click "Next" once you’ve selected it.
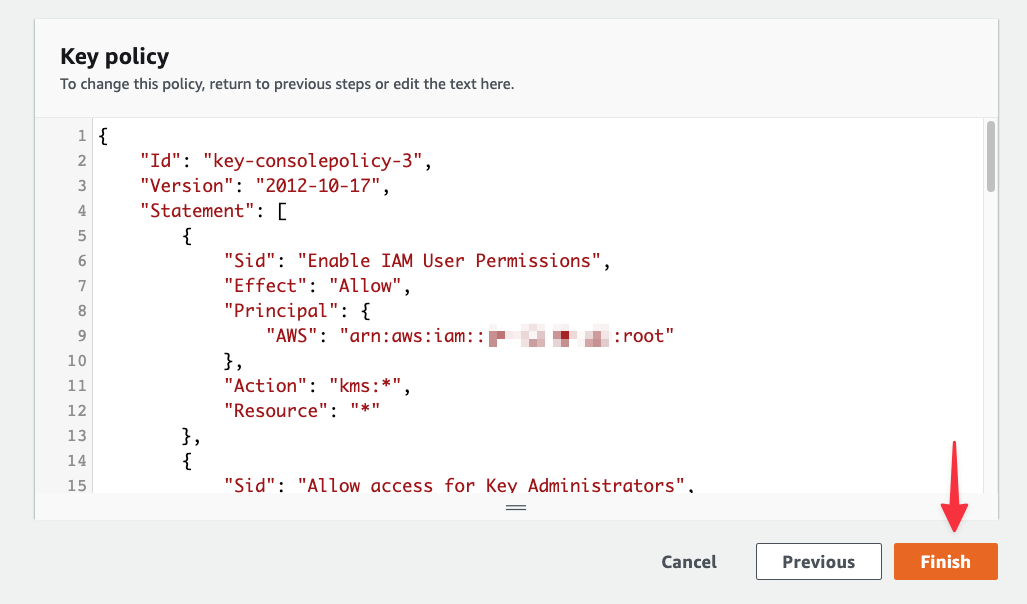
Finally, scroll to the bottom and click "Finish".
Encrypt the connection string in Lambda
Head back to your Lambda function, select the "Configuration" tab > "Environment variables" > "Edit".
Now expand the Encryption configuration section. Check the "Enable helpers for encryption in transit" box and you’ll notice that an Encrypt button is now present next to the DSN environment variable.
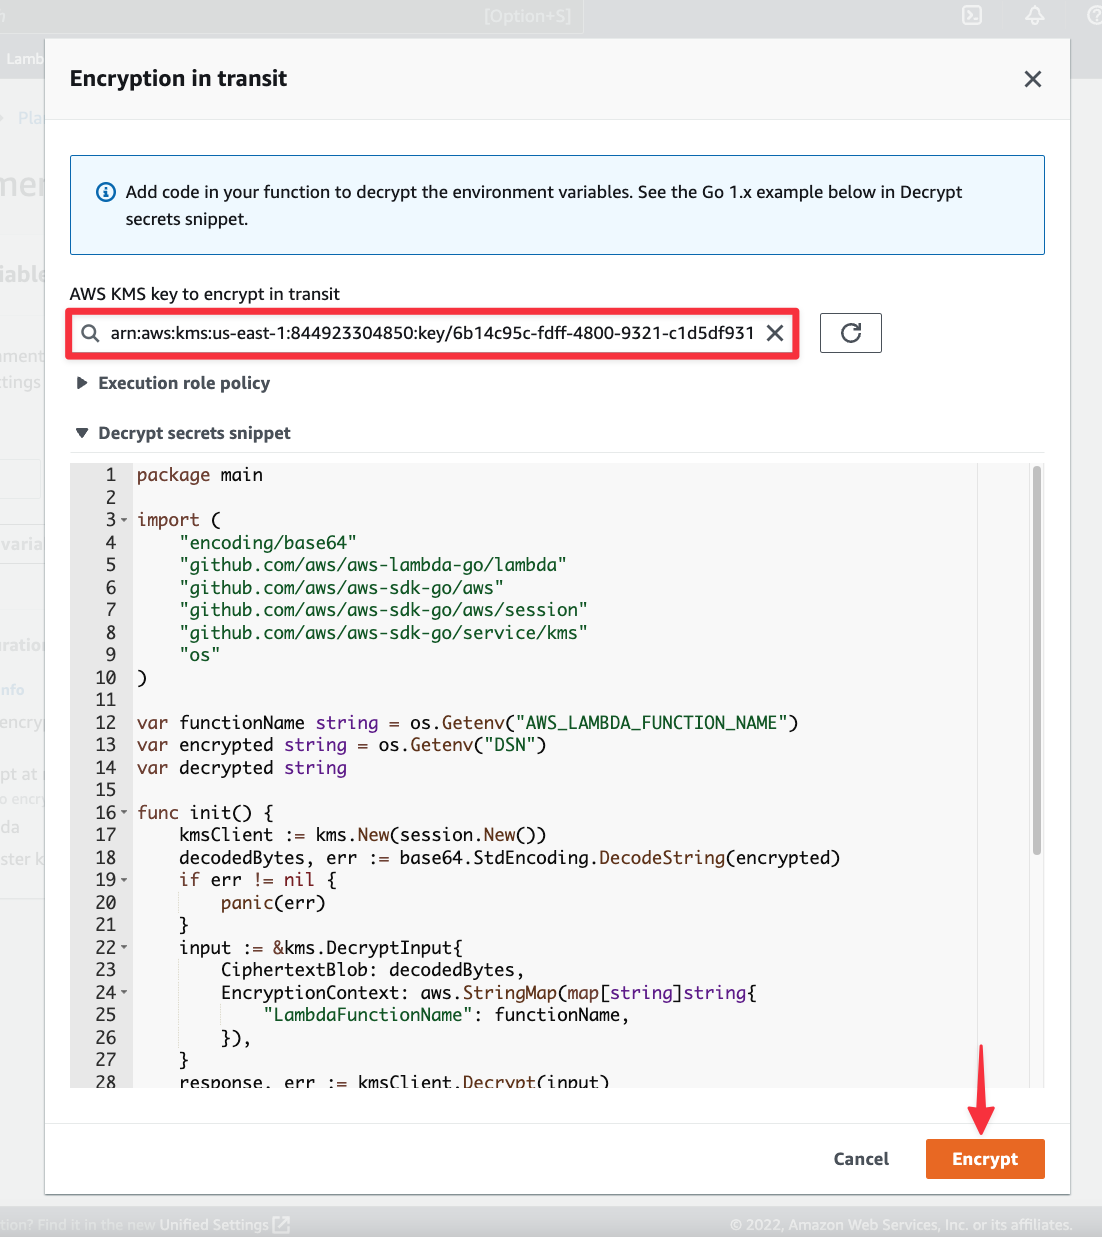
When you click "Encrypt", a modal will appear where you can select your KMS key created in the previous section. If you expand Decrypt secrets snippet, you’ll also be shown the code you can use to pull in the encrypted value in and decrypt it for use in your code. We’ll be adding this into the Lambda function. Select your KMS key and click "Encrypt".
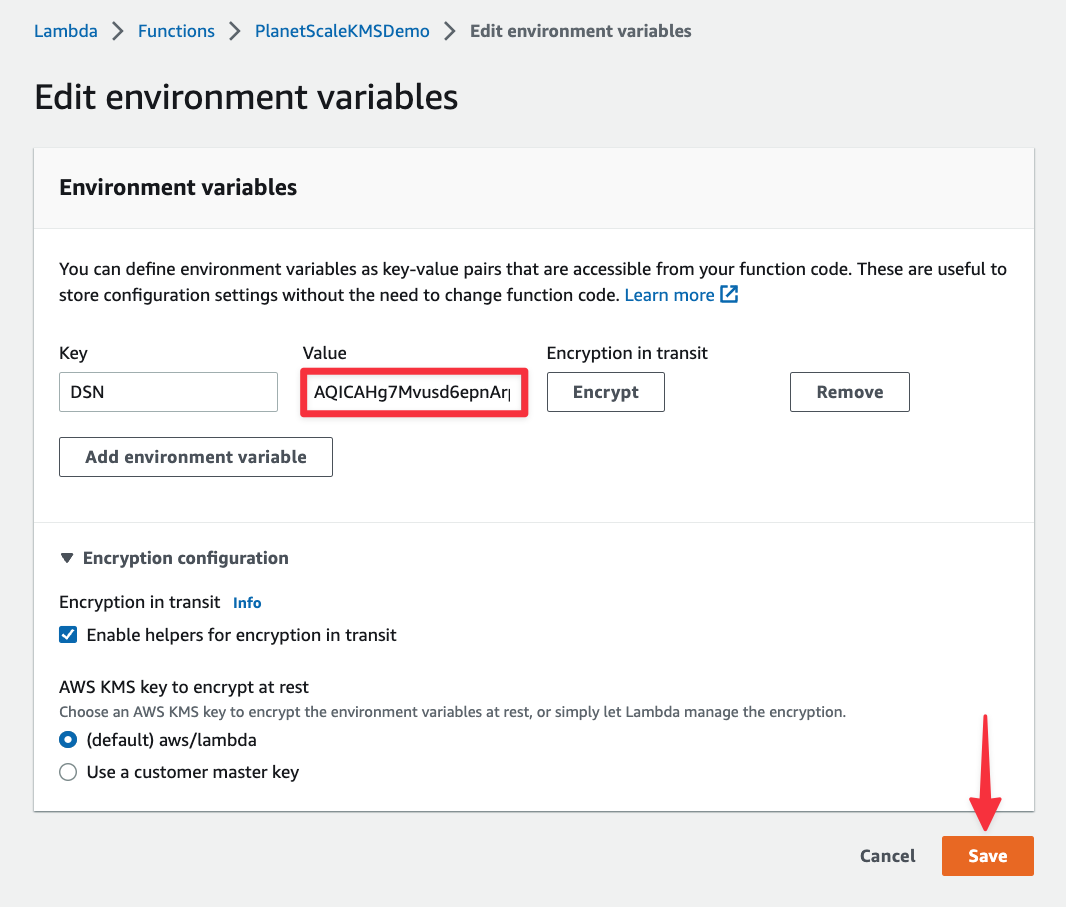
The value for the DSN environment variable should have updated to an encrypted value. Click "Save".
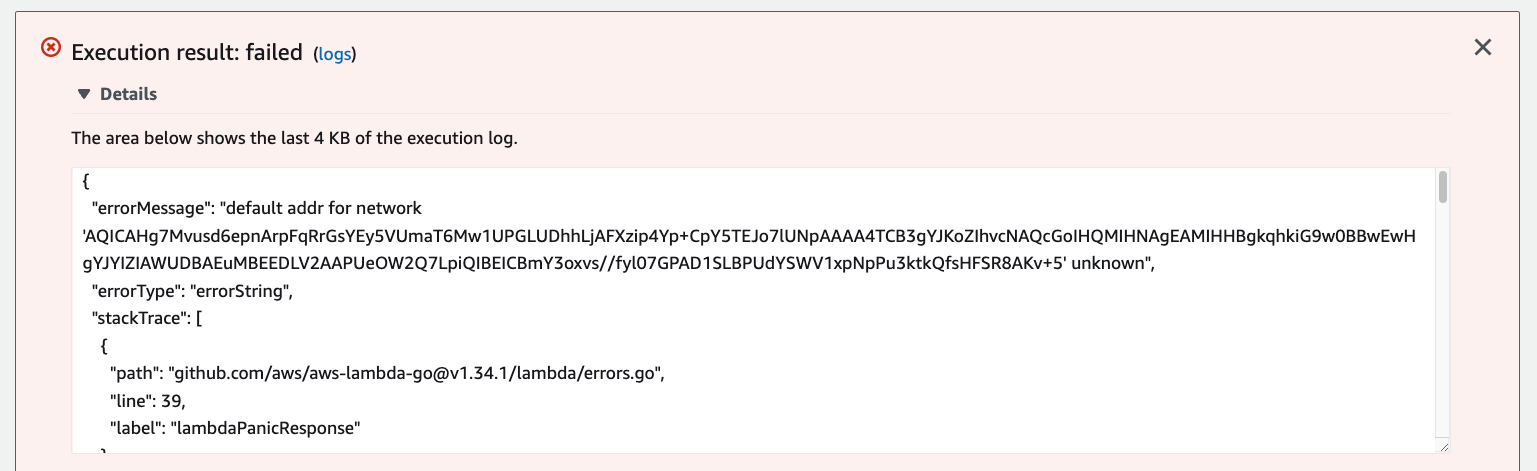
Now if you try to test the code again, it should fail since the code doesn't know what to do with the encrypted connection string. Notice how the error is specifically around how the MySQL driver can’t figure out how to connect to the PlanetScale database.
To fix this, open main.go again on your computer and update the first half of the file (up through GetDatabase()) to look like the following. The imports will be updated, the init() function will be added, and the GetDatabase() function will be updated to reflect the DSN variable which holds the decrypted connection string.
package main

import (
	"database/sql"
	"encoding/json"
	"log"
	"os"
	"encoding/base64"
	"github.com/aws/aws-lambda-go/lambda"
	"github.com/aws/aws-sdk-go/aws"
	"github.com/aws/aws-sdk-go/aws/session"
	"github.com/aws/aws-sdk-go/service/kms"
	_ "github.com/go-sql-driver/mysql"
)

// Set up variables to be used with the encrypted connection string.
var functionName string = os.Getenv("AWS_LAMBDA_FUNCTION_NAME")
var encrypted string = os.Getenv("DSN")
var DSN string

// The init function will run first, decrypting DNS into the above variable.
func init() {
	kmsClient := kms.New(session.New())
	decodedBytes, err := base64.StdEncoding.DecodeString(encrypted)
	if err != nil {
		panic(err)
	}

	input := &kms.DecryptInput{
		CiphertextBlob: decodedBytes,
		EncryptionContext: aws.StringMap(map[string]string{
			"LambdaFunctionName": functionName,
		}),
	}

	response, err := kmsClient.Decrypt(input)
	if err != nil {
		panic(err)
	}
	DSN = string(response.Plaintext[:])
}

// The Recipe model will hold the data for a record pulled from the database.
type Recipe struct {
	Id            int
	Name          string
	EstTimeToMake int
	Description   string
}

// Sets up the connection to the PlanetScale database.
func GetDatabase() (*sql.DB, error) {
	db, err := sql.Open("mysql", DSN) // ← Update the second parameter here
	return db, err
}

// remainder of the code...
Now follow the process from the previous section to build the project, zip it up, and upload it into AWS. Once you do so, test the function again in AWS and it should return data successfully.
Conclusion
If you’ve followed along, you should have a good understanding on how KMS can be used to encrypt sensitive info within an application build on AWS. This is a much more secure way to store connection strings so that even if your AWS account is compromised, unauthorized users would not be able to access your PlanetScale database. While the examples here used Go, the same principles apply to any application, regardless of the language.