In this tutorial, you’ll learn how to build a mood tracker application with Laravel 9, connect it to a PlanetScale MySQL database, make database schema changes, and deploy your database branch to production. You’ll use PlanetScale for the database, which gives you a fully managed MySQL-compatible database, unlimited scalability, a Git-like development workflow, zero downtime schema changes, and more.
Warning
This blog post is over a year old and may be out of date.
Here are some of the highlights of what you’ll create:
- A production-ready MySQL database in PlanetScale
- 2 database branches:
mainfor production anddevfor development - 2 tables,
moodsandentries, to store your daily entries and mood options - Database migrations and a seeder to run on your development database
- Deploy non-blocking schema changes from development to production with PlanetScale branching and deploy requests.
If you just want to get up and running with Laravel and PlanetScale, check out our Laravel quickstart instead. You can also find the final code for this application on GitHub if you'd prefer to just poke around.
Let’s get started!
Prerequisites
To run this tutorial, you will need the following:
- Beginner Laravel knowledge — This tutorial uses Laravel
v9.0. - PHP — This tutorial uses
v8.1 - Composer
- npm
- A PlanetScale account
Laravel installation
There are several ways to install a new Laravel 9 application.
This tutorial will use the Composer installation method, but feel free to choose whichever method you prefer.
To install with Composer, make sure you have PHP and Composer installed on your machine.
composer create-project laravel/laravel laravel-mood-tracker
Once installed, enter into your folder, open it in your code editor, and start the application:
cd laravel-mood-tracker
php artisan serve
You can view your application at http://localhost:8000/.
PlanetScale setup
Before you dive into the code, let’s get your database set up. Head over to PlanetScale to sign up for an account if you haven’t already.
Create a database
Next you’ll be prompted to create a new database. Give it a name, select the region closest to you or your application, and click "Create database".
While you're here, go to the "Settings" tab on your database, and click the checkbox next to "Automatically copy migration data", select "Laravel" from the dropdown, and click "Save database changes". This isn’t required, but it allows PlanetScale to track your Laravel migrations so that new database branches are automatically created with the latest migrations.
Working with branches
One of PlanetScale’s powerful features is the ability to create branches, similar to the Git model.
Your database comes with one default branch, main. This branch is designated as a development branch to start, with the goal to move it to production after you make any necessary schema changes.
To demonstrate how this works, let’s promote the main branch to production now, and then create a new branch, dev, for development. The main branch is empty at this point, but once you're done with all your changes on the dev branch, you can roll them up to main.
To create a new branch:
- Select your database from the main page
- Click "New branch"
- Name it
devor whatever you want - Click "Create branch"
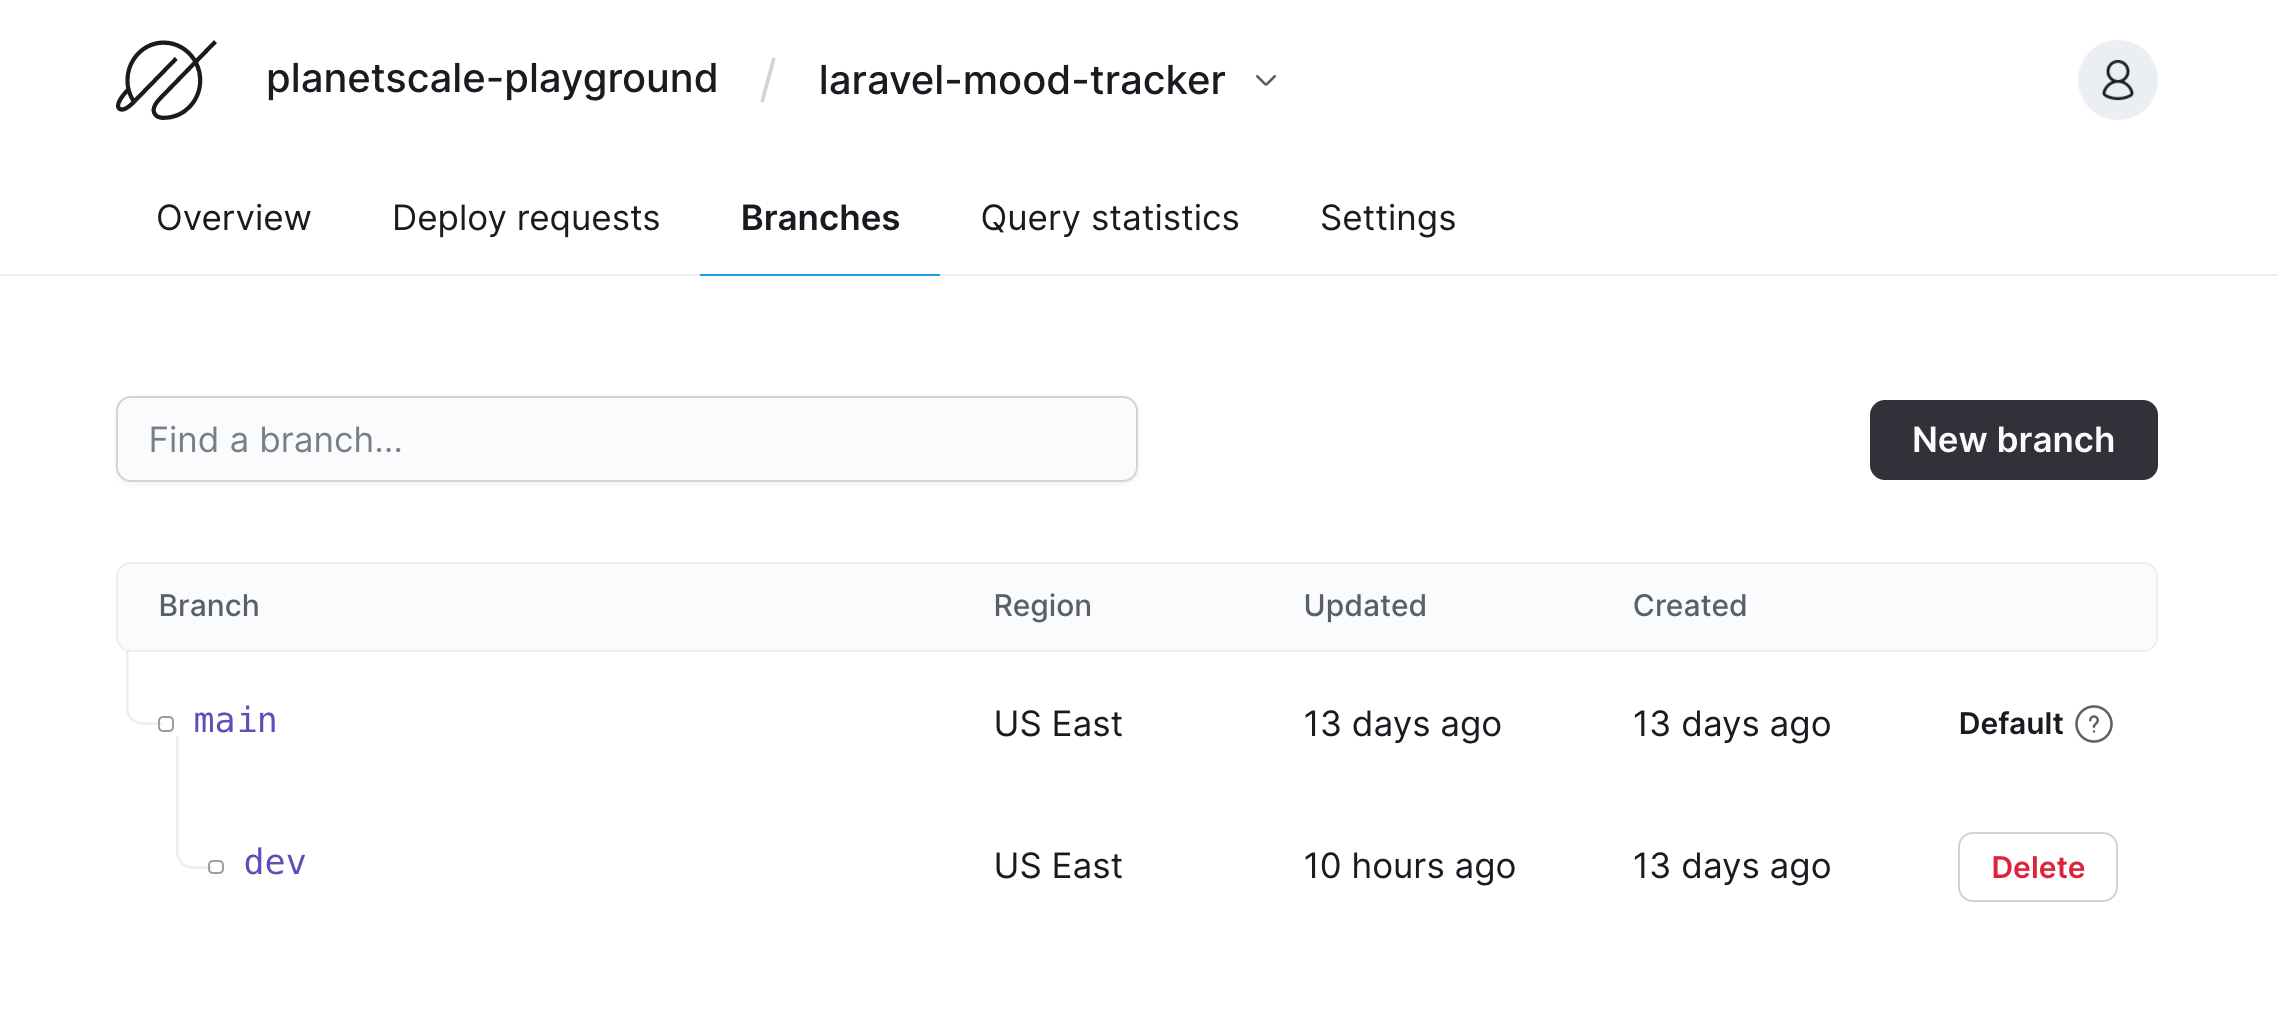
Next, promote the main branch to production. A production branch with safe migrations enabled protects you from making direct schema changes (meaning less chance of mistakes!) and includes an additional replica to improve availability.
Promote main to production:
- Go back to the database overview page and click the Branches tab
- Click the
mainbranch - Click the "Promote a branch to production" button
- Make sure
mainis selected and click "Promote branch"
That’s it! You now have a live database with two branches hosted on PlanetScale.
Your database is currently empty, so let’s get it connected to your Laravel app so you can start writing data to it.
Connect your database
You can connect your development database to your Laravel application in one of two ways: using the PlanetScale proxy or with a username and password. This tutorial will show you how to connect with a username and password, but you can use either option.
Connect with username and password
- Back in your PlanetScale dashboard, click on the "Branches" tab of your database and select
dev. - Click the "Connect" button
- Click "New password"
- Select "Laravel" from the dropdown that’s currently set to "General"
- Copy the full set of credentials. Make sure you copy it, as you won’t be able to see the password again when you leave the page. You can always generate a new one if you do forget to store it.
Configure your Laravel 9 app
Next, let’s connect your Laravel application. Open up your .env file in your code editor, find the database connection section, and paste in the credentials you copied from the PlanetScale dashboard.
It should look something like this:
DB_CONNECTION=mysql
DB_HOST=xxxxxxxxxx.us-east-3.psdb.cloud
DB_PORT=3306
DB_DATABASE=laravel-mood-tracker
DB_USERNAME=xxxxxxxxxxx
DB_PASSWORD=pscale_pw_xxxxxx-xx-xxxxxxxxxxxxxxxxxxxxxxxx
MYSQL_ATTR_SSL_CA=/etc/ssl/cert.pem
Note
The value for MYSQL_ATTR_SSL_CA will depend on your system. You can find more information on our Secure Connections page.
Finally, run your Laravel application with:
php artisan serve
Your PlanetScale development branch is now connected to your Laravel application! Let’s add a schema and some data to see it in action.
Models and migrations and seeders, oh my!
For this mood tracker application, you're going to need two models: Mood and Entry.
In addition, each model will have a corresponding controller, migration, and/or seeder and factory file. Here’s an overview of what each file is used for and how they interact:
- Models — To use Laravel's ORM, Eloquent, each table has a Model that lets Eloquent know how to interact with that table. It holds information about table relationships, what attributes can be modified, and more.
- Controllers — Each model also has a corresponding controller. These controllers hold the logic for handling requests in your application. For example, to view all entries in your mood tracker, your application will use the specified controller class to figure out how to grab the data.
- Migrations — Your migrations not only define the database schema that your application uses, but also act as version control. If someone new joins your team, all they have to do to get the current version of your schema (as well as all history) is run the existing migrations. Any time you need to modify the schema, you’ll create a migration to do so.
- Seeders — Your seeder files allow you to run your development database with some initial data, which is beneficial for testing your application. You can create your seeders with specific data, auto-generated data, or a combination. Either way, it’s helpful to know that the entire team working on the application can easily use the same sample data.
- Factories — The factory files work with your models and seeder files to define the seed data. You can’t just use any data when you seed your database. It must match the database schema requirements such as type, length, uniqueness, etc. With the factory, you can use these definitions from your Model class to control what data is created and how much.
You can actually create skeletons for all of these files with a single command! Run the following to create these files:
php artisan make:model Mood -mcrs
php artisan make:model Entry -mfcr
php artisan make:controller HomeController
The moods table will be pretty static, so you don’t need a factory file for that, just for entries. Likewise, you won’t need a seeder file for the entries table, as you’ll call the factory straight from the main seeder file. You're also making a standalone HomeController file to generate the homepage. You’ll see a total of 9 new files structured as follows:
├ app
├── Http
│   ├── Controllers
│       └── MoodController.php
│       └── EntryController.php
│       └── HomeController.php
├── Models
│   ├── Mood.php
│   └── Entry.php
├── database
│   ├── factories
│       └── EntryFactory.php
│   └── migrations
│       └── xxxx_xx_xx_xxxxxx_create_moods_table.php
│       └── xxxx_xx_xx_xxxxxx_create_entries_table.php
│   └── seeders
│       └── MoodSeeder.php
└
Let’s set up these files now so you can get a better sense of what the data will look like.
Create migrations
First, delete all of the existing migration files in database/migrations except the two files for moods and entries. There’s also a sneaky one hanging out in vendor/laravel/sanctum/database/migrations that you can delete as well.
Open up the migration file for the moods table under database/migrations/xxxx_xx_xx_xxxxxx_create_moods_table.php and replace it with the following:
<?php

use Illuminate\Database\Migrations\Migration;
use Illuminate\Database\Schema\Blueprint;
use Illuminate\Support\Facades\Schema;

class CreateMoodsTable extends Migration
{
    /**
     * Run the migrations.
     *
     * @return void
     */
    public function up()
    {
        Schema::create('moods', function (Blueprint $table) {
            $table->id();
            $table->string('name');
            $table->string('color');
        });
    }

    /**
     * Reverse the migrations.
     *
     * @return void
     */
    public function down()
    {
        Schema::dropIfExists('moods');
    }
}
Once ran, this will create the moods table with columns id, name, and color, as described below:
id(UNSIGNED BIGINT) — Auto-increments to identify the moodname(VARCHAR) — Name of the moodcolor(VARCHAR) — Color used to represent the mood
Next, open the migration file for entries at database/migrations/xxxx_xx_xx_xxxxxx_create_entries_table.php and replace it with:
<?php

use Illuminate\Database\Migrations\Migration;
use Illuminate\Database\Schema\Blueprint;
use Illuminate\Support\Facades\Schema;

class CreateEntriesTable extends Migration
{
    /**
     * Run the migrations.
     *
     * @return void
     */
    public function up()
    {
        Schema::create('entries', function (Blueprint $table) {
            $table->id();
            $table->date('date');
            $table->text('notes');
            $table->foreignId('mood_id');
        });
    }

    /**
     * Reverse the migrations.
     *
     * @return void
     */
    public function down()
    {
        Schema::dropIfExists('entries');
    }
}
Here are the columns for the entries table:
id(UNSIGNED BIGINT) — Auto-increments to identify the entrydate(DATE) — The date of the entrynotes(TEXT) — Any notes that go along with the entrymood_id(UNSIGNED BIGINT) — The corresponding mood for this entry
Note
While normally you could add the constrained() method to the foreign key (mood_id) to enforce referential integrity, we've purposely left it out here. PlanetScale previously did not support foreign key constraints enforced at the database level because we believe they aren't worth the trade-offs in performance and scalability.
PlanetScale now supports foreign key constraints, so you can use the constrained() method if you would prefer to.
Run migrations
Now it’s time to run the migrations. In your terminal in the Laravel project directory, run the following:
php artisan migrate
Since you're connected to your PlanetScale database, these migrations are now live on your dev branch (or whatever you configured in your .env file)!
To confirm this, go to your PlanetScale dashboard, click on your database, click "Branches", select the dev branch, click "Schema", and click "Refresh schema". You should see three tables: entries, migrations, and moods.

You can also view your tables in the PlanetScale MySQL console by clicking "Console" and running:
SHOW tables;
DESCRIBE entries;
DESCRIBE moods;
Set up factories and seeders
Let’s add some data to your database. Open up database/seeders/MoodSeeder.php and replace it with the following:
<?php

namespace Database\Seeders;

use Illuminate\Database\Seeder;
use Illuminate\Support\Facades\DB;

class MoodSeeder extends Seeder
{
  /**
   * Run the database seeds.
   *
   * @return void
   */
  public function run()
  {
    DB::table('moods')->insert([
      'name' => 'Happy',
      'color' => '#FEC8DF',
    ]);

    DB::table('moods')->insert([
      'name' => 'Sad',
      'color' => '#75CFE0',
    ]);

    DB::table('moods')->insert([
      'name' => 'Angry',
      'color' => '#F5C691',
    ]);

    DB::table('moods')->insert([
      'name' => 'Productive',
      'color' => '#C5E8B4',
    ]);

    DB::table('moods')->insert([
      'name' => 'Normal',
      'color' => '#FFEFC9',
    ]);

    DB::table('moods')->insert([
      'name' => 'Calm',
      'color' => '#BBA1D5',
    ]);
  }
}
As mentioned before, the moods table will be pretty static for now, so you can just explicitly create the data in the seeder since there isn’t much to it.
For the entries seed data, you’ll want to generate several records with some random values instead of hard-coded data like in moods. This is where factories come into play. Open up database/factories/EntryFactory.php and replace it with:
<?php

namespace Database\Factories;

use Illuminate\Database\Eloquent\Factories\Factory;
use App\Models\Mood;

class EntryFactory extends Factory
{
    /**
     * Define the model's default state.
     *
     * @return array
     */
    public function definition()
    {
        return [
            'notes' => $this->faker->realText($maxNbChars = 300),
            'mood_id' => Mood::inRandomOrder()->value('id'),
        ];
    }
}
The text for each entry is being generated using Faker PHP. A random id from the Mood model is assigned for mood_id. The date entry is a little more complicated because it needs to be unique and in a specific format. You can’t use the Faker library for this because it can only generate a unique DATETIME value, not DATE. You’ll create the random date values in the next step.
Finally, modify your main database/seeders/DatabaseSeeder.php file as follows:
<?php

namespace Database\Seeders;

use Illuminate\Database\Seeder;
use App\Models\Entry;
use Illuminate\Support\Carbon;

class DatabaseSeeder extends Seeder
{
  /**
   * Seed the application's database.
   *
   * @return void
   */
  public function run()
  {
    $this->call(MoodSeeder::class);

    // create an array of random unique dates in the format y-m-d
    $randomDates = [];
    while (count($randomDates) < 15) {
      $date = Carbon::today()->subDays(rand(0, 31))->format('Y-m-d');
      if (!in_array($date, $randomDates))
        array_push($randomDates, $date);
    }

    foreach($randomDates as $date) {
      Entry::factory()->create([
        'date' => $date
      ]);
    }
  }
}
This first runs the MoodSeeder.php file that you filled out earlier. Next, you're creating an array of 15 random, unique dates using the Carbon library. Finally, you loop through that array, call the database/factories/EntryFactory.php file that you created in the previous step, and add the random date to each entries record. The EntryFactory uses the create() method to create new database records based on the Entry model.
Set up models
The final step before seeding is to set up the models. First, open up app/Models/Mood.php and replace it with:
<?php

namespace App\Models;

use Illuminate\Database\Eloquent\Model;
use Illuminate\Support\Facades\Cache;

class Mood extends Model
{
    public $timestamps = FALSE;
    protected $fillable = ['name', 'color'];

    // Get the entries for a specific mood.
    public function entries()
    {
        return $this->hasMany(Mood::class);
    }

    // Clear moods cache upon modifying a mood entry
    protected static function boot()
    {
        parent::boot();

        static::saving(function() {
            Cache::forget('moods');
        });
    }
}
Here, you're first specifying what attributes can be modified in fillable. Forgetting to set this is a common mistake that can be difficult to debug as a beginner, so any time you add a column that you may write to, make sure to update it here!
You're also setting timestamps to FALSE so that Laravel doesn’t automatically create created_at and updated_at columns in the moods table.
Models also allow you to define Eloquent relationships. In the Mood model, you're defining the one-to-many relationship between entries and moods. Each mood can have several entries, but each entry will only have one mood that corresponds to it. This is reflected in the entries() function using the hasMany() method. Each Mood has many entries.
The boot() method is used to clear the cache upon saving a new mood. You’ll see where this comes into play when you update your controllers.
Next, open app/Models/Entry.php and replace it with the following:
<?php

namespace App\Models;

use Illuminate\Database\Eloquent\Factories\HasFactory;
use Illuminate\Database\Eloquent\Model;
use Illuminate\Support\Facades\Cache;

class Entry extends Model
{
    use HasFactory;

    public $timestamps = FALSE;
    protected $fillable = ['date', 'notes', 'mood_id'];

    public function mood()
    {
        return $this->belongsTo(Mood::class);
    }

    // Clear entries cache upon modifying an entry
    protected static function boot()
    {
        parent::boot();

        static::saving(function() {
            Cache::forget('entries');
        });
    }
}
This is similar to the Mood model. You're also creating the inverse relationship using belongsTo(). Each Entry belongs to exactly one Mood.
Defining these relationships now will allow you to use Eloquent, Laravel's ORM, to easily work with your data.
Seed your database
Finally, it’s time to seed your database! In the terminal in your project folder, run the following:
php artisan db:seed
This will run the main database/seeders/DatabaseSeeder.php file.
To view your seeded data and confirm that it worked, head back to your PlanetScale dashboard, select the database, click "Branches", select the dev branch, and click "Console". Run the following queries:
SELECT * FROM moods;
You should see the data for the moods table you created.
SELECT * FROM entries;
For the entries table, you have: 15 records with random, unique dates from the past 2 months, random text under notes, and a randomly selected mood_id that matches one of the moods in the moods table.
Now that your development branch is loaded up with some mock data, let’s set up the resource controllers so you can create and modify the data.
Add controllers
While the database is set up and ready to go, the application doesn’t actually do anything yet. Let’s fix that!
EntryController
First, open app/Http/Controllers/EntryController.php and replace it with:
<?php

namespace App\Http\Controllers;

use App\Models\Entry;
use App\Models\Mood;
use Illuminate\Http\Request;
use Illuminate\Support\Facades\Cache;

class EntryController extends Controller
{
    /**
     * Display a listing of the resource.
     *
     * @return \Illuminate\Http\Response
     */
    public function index()
    {
        // Store all entries in cache for 1 hour (3600 seconds)
        $entries = Cache::remember('entries', 3600, function() {
            return Entry::orderBy('date', 'ASC')->get();
        });

        return view('entries.index')
            ->with('entries', $entries);
    }

    /**
     * Show the form for creating a new resource.
     *
     * @return \Illuminate\Http\Response
     */
    public function create()
    {
        $moods = Cache::remember('moods', 3600, function() {
            return Mood::all();
        });

        return view('entries.create')
            ->with('moods', $moods);
    }

    /**
     * Store a newly created resource in storage.
     *
     * @param  \Illuminate\Http\Request  $request
     * @return \Illuminate\Http\Response
     */
    public function store(Request $request)
    {

        // Date must be in format Y-M-D. Must also not already exist in entries table date column
        // Selected mood_id must exist in the moods table under column id
        $request->validate([
            'date' => 'required|date_format:Y-m-d|unique:entries,date,',
            'notes' => 'string|nullable',
            'mood_id' => 'required|exists:moods,id',
        ]);

        Entry::create($request->all());

        return redirect()->route('entries.index')
            ->with('success', 'Entry created.');

    }

    /**
     * Display the specified resource.
     *
     * @param  \App\Models\Entry  $entry
     * @return \Illuminate\Http\Response
     */
    public function show(Entry $entry)
    {
        return view('entries.show')
        ->with('entry', $entry);
    }

    /**
     * Show the form for editing the specified resource.
     *
     * @param  \App\Models\Entry  $entry
     * @return \Illuminate\Http\Response
     */
    public function edit(Entry $entry)
    {
        $moods = Cache::remember('moods', 3600, function() {
            return Mood::all();
        });

        return view('entries.edit', compact('entry', 'moods'));
    }

    /**
     * Update the specified resource in storage.
     *
     * @param  \Illuminate\Http\Request  $request
     * @param  \App\Models\Entry  $entry
     * @return \Illuminate\Http\Response
     */
    public function update(Request $request, Entry $entry)
    {
        // Date must be in format Y-M-D. Must also not already exist in entries table date column
        // Selected mood_id must exist in the moods table under column id
        $request->validate([
            'date' => 'required|date_format:Y-m-d|unique:entries,date,'. $entry->id,
            'notes' => 'string|nullable',
            'mood_id' => 'required|exists:moods,id',
        ]);

        $updatedEntry = $request->all();
        $entry->update($updatedEntry);

        return redirect()->route('entries.show', [$entry->id])
            ->with('success', 'Entry updated.');
    }

    /**
     * Remove the specified resource from storage.
     *
     * @param  \App\Models\Entry  $entry
     * @return \Illuminate\Http\Response
     */
    public function destroy(Entry $entry)
    {
        $entry->delete();

        return redirect()->route('entries.index')
            ->with('success', 'Entry deleted.');
    }
}
Then EntryController has the following methods:
index()— Display all entriescreate()— Display the form to create a new entrystore()— Validate new entry input and save it to the databaseshow()— Display a single entryedit()— Display the form to update an entryupdate()— Validate updated entry input and update in the databasedestroy()— Delete an entry
Let’s go over a few notable details of this controller that you’ll also see in the MoodController.
Caching
The index() method grabs ALL entries from the database. While this isn’t a huge number for this sample application, it could potentially turn into a huge performance and cost hit as the data grows.
There are a few ways to improve the performance, but one quick solution is to cache the data.
$entries = Cache::remember('entries', 3600, function() {
    return Entry::orderBy('date', 'ASC')->get();
});
Laravel makes caching easy using the Cache::remember() method. This will check the cache to see if the data already exists there, and if not, it will pull from the database and store it in the cache for 3600 seconds as entries.
For a more in-depth primer on Laravel caching, check out Introduction to Laravel caching.
Views
With every method, you’ll see a return statement at the end that either returns a view or a redirect along with some data.
return view('entries.index')
    ->with('entries', $entries);
In the above example, after the method executes, the user will be routed to the entries index page found at resources/views/entries/index.php (you’ll create this soon). The data for $entries will also be passed to the view.
Form validation
The store() and update() methods both require some kind of form validation before storing the entries to the database. You should never trust user input, so backend form validation is essential for, well, validating that the user's input is correct.
$request->validate([
    'date' => 'required|date_format:Y-m-d|unique:entries,date,'. $entry->id,
    'notes' => 'string|nullable',
    'mood_id' => 'required|exists:moods,id',
]);
Laravel makes even the most complex form validation a breeze. The above code snippet is from the update() method.
Let’s examine the date validation. The first two, required and date_format, are pretty straightforward.
The next one, unique:table,column, is a little more complex. You don’t want repeated dates in this application, so you must check that the date is unique when validating. However, if you're updating an existing entry, your application will compare the user's updated input to the existing entry. If the user is only updating the text, then the date will be the same, so it will fail validation. To get around this, you can pass in the current id and it will check that all dates are unique except for the date on the specified entry.
HomeController
Next, set up the HomeController, which will be used to grab the data for the homepage. Open up app/Http/Controller/HomeController.php and paste in the following:
<?php

namespace App\Http\Controllers;

use App\Models\Entry;
use App\Models\Mood;
use Illuminate\Http\Request;
use Illuminate\Support\Facades\Cache;

class HomeController extends Controller
{
    /**
     * Display a listing of the resource.
     *
     * @return \Illuminate\Http\Response
     */
    public function index()
    {
        $entries = Cache::remember('entries', 3600, function() {
            return Entry::orderBy('date', 'ASC')->get();
        });

        $moods = Cache::remember('moods', 3600, function() {
            return Mood::all();
        });

        return view('home', compact('entries', 'moods'));
    }
}
MoodController
Finally, open up app/Http/Controllers/MoodController.php and paste in the following:
<?php

namespace App\Http\Controllers;

use App\Models\Mood;
use Illuminate\Http\Request;

class MoodController extends Controller
{
    /**
     * Display a listing of the resource.
     *
     * @return \Illuminate\Http\Response
     */
    public function index()
    {
        $moods = Mood::all();

        return view('moods.index')
            ->with('moods', $moods);
    }

    /**
     * Show the form for creating a new resource.
     *
     * @return \Illuminate\Http\Response
     */
    public function create()
    {
        return view('moods.create');
    }

    /**
     * Store a newly created resource in storage.
     *
     * @param  \Illuminate\Http\Request  $request
     * @return \Illuminate\Http\Response
     */
    public function store(Request $request)
    {
      $this->validate($request, [
        'name' => 'required|string',
        'color' => 'required|string',
      ]);

      Mood::create($request->all());

      return redirect()->route('entries.mood')
        ->with('success', 'Mood created.');
    }

    /**
     * Display the specified resource.
     *
     * @param  \App\Models\Mood  $mood
     * @return \Illuminate\Http\Response
     */
    public function show(Mood $mood)
    {
        return view('moods.show')
            ->with('mood', $mood);
    }

    /**
     * Show the form for editing the specified resource.
     *
     * @param  \App\Models\Mood  $mood
     * @return \Illuminate\Http\Response
     */
    public function edit(Mood $mood)
    {
      return view('moods.edit')->with('mood', $mood);
    }

    /**
     * Update the specified resource in storage.
     *
     * @param  \Illuminate\Http\Request  $request
     * @param  \App\Models\Mood  $mood
     * @return \Illuminate\Http\Response
     */
    public function update(Request $request, Mood $mood)
    {
        $this->validate($request, [
            'name' => 'required|string',
            'color' => 'required|string',
        ]);

        $updatedMood = $request->all();
        $mood->update($updatedMood);

        return redirect()->route('moods.show', [$mood->id])
            ->with('success', 'Mood updated.');
    }

    /**
     * Remove the specified resource from storage.
     *
     * @param  \App\Models\Mood  $mood
     * @return \Illuminate\Http\Response
     */
    public function destroy(Mood $mood)
    {
        $mood->delete();

        return redirect()->route('moods.index')
            ->with('success', 'Mood deleted.');
    }
}
This is very similar to the EntryController, so for the sake of brevity, I won’t expand on any of the details.
Set up routes
Now that you have controllers created, let’s set up the routes. Open up routes/web.php and replace it with:
<?php

use Illuminate\Support\Facades\Route;
use App\Http\Controllers\MoodController;
use App\Http\Controllers\EntryController;
use App\Http\Controllers\HomeController;

Route::get('/', [HomeController::class, 'index']);
Route::resource('moods', MoodController::class);
Route::resource('entries', EntryController::class);
When you made your Entry and Mood controllers earlier, you specified them as resource controllers by using the -r flag. This means the controllers are pre-built to handle all CRUD (create, read, update, destroy) operations.
You can then use the Route::resource() method to generate all of the routes needed to create, read, update, and delete in just a single line.
A nifty way to see all of the routes this will create is by running:
php artisan route:list
You should see something like this:
+--------+-----------+----------------------+-----------------+---------------------------------------------+-------------+
| Domain | Method    | URI                  | Name            | Action                                      | Middleware  |
+--------+-----------+----------------------+-----------------+---------------------------------------------+-------------+
|        | GET|HEAD  | /                    |                 | App\Http\Controllers\HomeController@index   | web         |
|        | GET|HEAD  | entries              | entries.index   | App\Http\Controllers\EntryController@index  | web         |
|        | POST      | entries              | entries.store   | App\Http\Controllers\EntryController@store  | web         |
|        | GET|HEAD  | entries/create       | entries.create  | App\Http\Controllers\EntryController@create | web         |
|        | GET|HEAD  | entries/{entry}      | entries.show    | App\Http\Controllers\EntryController@show   | web         |
|        | PUT|PATCH | entries/{entry}      | entries.update  | App\Http\Controllers\EntryController@update | web         |
|        | DELETE    | entries/{entry}      | entries.destroy | App\Http\Controllers\EntryController@destroy| web         |
|        | GET|HEAD  | entries/{entry}/edit | entries.edit    | App\Http\Controllers\EntryController@edit   | web         |
|        | GET|HEAD  | moods                | moods.index     | App\Http\Controllers\MoodController@index   | web         |
|        | POST      | moods                | moods.store     | App\Http\Controllers\MoodController@store   | web         |
|        | GET|HEAD  | moods/create         | moods.create    | App\Http\Controllers\MoodController@create  | web         |
|        | GET|HEAD  | moods/{mood}         | moods.show      | App\Http\Controllers\MoodController@show    | web         |
|        | PUT|PATCH | moods/{mood}         | moods.update    | App\Http\Controllers\MoodController@update  | web         |
|        | DELETE    | moods/{mood}         | moods.destroy   | App\Http\Controllers\MoodController@destroy | web         |
|        | GET|HEAD  | moods/{mood}/edit    | moods.edit      | App\Http\Controllers\MoodController@edit    | web         |
+--------+-----------+----------------------+-----------------+---------------------------------------------+-------------+
At this point, you have a working database seeded with mock data and complete CRUD functionality. All you need to do now is create the application views so that your users can interact with the application.
Tailwind setup
The layouts for this app use Tailwind for styling, as well as some of the pre-built TailwindUI components, so you’ll need to add Tailwind as a dependency.
Here’s how you pull Tailwind into your app:
- Run the following in the root of your Laravel project to install it:
npm install -D tailwindcss postcss autoprefixer
npx tailwindcss init
- Open up
webpack.mix.jsand addtailwindcssas a PostCSS plugin:
mix.js('resources/js/app.js', 'public/js').postCss('resources/css/app.css', 'public/css', [
  require('tailwindcss') // <---- new code
])
- Open
tailwind.config.jsand updatemodule.exportsas follows:
module.exports = {
  content: ['./resources/**/*.blade.php', './resources/**/*.js', './resources/**/*.vue'],
  theme: {
    extend: {}
  },
  plugins: []
}
- Open
resources/css/app.cssand paste in:
@tailwind base;
@tailwind components;
@tailwind utilities;
- In a new terminal tab, start the build process with:
npm run watch
Create views
I’m going to speed through this section as there are quite a few files and a lot of copying and pasting. You’ll begin to see your app come to life with every new view added, so feel free to run your application now and watch as the magic happens!
php artisan serve
First, create the following folders and files in the resources/views directory:
home.blade.phplayout.blade.phpentries/index.blade.phpentries/create.blade.phpentries/edit.blade.phpentries/show.blade.phpmoods/index.blade.phpmoods/create.blade.phpmoods/edit.blade.phpmoods/show.blade.php
You can paste this in your terminal so you don’t have to make them manually:
cd resources/views
mkdir entries && mkdir moods
touch home.blade.php
touch layout.blade.php
touch entries/index.blade.php
touch entries/create.blade.php
touch entries/edit.blade.php
touch entries/show.blade.php
touch moods/index.blade.php
touch moods/create.blade.php
touch moods/edit.blade.php
touch moods/show.blade.php
Reference the final GitHub repository if you want to confirm yours is laid out correctly.
layout.blade.php
Open up the resources/views/layout.blade.php file. This is going to be the main layout that will be reused across the rest of the views. Content from the other views will be injected where you see @yield('content').
Paste in the following:
<!doctype html>
<html class="h-full bg-gray-100" lang="{{ str_replace('_', '-', app()->getLocale()) }}">
  <head>
    <meta charset="utf-8" />
    <meta name="viewport" content="width=device-width, initial-scale=1" />
    <title>@yield('title') - Mood Tracker</title>
    <link href="{{ asset('css/app.css') }}" rel="stylesheet" />
  </head>
  <body class="h-full">
    <div class="min-h-full">
      <nav class="bg-gray-800">
        <div class="mx-auto max-w-7xl px-4 sm:px-6 lg:px-8">
          <div class="flex h-16 items-center justify-between">
            <div class="flex items-center">
              <div class="flex-shrink-0">
                <a class="text-light text-2xl font-semibold" href="/">Year in Pixels</a>
              </div>
              <div class="hidden md:block">
                <div class="ml-10 flex items-baseline space-x-4">
                  <a
                    href="/moods"
                    class="hover:text-light rounded-md px-3 py-2 text-sm font-medium text-gray-300 hover:bg-gray-700"
                    >Moods</a
                  >

                  <a
                    href="/entries"
                    class="hover:text-light rounded-md px-3 py-2 text-sm font-medium text-gray-300 hover:bg-gray-700"
                    >Entries</a
                  >
                </div>
              </div>
            </div>
            <div class="absolute inset-y-0 right-0 flex items-center pr-2 sm:static sm:inset-auto sm:ml-6 sm:pr-0">
              <a
                href="/moods/create"
                class="bg-stone-500 hover:bg-stone-700 text-light mx-6 inline-flex justify-center rounded-md border border-transparent px-4 py-2 text-sm font-medium shadow-sm"
              >
                New mood
              </a>
              <a
                href="/entries/create"
                class="text-light inline-flex justify-center rounded-md border border-transparent bg-gray-600 px-4 py-2 text-sm font-medium shadow-sm hover:bg-gray-700"
              >
                New entry
              </a>
            </div>
          </div>
        </div>
      </nav>

      <main>
        <div class="container mx-auto px-8 py-16">@yield('content')</div>
      </main>
    </div>
  </body>
</html>
home.blade.php
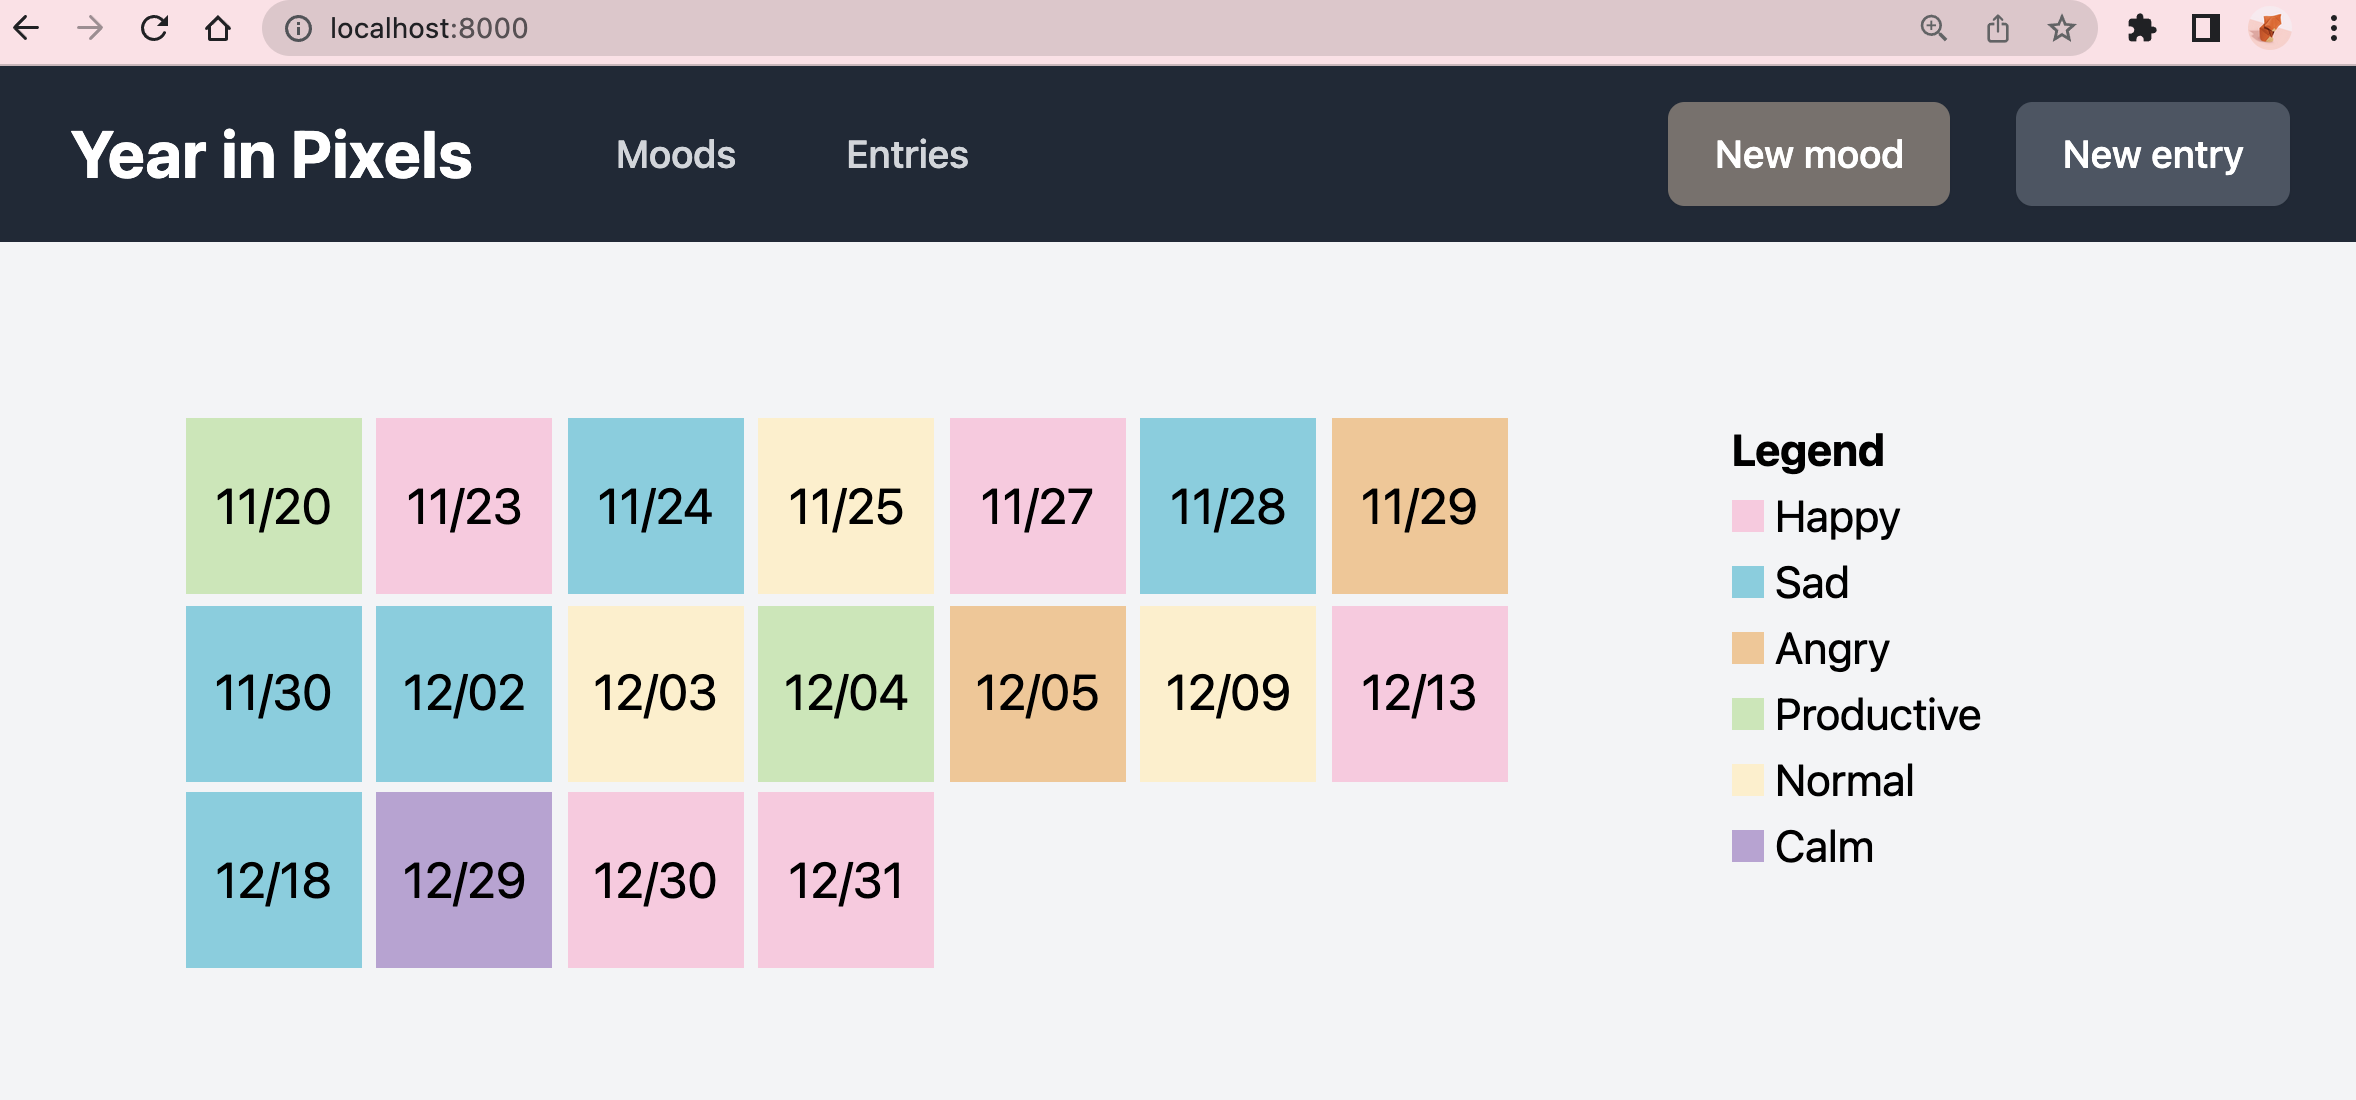
Next, open up resources/views/home.blade.php and paste in the following:
@section('title', 'Home')
@extends('layout')

@section('content')
  <div class="grid grid-cols-6">
    <div class="moods col-span-4 gap-2">
      <div class="grid grid-cols-2 lg:grid-cols-6 gap-2">
        @foreach($entries as $entry)
        <a href="/entries/{{$entry->id}}">
          <div class="w-16 h-16 justify-center items-center flex" style="background-color:{{ $entry->mood->color }}">
            <span class="text-black text-lg">
              {{ \Carbon\Carbon::parse($entry->date)->format('m/d') }}
            </span>
          </div>
        </a>
        @endforeach
      </div>
    </div>
    <div class="legend col-span-2 pl-0 md:pl-20">
      <span class="font-semibold">Legend</span>
      <ul>
      @foreach($moods as $mood)
        <li>
          <span class="w-3 h-3 inline-block" style="background-color:{{ $mood->color }}"></span>
          {{ $mood->name }}
        </li>
      @endforeach
      </ul>
    </div>
  </div>
</body>
</html>
@endsection
This file uses the HomeController to render the homepage. If you look at that controller, you’ll see the moods and entries data are both retrieved from the database and passed to this view. You're then looping through both to display on the page.
entries/index.blade.php
This file, along with the next three files, will render the views for the following pages:
- Landing page that shows all entries
- Page to view a single entry
- Page to edit an entry
- Page to create a new entry
Open up entries/index.blade.php and paste in the following:
@section('title', 'Entries')
@extends('layout')

@section('content')
<div class="flex flex-col">
  <div class="-my-2 overflow-x-auto sm:-mx-6 lg:-mx-8">
    <div class="py-2 align-middle inline-block min-w-full sm:px-6 lg:px-8">
      <div class="shadow overflow-hidden border-b border-gray-200 sm:rounded-lg">
        <table class="min-w-full divide-y divide-gray-200">
          <thead class="bg-gray-50">
            <tr>
              <th scope="col" class="px-6 py-3 text-left text-xs font-medium text-secondary uppercase tracking-wider">
                Date
              </th>
              <th scope="col" class="px-6 py-3 text-left text-xs font-medium text-secondary uppercase tracking-wider">
                Mood
              </th>
              <th scope="col" class="px-6 py-3 text-left text-xs font-medium text-secondary uppercase tracking-wider">
                Notes
              </th>
              <th scope="col" class="relative px-6 py-3">
                <span class="sr-only">Edit</span>
              </th>
              <th scope="col" class="relative px-6 py-3">
                <span class="sr-only">Delete</span>
              </th>
            </tr>
          </thead>
          <tbody class="bg-white divide-y divide-gray-200">
          @foreach($entries as $entry)
            <tr>
              <td class="px-6 py-4 whitespace-nowrap">
                <div class="flex items-center">
                  <div class="flex-shrink-0 h-10 w-10" style="background-color:{{ $entry->mood->color }}">
                  </div>
                  <div class="ml-4">
                    <div class="text-sm font-medium text-secondary">
                    {{ \Carbon\Carbon::parse($entry->date)->format('M d, Y') }}
                    </div>
                  </div>
                </div>
              </td>
              <td class="px-4 py-4 whitespace-nowrap">
                <div class="text-sm text-dark">
                {{ $entry->mood->name }}
                </div>
              </td>
              <td class="px-4 py-4 whitespace-wrap">
                <p class="text-xs text-secondary">
                    {{ $entry->notes }}
                </p>
              </td>
              <td class="px-4 py-4 text-right text-sm font-medium">
                <a href="/entries/{{ $entry->id }}/edit" class="text-indigo-600 hover:text-indigo-900">Edit</a>
              </td>
              <td class="px-4 py-4 text-right text-sm font-medium">
                <form action="{{ route('entries.destroy', $entry->id) }}" method="POST">
                @csrf
                @method('DELETE')
                  <button type="submit" class="text-red-600 hover:text-red-900">Delete</button>
              </form>
              </td>
            </tr>
            @endforeach
          </tbody>
        </table>
      </div>
    </div>
  </div>
</div>
</body>
</html>
@endsection
This loops through all entries and displays them. It also includes the button to get to the individual edit page and a button for deletion.
entries/edit.blade.php
Open up entries/edit.blade.php and paste in:
@section('title', 'Edit entry')
@extends('layout')

@section('content')

<div class="mt-10 sm:mt-0">
  <div class="md:grid md:grid-cols-3 md:gap-2">
    <div class="md:col-span-1">
      <div class="px-4 sm:px-0">
        <h3 class="text-lg font-medium text-dark">Edit your mood entry</h3>
        <p class="mt-1 text-sm text-gray-600">
          How are you feeling?
        </p>
      </div>
    </div>
    <div class="mt-5 md:mt-0 md:col-span-2">
      <form action="{{ route('entries.update', $entry->id) }}" method="POST">
      @csrf
      @method('PATCH')
        <div class="shadow overflow-hidden sm:rounded-md">
          <div class="px-4 py-5 bg-white sm:p-6">
            <div class="grid grid-cols-6 gap-6">
              <div class="col-span-6 sm:col-span-3">
                <label for="date" class="block text-sm font-medium text-gray-700">Date</label>

                <input type="text" name="date" id="date" value="{{ $entry->date }}" class="mt-1 focus:ring-indigo-500 focus:border-indigo-500 block w-full shadow-sm sm:text-sm border-gray-300 rounded-md py-2 px-3">
                <span class="text-gray-400 text-xs">Date must be in format YYYY-MM-DD</span>
              </div>

              <div class="col-span-6 sm:col-span-3">
                <label for="mood" class="block text-sm font-medium text-gray-700">Mood</label>
                <select id="mood_id" name="mood_id" class="mt-1 block w-full py-2 px-3 border border-gray-300 bg-white rounded-md shadow-sm focus:outline-none focus:ring-indigo-500 focus:border-indigo-500 sm:text-sm">
                    @foreach ($moods as $mood)
                      <option
                        value="{{ $mood->id }}"
                        {{ ( $mood->name == $entry->mood->name) ? 'selected' : '' }} >
                        {{ $mood->name }}
                      </option>
                    @endforeach
                </select>
              </div>
              <div class="col-span-6">
                <label for="notes" class="block text-sm font-medium text-gray-700">Notes</label>
                <textarea name="notes" id="notes" rows="6" class="mt-1 p-3 focus:ring-indigo-500 focus:border-indigo-500 block w-full shadow-sm sm:text-sm border-gray-300 rounded-md">{{ $entry->notes }}</textarea>
              </div>
            </div>
            @if ($errors->any())
            <div class="bg-red-100 border border-red-400 mt-8 text-red-700 px-4 py-3 rounded relative" role="alert">
              <strong class="font-semibold">Please fix the following issues with your input:</strong>
                <ul>
                  @foreach ($errors->all() as $error)
                    <li>{{ $error }}</li>
                  @endforeach
                </ul>
            </div>
            @endif
          </div>

          <div class="px-4 py-3 bg-gray-50 text-right sm:px-6">
            <button type="submit" class="inline-flex justify-center py-2 px-4 border border-transparent shadow-sm text-sm font-medium rounded-md text-light bg-indigo-600 hover:bg-indigo-700 focus:outline-none focus:ring-2 focus:ring-offset-2 focus:ring-indigo-500">
              Update
            </button>
          </div>
        </div>
      </form>
    </div>
  </div>
</div>
@error('title')
    <div class="alert alert-danger">{{ $message }}</div>
@enderror
</body>
</html>
@endsection
Since the resource controller uses PATCH, you're using a hidden PATCH method on the form with @method('PATCH').
You're also validating this input on the backend in EntryController.php, so if the input is invalid, the error messages are displayed here with {{ $error }}.
Another thing to note is this view needs to show the existing entry that’s being updated, so you're setting the value for each input with the entry data that’s passed in from the database.
entries/create.blade.php
Next, update the view used to create a new entry. Open up entries/create.blade.php and paste in the following:
@section('title', 'New entry')
@extends('layout')

@section('content')

<div class="mt-10 sm:mt-0">
  <div class="md:grid md:grid-cols-3 md:gap-6">
    <div class="md:col-span-1">
      <div class="px-4 sm:px-0">
        <h3 class="text-lg font-medium text-dark">Create a new entry</h3>
        <p class="mt-1 text-sm text-gray-600">
          How are you feeling today?
        </p>
      </div>
    </div>
    <div class="mt-5 md:mt-0 md:col-span-2">
      <form action="{{ route('entries.store') }}" method="POST">
      @csrf
        <div class="shadow overflow-hidden sm:rounded-md">
          <div class="px-4 py-5 bg-white sm:p-6">
            <div class="grid grid-cols-6 gap-6">
              <div class="col-span-6 sm:col-span-3">
                <label for="date" class="block text-sm font-medium text-gray-700">Date</label>
                <input type="text" name="date" id="date" placeholder="2021-12-05" class="mt-1 focus:ring-indigo-500 focus:border-indigo-500 block w-full shadow-sm sm:text-sm border-gray-300 rounded-md py-2 px-3">
              </div>

              <div class="col-span-6 sm:col-span-3">
                <label for="mood" class="block text-sm font-medium text-gray-700">Mood</label>
                <select id="mood_id" name="mood_id" class="mt-1 block w-full py-2 px-3 border border-gray-300 bg-white rounded-md shadow-sm focus:outline-none focus:ring-indigo-500 focus:border-indigo-500 sm:text-sm">
                    @foreach ($moods as $mood)
                      <option value="{{ $mood->id }}">{{ $mood->name }}</option>
                    @endforeach
                </select>
              </div>
              <div class="col-span-6">
                <label for="notes" class="block text-sm font-medium text-gray-700">Notes</label>
                <textarea name="notes" id="notes" class="mt-1 px-3 py-3 focus:ring-indigo-500 focus:border-indigo-500 block w-full shadow-sm sm:text-sm border-gray-300 rounded-md"></textarea>
              </div>
            </div>
            @if ($errors->any())
            <div class="bg-red-100 border border-red-400 mt-8 text-red-700 px-4 py-3 rounded relative" role="alert">
              <strong class="font-semibold">Please fix the following issues with your input:</strong>
                <ul>
                  @foreach ($errors->all() as $error)
                    <li>{{ $error }}</li>
                  @endforeach
                </ul>
            </div>
            @endif
          </div>
          <div class="px-4 py-3 bg-gray-50 text-right sm:px-6">
            <button type="submit" class="inline-flex justify-center py-2 px-4 border border-transparent shadow-sm text-sm font-medium rounded-md text-light bg-indigo-600 hover:bg-indigo-700 focus:outline-none focus:ring-2 focus:ring-offset-2 focus:ring-indigo-500">
              Create
            </button>
          </div>
        </div>
      </form>
    </div>
  </div>
</div>
</body>
</html>
@endsection
This is similar to the edit view, but without any existing data being pulled in. You can even get crafty and consolidate the two views, but I personally prefer to keep them separate so that it’s easier to read.
entries/show.blade.php
Finally, create the view that’s used to display a single entry. Open up entries/show.blade.php and paste in:
@section('title', 'Entry')
@extends('layout')

@section('content')

<div class="bg-white shadow overflow-hidden sm:rounded-lg">
  <div class="px-4 py-5 sm:px-6">
    <h3 class="text-lg font-medium text-dark">
      Entry
    </h3>
    <a href="/entries/{{ $entry->id }}/edit" class="text-gray-400 text-xs text-right">Edit</a>
  </div>
  <div class="border-t border-gray-200">
    <dl>
      <div class="bg-gray-50 px-4 py-5 sm:grid sm:grid-cols-3 sm:gap-4 sm:px-6">
        <dt class="text-sm font-medium text-secondary">
          Date
        </dt>
        <dd class="mt-1 text-sm text-dark sm:mt-0 sm:col-span-2">
            {{ \Carbon\Carbon::parse($entry->date)->format('M d, Y') }}
        </dd>
      </div>
      <div class="bg-white px-4 py-5 sm:grid sm:grid-cols-3 sm:gap-4 sm:px-6">
        <dt class="text-sm font-medium text-secondary">
            Mood
        </dt>
        <dd class="mt-1 text-sm text-dark sm:mt-0 sm:col-span-2">
            {{ $entry->mood->name }}
        </dd>
      </div>
      <div class="bg-gray-50 px-4 py-5 sm:grid sm:grid-cols-3 sm:gap-4 sm:px-6">
        <dt class="text-sm font-medium text-secondary">
            Notes
        </dt>
        <dd class="mt-1 text-sm text-dark sm:mt-0 sm:col-span-2">
            {{ $entry->notes }}
        </dd>
      </div>
    </dl>
  </div>
</div>
</body>
</html>
@endsection
Mood views
The views for creating, updating, and displaying the moods are almost identical to those for entries, so you copy them in straight from the final repo. You can find the code for them in this section on the GitHub repository.
Add, update, and delete data
Your application is now complete and ready to play with! Let’s test it out.
Make sure you still have everything running:
- Start the PHP server:
php artisan serve
- Run the build process for Tailwind:
npm run watch
- Navigate to
http://localhost:8000to view your app.
Add an entry
Click on the "New entry" button at the top right and fill out the form. Try to choose a date that’s already been taken or leave the required mood field blank and you’ll get a validation error, as expected. Once you submit a valid entry, you’ll be taken back to the entries index page where you’ll see the entry listed.
You can also click the "Edit" button to modify an entry, or the "Delete" button to get rid of one. This sample app doesn’t have a delete confirmation built in, so don’t click unless you're sure you want to delete it!
Deploy development database branch to production
PlanetScale offers branching capabilities, similar to the Git model. When you started working on this application, you created a development branch off of the main production branch. You’ve spent this whole time working in that development database branch, making schema changes as needed. But that production database branch is still empty.
So the next step is to merge this development branch into production. You do this by opening a PlanetScale deploy request (similar to a GitHub pull request). You can view your schema diff here and PlanetScale will check to make sure there are no merge conflicts.
Once everything is good, you can deploy the changes straight to production with zero downtime. It’s really that simple!
Let’s create a deploy request and merge this dev branch into production.
Create a deploy request
In your PlanetScale dashboard, select the database, click "Branches", and select the dev branch. On the Overview page, you’ll see the Deploy Request form. Make sure "Deploy to" is set to main. Write a comment to go with your deploy request, and then click "Create deploy request".
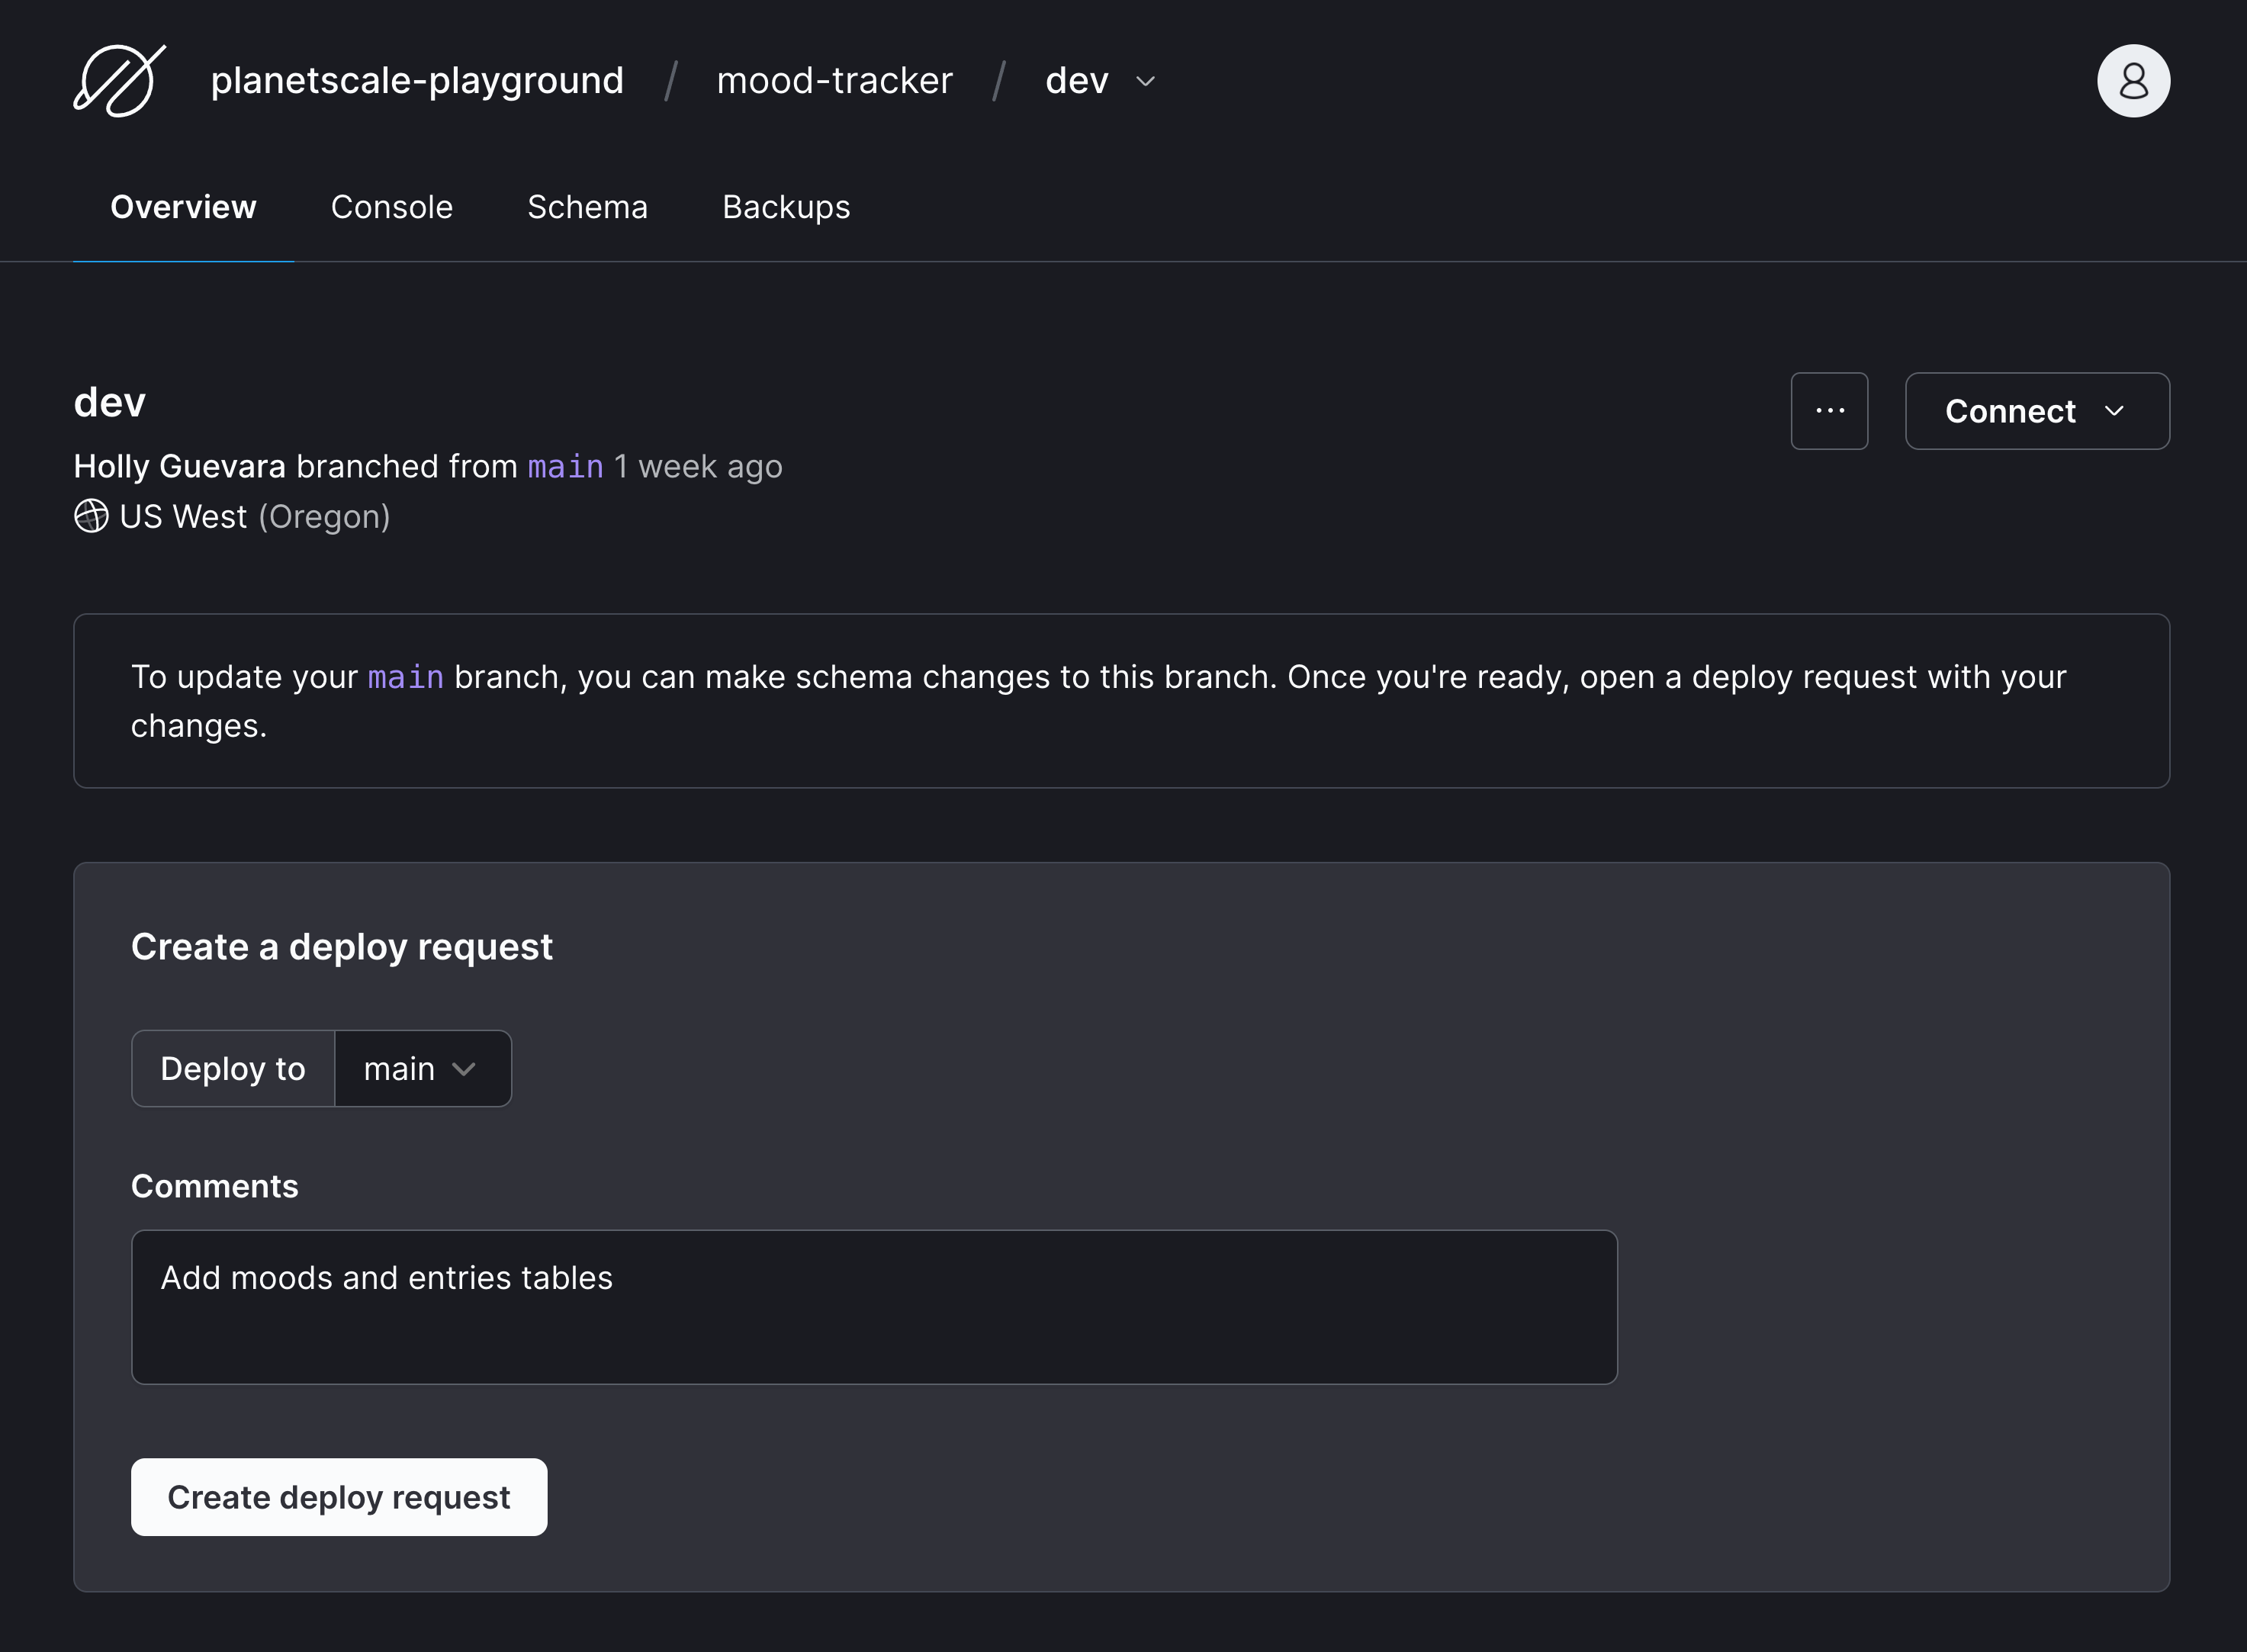
Once created, you’ll see a schema diff under "Schema changes" that shows you exactly what changes this deploy request will introduce if merged. This allows you and/or your team to carefully review schema changes before pushing them to production.
Deploy schema changes to production
Once the changes are approved, it’s time to merge the deploy request.
Click "Add changes to the deploy queue". As the changes are deploying, you’ll see the deployment progress for each table. One really cool feature to note here is that these schema changes are being updated with zero downtime or locking. The branching feature allows PlanetScale to offer non-blocking schema changes, so your production application will continue to work seamlessly as these changes are deployed. PlanetScale is handling it all in the background.
You can now go to your main branch, click "Schema", and you’ll see the schema you just created in development now live in production!
Recap
If you’ve reached the end, congratulations! You should have a working mood tracker application complete with all CRUD functionality and a production MySQL database.
Throughout the tutorial, you learned how to:
- Create Laravel 9 controllers, models, migrations, factories, and seeders
- Create Laravel forms
- Validate input from Laravel forms
- Work with Laravel Eloquent ORM
- Connect your Laravel application to a MySQL database
- Create PlanetScale deploy requests
Please let me know if you have any questions! You can find me on Twitter at @hollylawly. Thanks for reading!