Yo, I heard you liked databases, so we put logical databases in your database cluster so you can database while you database
The goal
Say we want to run multiple applications with distinct schemas. Let's start with two classic side project app ideas: a blog and a to-do list.
PlanetScale Postgres clusters start at $5/month, but this doesn't mean you have to create a new one for every new app idea. A single database cluster can contain many logical databases.
However, orchestrating logical databases and the roles that connect to them gets complicated fast. We can automate away the complexity, but let's first understand how they work.
Note
Running multiple small applications from a single database cluster is great for spikes and side projects. When you need to scale an application to thousands of users, it's best to use dedicated Postgres clusters.
Definitions
- Database cluster: The shared Postgres instance (compute, storage, connection endpoint) of a single branch. Apps connect to the cluster via a connection string.
- Branch: An isolated Postgres environment inside that cluster (e.g.
main). Connection credentials are scoped to a branch. Role usernames include the branch's ID (e.g.<role-id>.<branch-id>). - Logical database: A named Postgres database within a cluster (e.g.
blog,todo) with its own schema and data. Logical databases share the branch's compute, storage, and connection limits. - Role: A unit of access control: a username, password, and permissions.
About logical databases
A new managed Postgres instance likely already contains a few logical databases, primarily for administration. In a fresh PlanetScale Postgres database, you may see multiple logical databases owned by pscale_admin and pscale_superuser.
If you're using pgcli, you can list all logical databases with \l, the output should look something like this:
pg> \l

+------------------+------------------+----------+-------------+-------------+---------------------------------------+
| Name             | Owner            | Encoding | Collate     | Ctype       | Access privileges                     |
|------------------+------------------+----------+-------------+-------------+---------------------------------------|
| postgres         | postgres         | UTF8     | en_US.UTF-8 | en_US.UTF-8 | postgres=CTc/postgres                 |
|                  |                  |          |             |             | pscale_api_ecr2xwwa8rhj=c/postgres    |
| pscale_admin     | pscale_admin     | UTF8     | en_US.UTF-8 | en_US.UTF-8 | =Tc/pscale_admin                      |
|                  |                  |          |             |             | pscale_admin=CTc/pscale_admin         |
| pscale_exporter  | pscale_admin     | UTF8     | en_US.UTF-8 | en_US.UTF-8 | =Tc/pscale_admin                      |
|                  |                  |          |             |             | pscale_admin=CTc/pscale_admin         |
|                  |                  |          |             |             | pscale_exporter=c/pscale_admin        |
| pscale_pgbouncer | pscale_admin     | UTF8     | en_US.UTF-8 | en_US.UTF-8 | <null>                                |
| template0        | pscale_admin     | UTF8     | en_US.UTF-8 | en_US.UTF-8 | =c/pscale_admin                       |
|                  |                  |          |             |             | pscale_admin=CTc/pscale_admin         |
| template1        | pscale_superuser | UTF8     | en_US.UTF-8 | en_US.UTF-8 | =c/pscale_superuser                   |
|                  |                  |          |             |             | pscale_superuser=CTc/pscale_superuser |
+------------------+------------------+----------+-------------+-------------+---------------------------------------+
These other logical databases can be safely ignored. Typically, you'll only interact with the postgres database, which has the postgres owner.
Creating more logical databases in a cluster is straightforward, but the permission structure of Postgres makes isolating access to them a little difficult.
Creating logical databases
You will need to connect to and work "inside" the database cluster to create logical databases. It is not done at the platform level.
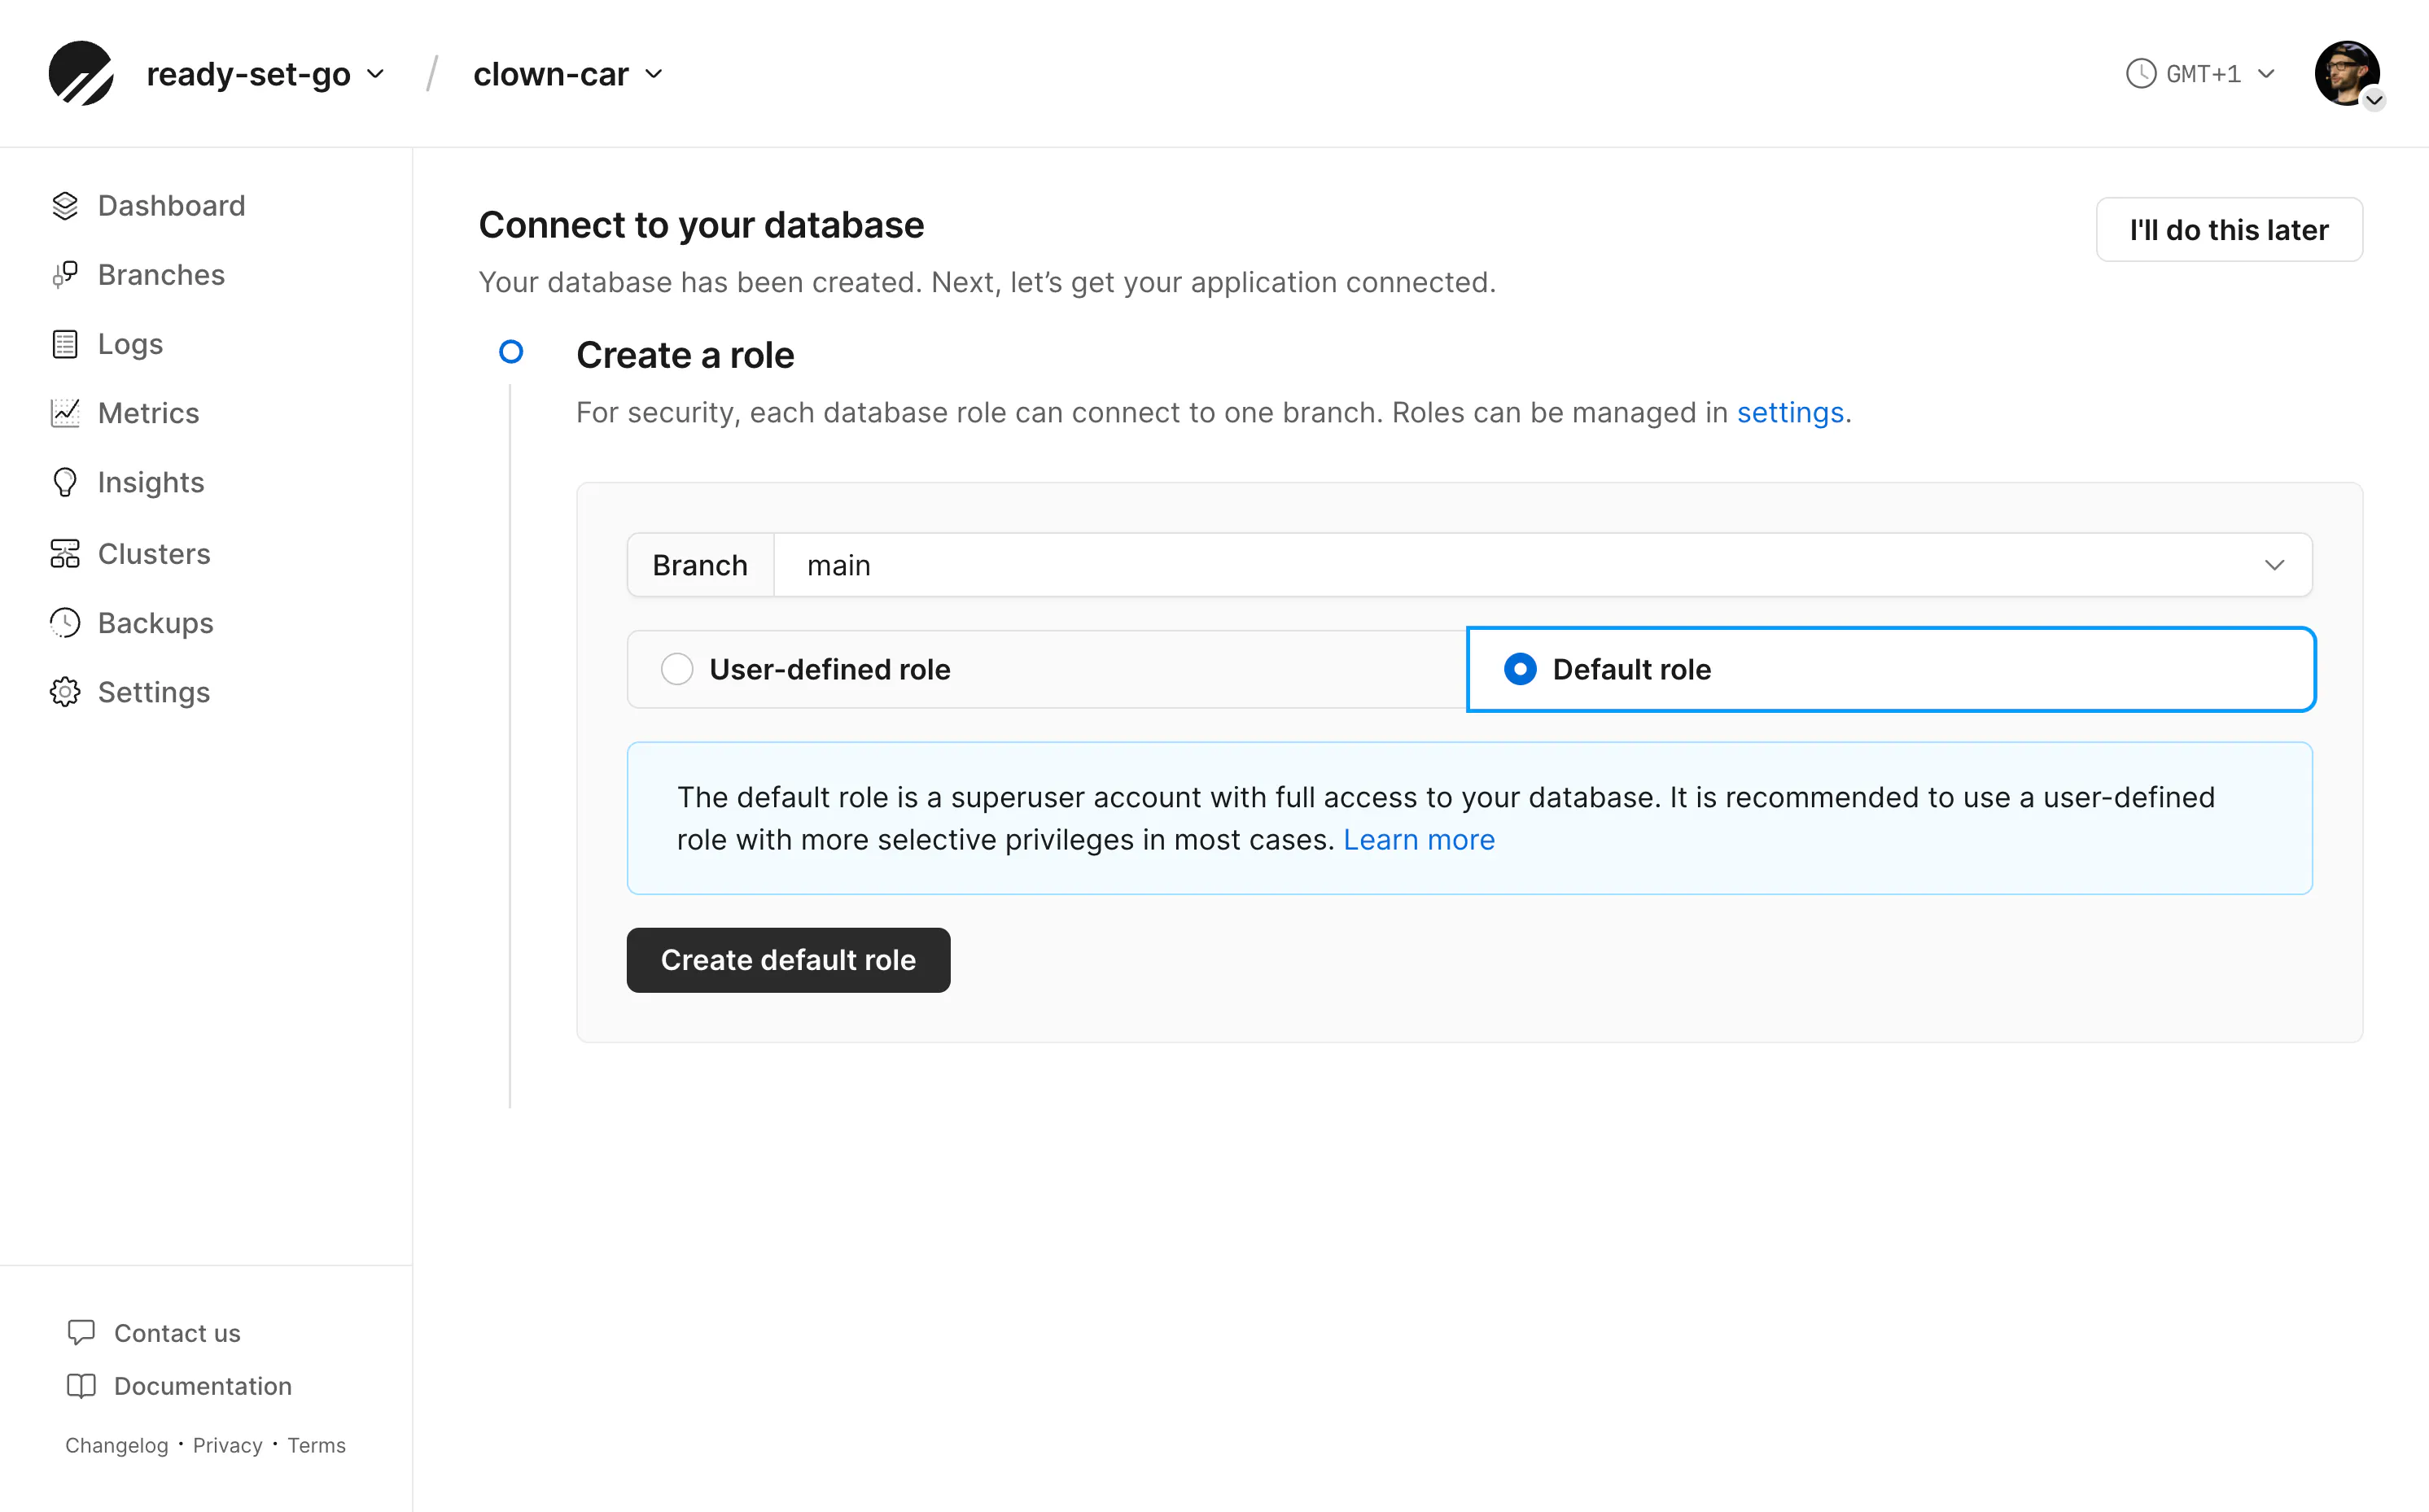
After creating a new database cluster in the PlanetScale dashboard, you'll need to create a role to connect to it. The "default role" has full privileges and is ideal for the following steps.
While connected with a role with the postgres permissions, create the logical databases.
CREATE DATABASE blog;
CREATE DATABASE todo;
Revoke logical database permissions
By default, any current and future role can CONNECT to new logical databases. If we want the blog and todo logical databases to be isolated from one another, we'll need to revoke these permissions.
In Postgres, PUBLIC is a special keyword that represents every existing and future role in the cluster. (Not to be confused with public, the default schema in a Postgres database, naming things is hard.)
Running the snippet below will remove CONNECT access from PUBLIC for the default postgres logical database and then grant it to the administrator's role.
REVOKE CONNECT ON DATABASE blog     FROM PUBLIC;
REVOKE CONNECT ON DATABASE todo     FROM PUBLIC;
REVOKE CONNECT ON DATABASE postgres FROM PUBLIC;

-- Put the default role back on postgres only
GRANT CONNECT ON DATABASE postgres TO postgres;
About roles
The default role you created earlier is useful for administrative actions but should not be used by individual applications.
Instead, you should create distinct roles, for distinct actions, in distinct applications. Granting only what each connection requires, following the principle of least privilege.
Creating roles in PlanetScale Postgres is best done "outside" the database on the platform level in the dashboard, the pscale CLI, or the PlanetScale API.
Creating roles
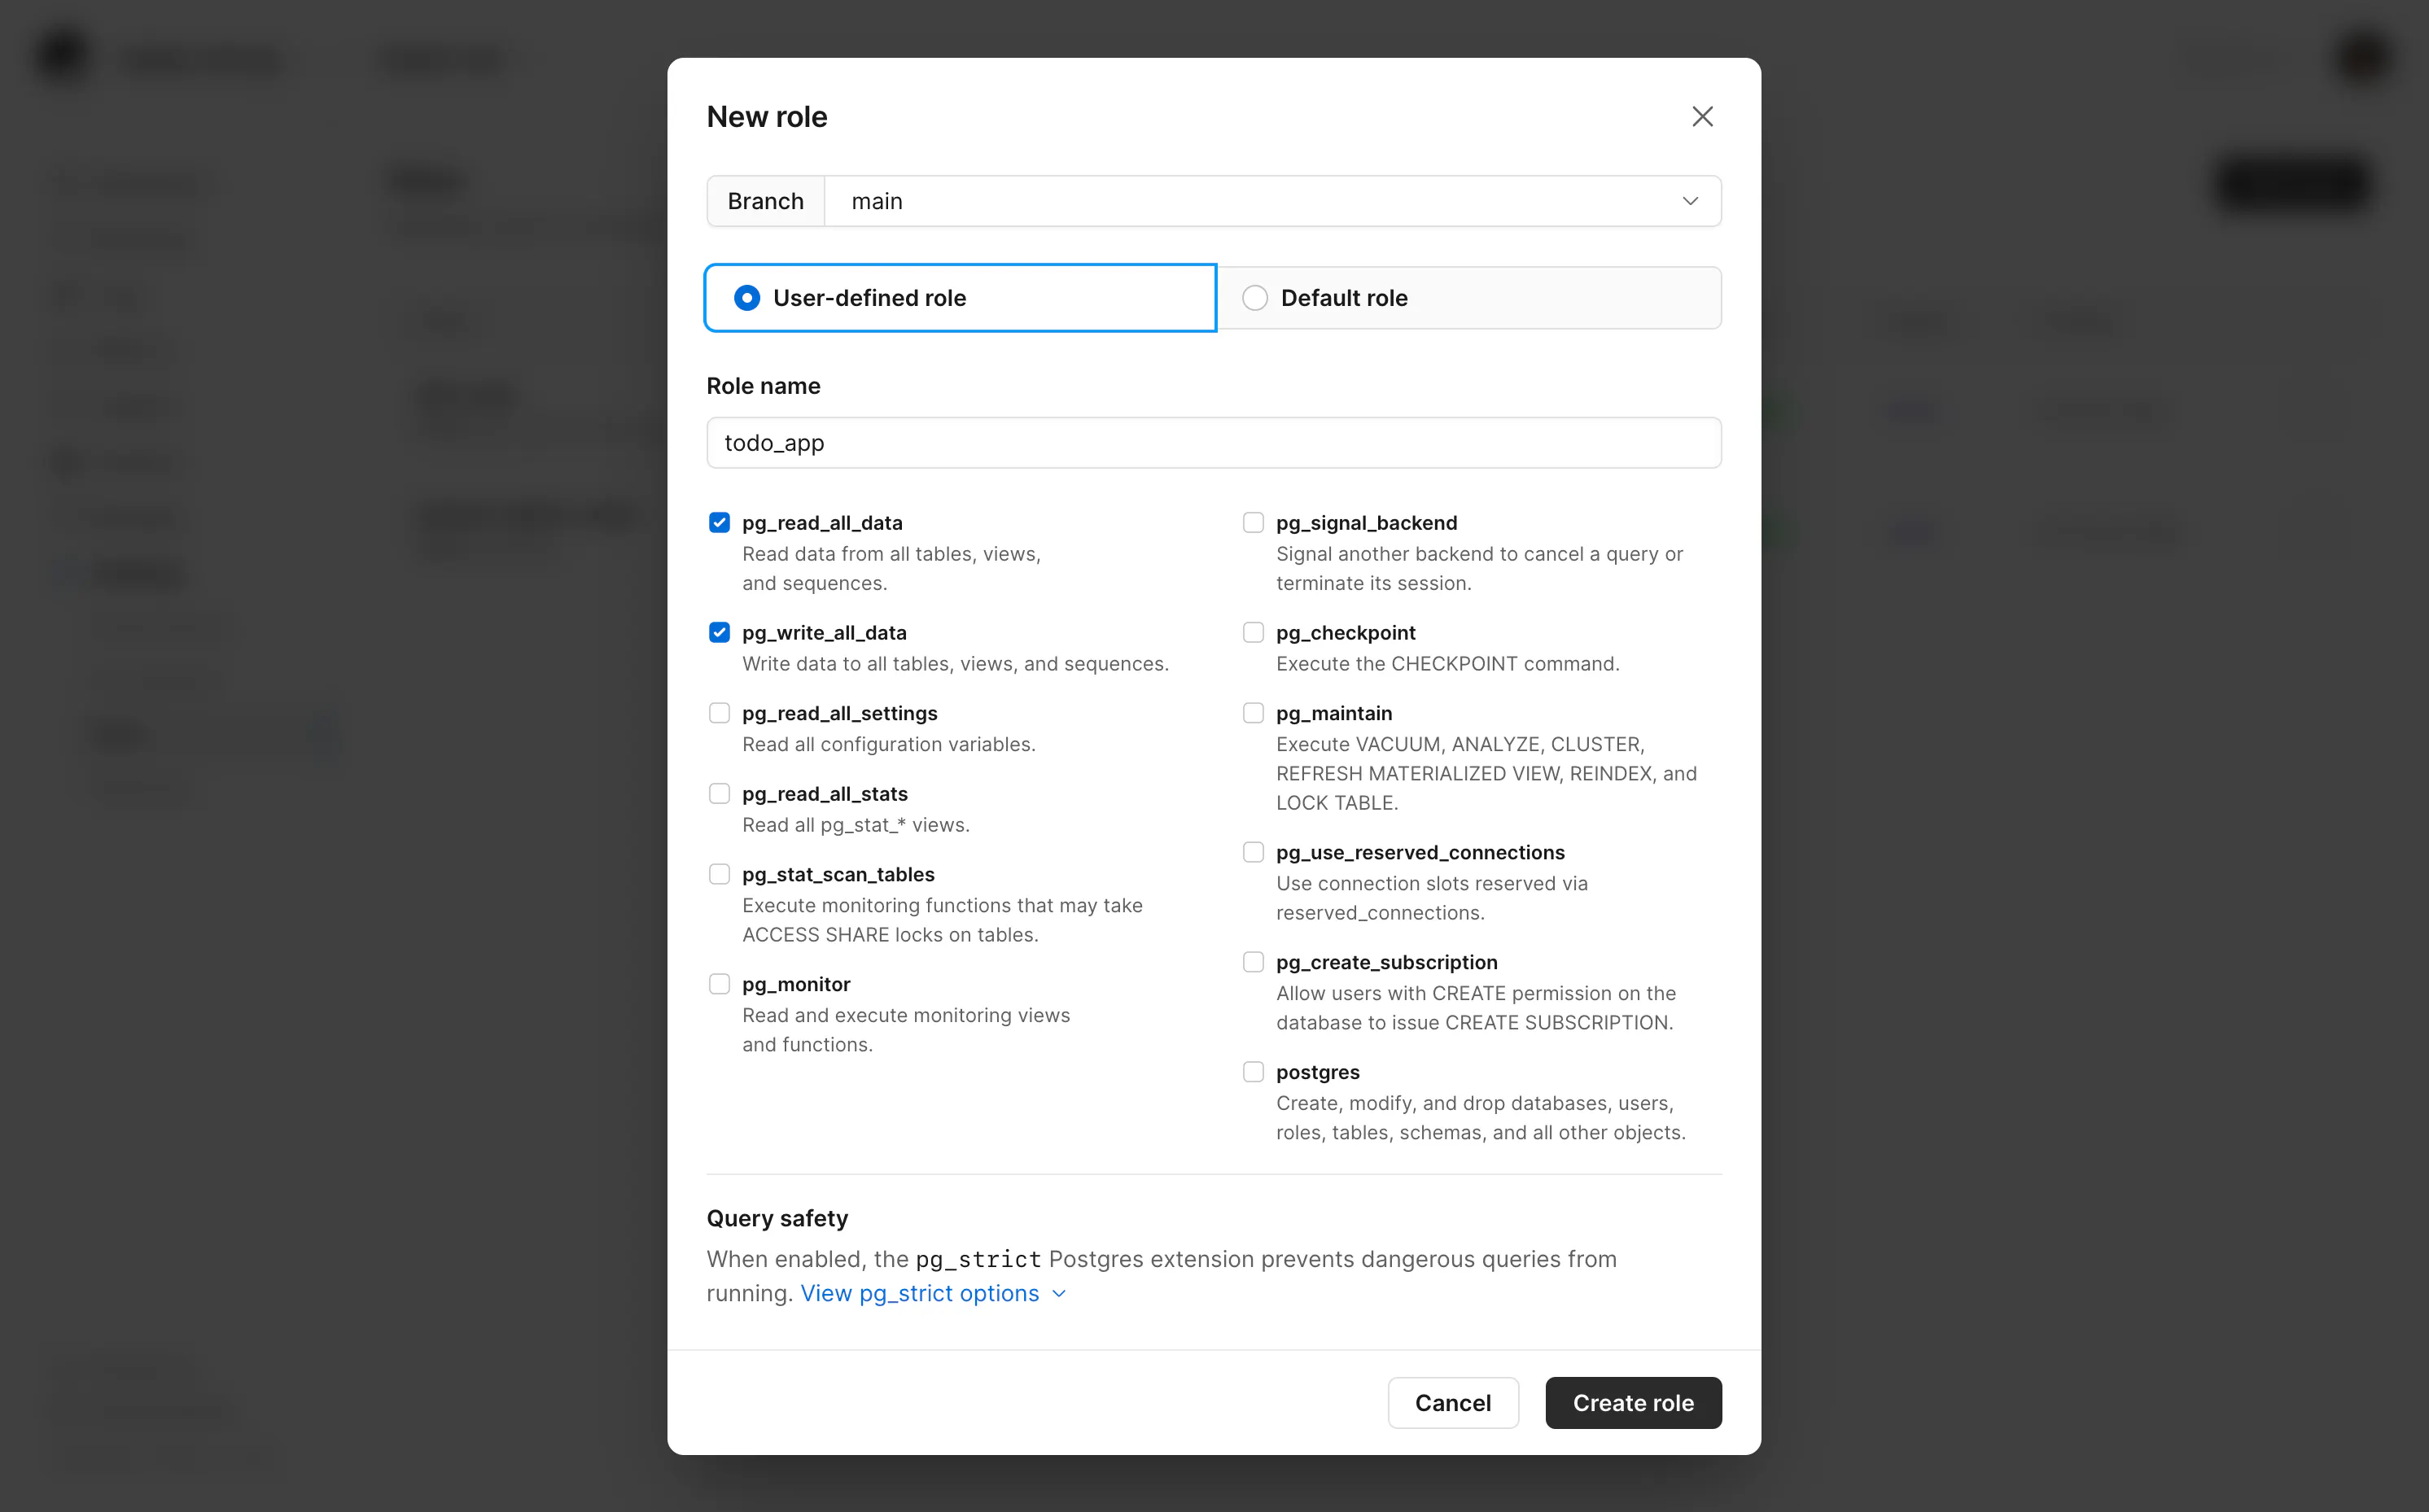
Let's create a role for each logical database named blog_app and todo_app.
The permissions you choose when creating a role, like pg_read_all_data and pg_write_all_data, apply to the database cluster. There's no option upon creation to scope permissions to a logical database.
These permissions also only cover data access, not schema changes. To allow a role to create or alter tables, you grant CREATE on the database and schema in SQL and you can limit those grants to a single logical database.
Note
While you enter a name when creating a role in the PlanetScale dashboard, CLI, and API, this is not used inside the database. A username is generated for the role and follows a <role-id>.<branch-id> naming convention and is used to connect to the database. Only the <role-id> is used within the database to reference that role.
Grant permissions
Finally, grant each role access to only its own logical database.
CONNECTcontrols which database the role can open.CREATEon the database and schema controls where it can run migrations.
-- blog_app: connect and migrate within blog only
GRANT CONNECT ON DATABASE blog TO <blog_app-role-id>;
GRANT CREATE ON DATABASE blog TO <blog_app-role-id>;
GRANT CREATE, USAGE ON SCHEMA public TO <blog_app-role-id>;

-- todo_app: same pattern for todo
GRANT CONNECT ON DATABASE todo TO <todo_app-role-id>;
GRANT CREATE ON DATABASE todo TO <todo_app-role-id>;
GRANT CREATE, USAGE ON SCHEMA public TO <todo_app-role-id>;
Note
To keep this tutorial short we're only creating a single role for read, write and schema migration access. For tighter security you should split responsibilities into separate roles, e.g. an app reader, an app writer, and an app migrator, each with its own connection string and grants.
Speeding up the process
The steps above were ordered in sequence for clarity. If you created the roles first, you could have run all the SQL statements in a single operation.
But now you can see how Postgres' permission model, public CONNECT on new databases by default and cluster-wide permissions make maintaining logical databases and roles difficult.
So now you know what needs to be done. Let's look at a simpler way to do it.
Automating logical database and role pairs
Instead of "click ops" (infrastructure configuration performed by manual actions) let's convert our clown-car database to "infrastructure as code" (IaC, configuration files that can spin up the desired state on-demand).
Here are a few options for automating the process:
- Terraform is the most standard choice for long-lived infrastructure. PlanetScale's provider can manage Postgres branches and roles. It is an excellent choice when this pattern becomes organization-owned production infrastructure.
- Pulumi gives us a similar provider-driven model while letting us write the workflow in TypeScript. The PlanetScale provider can be installed as a local package from our Terraform provider.
- SST is a good fit when PlanetScale credentials need to be linked into SST-managed applications, functions, or preview environments. For this tutorial's database-level
CONNECTisolation, you would still need separate SQL automation. - Alchemy is another choice using TypeScript and Effect. It offers a direct integration with PlanetScale. The logical database and grant-management layer we're going for would require additional custom code.
No matter which tool you choose, the split stays the same: roles are created through PlanetScale's API, while logical databases, CONNECT isolation, and DDL grants are managed inside Postgres.
The added benefit of using one of these infrastructure-as-code platforms is the ability to extend them. For example, configuring Cloudflare Workers and Hyperdrive connections as part of the same setup.
For this blog, we'll use Pulumi with the PlanetScale provider.
Note
You could just give this blog post to your agent and have it set up the following for you. Or ask it to achieve the same goals but in one of the alternative IaC tools mentioned above. The point of this blog is to explain the thinking behind this approach and any PlanetScale Postgres-specific implementation details.
Prepare your database cluster
Once you've created a new database cluster on PlanetScale, make a note of your organization, database, and branch names. These are mine for example:
- Organization: "ready-set-go"
- Database: "clown-car"
- Branch: "main"
It's also handy to add these to the AGENTS.md file in your project when using the PlanetScale MCP server.
Create a service token
Since Pulumi is going to be creating roles (an action that occurs on PlanetScale outside of the database cluster) it will need to be authenticated with a service token. Creating logical databases and applying GRANT/REVOKE statements requires a Postgres connection. The Pulumi stack creates its own bootstrap role for that, using credentials returned from the PlanetScale API.
You can create a new token by clicking on "Settings" in the PlanetScale dashboard, clicking the settings of your organization, then clicking "Service tokens."
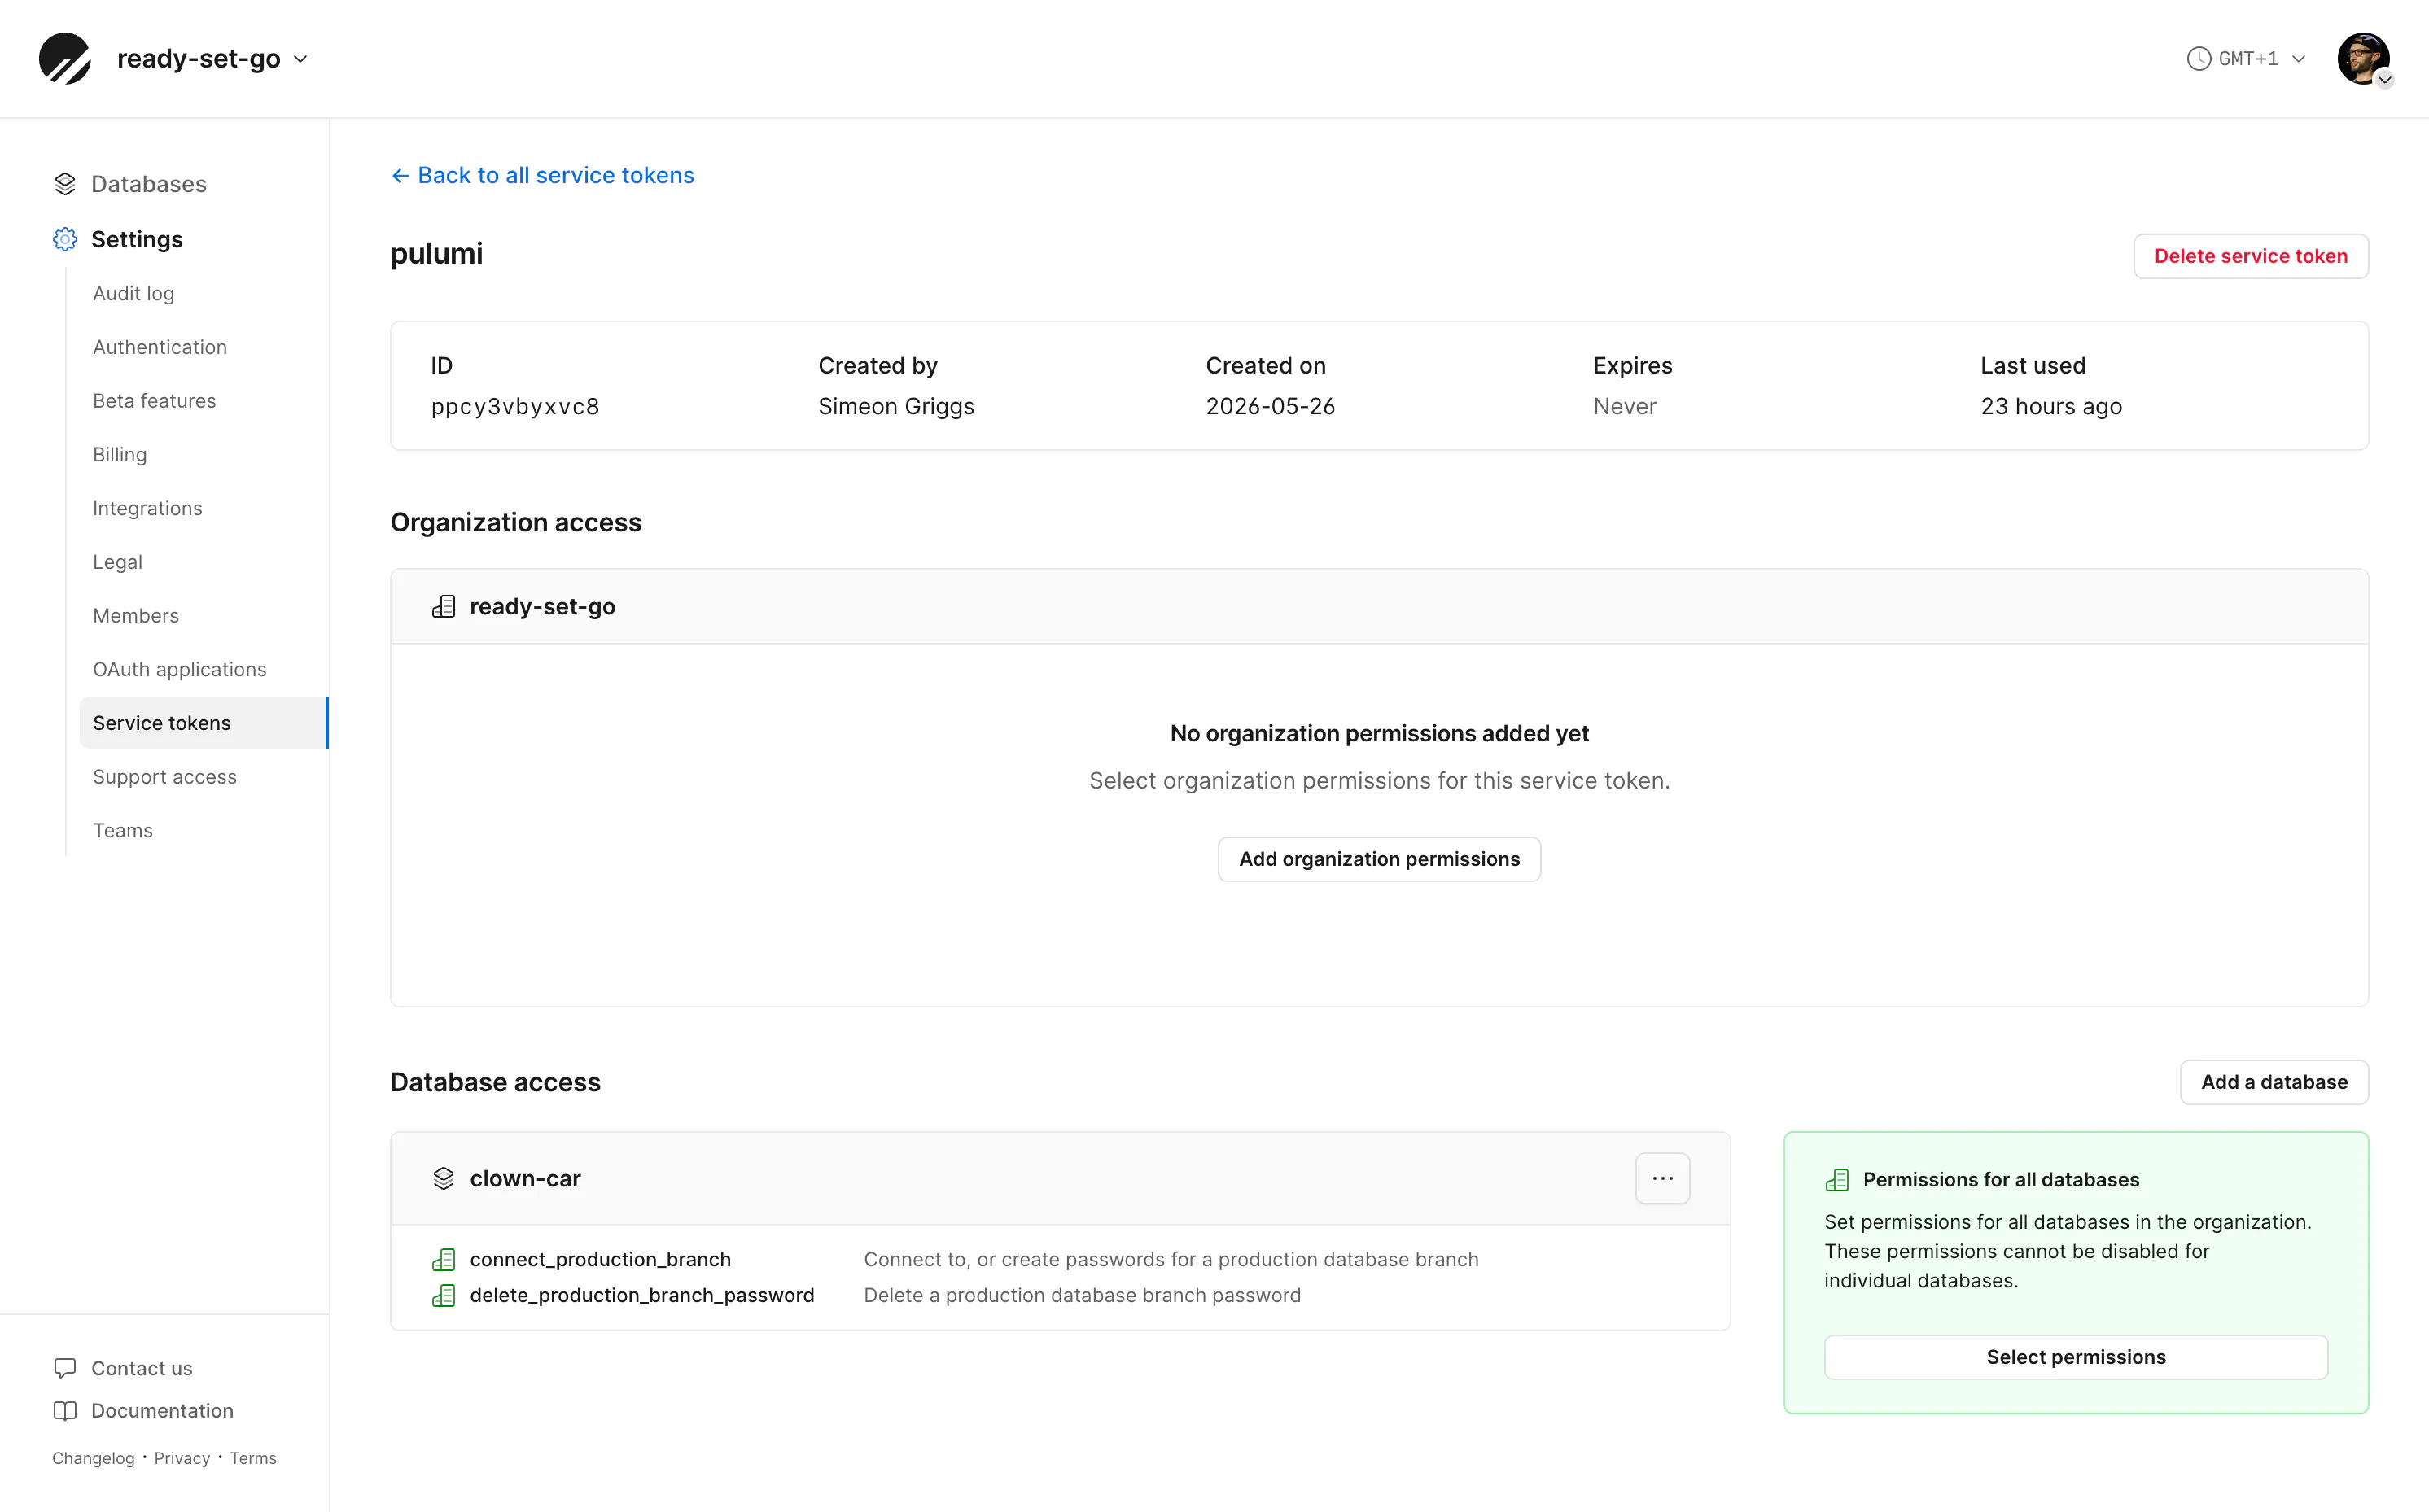
Once created, you will need to edit the token's permissions to give it access to the database you've noted above, and grant the following:
connect_production_branch(to create roles)delete_production_branch_password(to delete roles)
Alternatively, you can create a new token using the PlanetScale CLI. The snippet below creates a token named "pulumi".
pscale service-token create --name pulumi
The response will show the token's ID and value. Make a note of the value for the steps below, and use the token's ID (and not the token's name) when adding permissions to the service token, like so:
pscale service-token add-access <token-id> connect_production_branch delete_production_branch_password --database clown-car
Initialize Pulumi
Install the Pulumi CLI using the instructions in their documentation.
brew install pulumi/tap/pulumi
All the code for this blog is available in the tutorial-pulumi repository. You can either clone it locally or follow the instructions below.
Run the following to create a new, blank TypeScript-based Pulumi project.
mkdir tutorial-clown-car && cd tutorial-clown-car
pulumi new typescript --name tutorial-clown-car --stack clown-car
The default installation may contain boilerplate code in the index.ts file, which you can safely ignore or remove.
If you did not install dependencies in the step above, ensure they're done now:
npm install
You'll also need to add the PlanetScale provider (which generates a local SDK from our Terraform provider) and install the PostgreSQL provider.
pulumi package add terraform-provider planetscale/planetscale
npm install @pulumi/postgresql
Configure the stack
Now, using the PlanetScale details and credentials noted earlier, add configuration values to the Pulumi stack.
pulumi config set organization "ready-set-go"
pulumi config set clusterName "clown-car"
pulumi config set branch "main"
pulumi config set importBranch true
pulumi config set --secret planetScaleServiceToken "pscale_tkn_..."
pulumi config set --plaintext planetScaleServiceTokenId "p..."
importBranch true ensures that Pulumi will not try to create a branch but instead use the existing one. Leveraging branches is out of scope for this tutorial, just be aware if you want Pulumi to additionally create and manage branches you will also need to set a clusterSize configuration value.
Build the program
The example repository contains four specific files that create our desired outcome. You'll need to copy these to your project.
lib/services.tsdefines the logical databases and roles.lib/connection.tsoutputs connection strings in the correct format.lib/planetscale.tscontains a helper function for working with PlanetScale role names.index.tsthe root file that creates the infrastructure.
Test and deploy
You can now confirm your project is set up correctly by running the following:
pulumi preview
This will step through the setup process, and you will see the same steps we detailed earlier happening automatically. Creating databases, granting and revoking access, and applying DDL grants.
The preview command is just a dry run. To take action on the database, we need to run:
pulumi up
With a successful deploy, you can now generate connection strings for each logical database and its distinct roles' username and password.
Per-database connections
Run the following to output connection strings for each logical database, along with nice formatting.
pulumi stack output apps --show-secrets | jq -C .
You should receive a response like this:
{
  "blog": {
    "direct": "postgresql://pscale_api_...",
    "pooled": "postgresql://pscale_api_..."
  },
  "todo": {
    "direct": "postgresql://pscale_api_...",
    "pooled": "postgresql://pscale_api_..."
  }
}
The connection string URLs default to their logical database name in the pathname (/blog and /todo). Use the "direct" URL for schema migrations and writes and the "pooled" URL for runtime application traffic.
Use the direct URL, connect to the blog logical database with the blog_app role and run the following to attempt to connect to the other logical databases. It should fail.
\c blog      # OK
\c todo      # fail
\c postgres  # fail
Packing the car
Say you've just had a great idea to create an online store. This should now be as simple as adding the new database name to services.ts
// lib/services.ts

export const appDatabases: string[] = [
    "blog",
    "todo",
    // 👇 new database
    "shop"
];
Deploying the stack again:
pulumi up
Where you'll see confirmation that new resources need to be created:
Resources:
    + 10 to create
    16 unchanged
Upon completion, you can reveal the connection strings again and see the set for the new "shop" logical database and its role.
The inverse is also true: removing a logical database and its role is as simple as removing it from the appDatabases array and deploying the stack again.
Schema and migrations
While Pulumi manages logical databases, roles, and grants, your applications own schema definitions and migration files.
Each app's role already has the DDL grants it needs, so your migration tool, for example Drizzle, connects with the same credential from within your application and runs against its own logical database.
Note
For side projects, one role per app keeps connection strings and deployment config simple. If you outgrow that, create dedicated roles for specific actions. For example, an app reader (pg_read_all_data only), an app writer (pg_read_all_data + pg_write_all_data), and an app migrator (CREATE grants, no write-all-data).
Conclusion
Automating laborious maintenance tasks, such as creating logical databases and roles, is a great way to free up time to focus on problem-solving.
The IaC foundation you've now built could be extended to include other application infrastructure, like application hosting, queues, and notifications.
Now you can add new logical databases and role pairs on the same cluster on demand — each app walled off from its neighbors, migrations included. What will you build next?
Thank you to Jacob Hands for the original inspiration for this blog post.