> ## Documentation Index
> Fetch the complete documentation index at: https://planetscale.com/docs/llms.txt
> Use this file to discover all available pages before exploring further.
# PlanetScale Vitess quickstart guide
export const VimeoEmbed = ({id, title}) => {
return
;
};
PlanetScale supports both Vitess and [Postgres](/postgres/tutorials/planetscale-postgres-quickstart) databases. This guide covers getting started with a Vitess database.
## Overview
The following guide will show you how to:
* Create a database with PlanetScale
* Make a schema change
* Insert data
* Promote your database branch to production
If you already have your PlanetScale database set up, you may find the [Connecting your application](/vitess/tutorials/connect-any-application) or [Branching](/vitess/schema-changes/branching) guides more helpful.
This guide is split up so that you can either follow it in the [PlanetScale dashboard](#getting-started-%E2%80%94-planetscale-dashboard) or using the [PlanetScale CLI](#getting-started-%E2%80%94-planetscale-cli).
## Getting started — PlanetScale dashboard
You'll need [a PlanetScale account](https://auth.planetscale.com/sign-up) to complete this guide.
### Create a database
Follow these steps to create a database:
Click "**New database**" > "**Create a database**" on your organization's overview page.
Name your database.
Select a [region](/vitess/regions). For the lowest latency, select a region near you or your application's hosting location.
Select the desired [cluster and storage size](/planetscale-plans#base-plan) for your database.
Enter a valid credit or debit card.
Finally, click the "**Create database**" button to deploy your database.
Your database is created with a [**default production branch**](/vitess/schema-changes/branching), `main`, which you will use to apply a schema change and insert data. While this is just the first branch we create for you, you can always create new development branches (isolated copies of the production schema) off of production to use for development.
### Add a schema to your database
This quickstart demonstrates how to create and use two relational tables: `categories` and `products`.
By default, web console access to production branches is disabled to prevent accidental deletion. From your database's dashboard page, click on the "**Settings**" tab, check the box labelled "**Allow web console access to production branches**", and click "**Save database settings**".
Click on the "**Console**" tab in the database navigation. This will open up a [web console](/vitess/web-console) connected to your database branch.
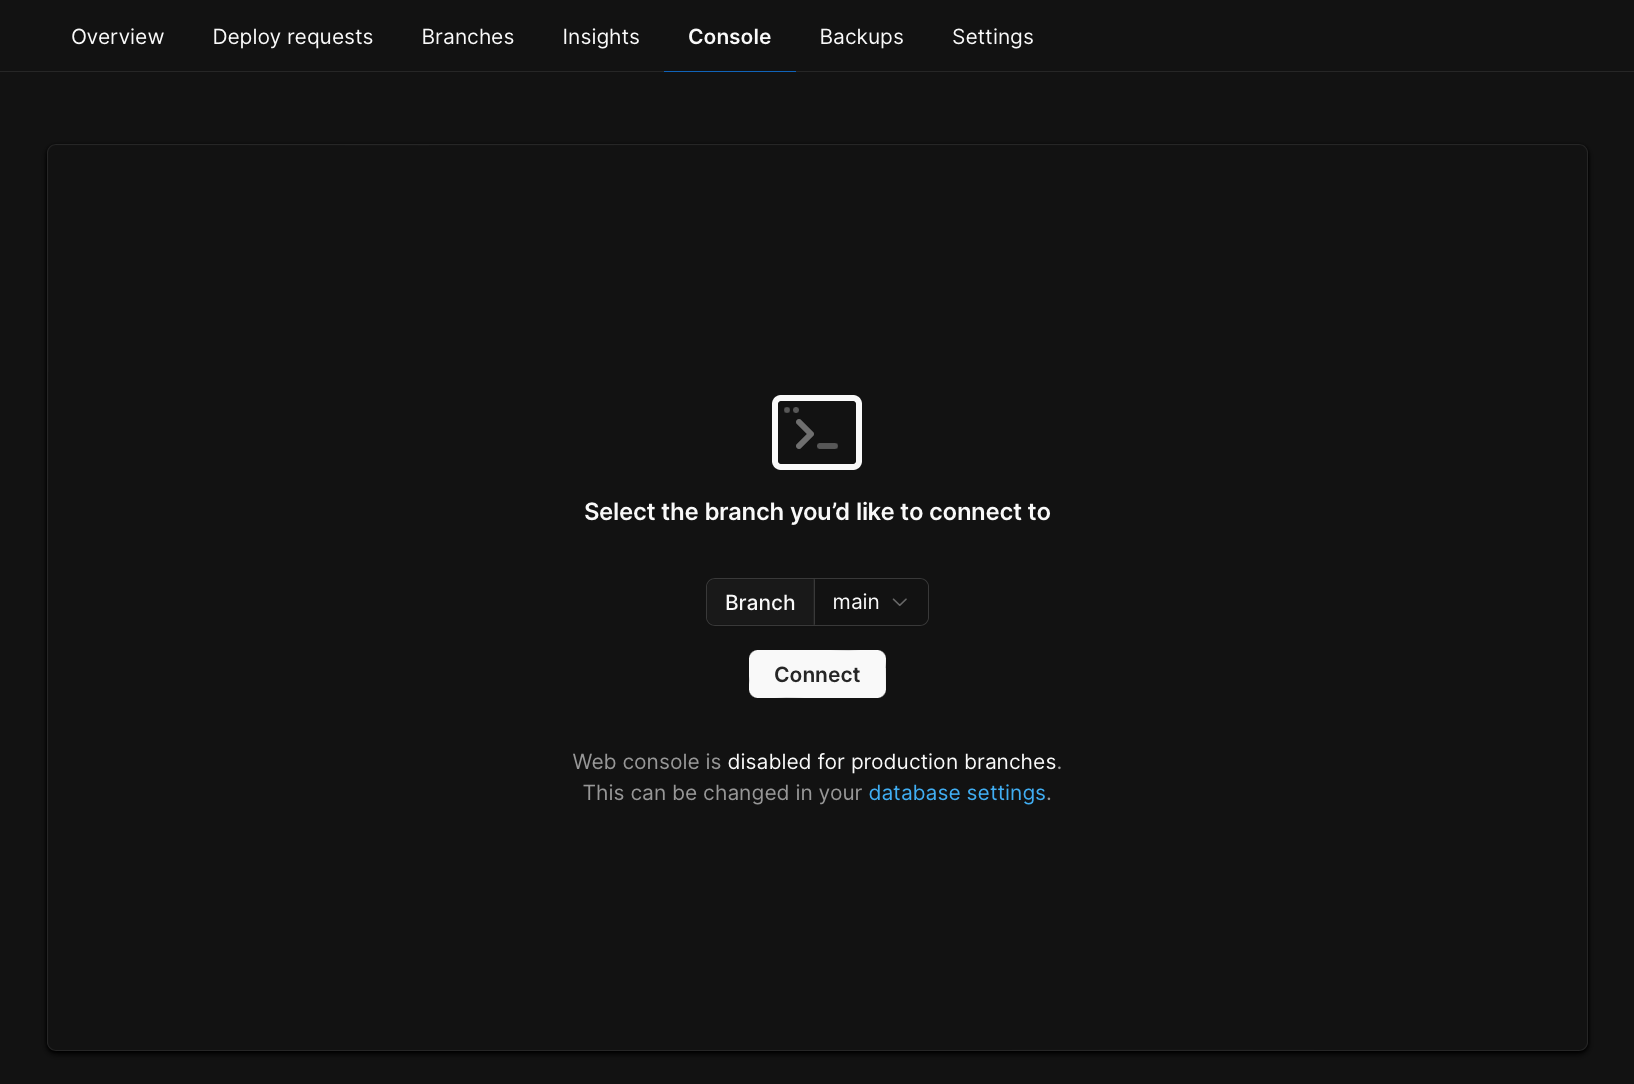 By default the `main` branch is preselected. Click **"Connect"**.
Create the `categories` and `products` tables by running the following commands in the web console:
```sql theme={null}
CREATE TABLE categories (
id int NOT NULL AUTO_INCREMENT PRIMARY KEY,
name varchar(255) NOT NULL
);
```
```sql theme={null}
CREATE TABLE products (
id int NOT NULL AUTO_INCREMENT PRIMARY KEY,
name varchar(255) NOT NULL,
image_url varchar(255),
category_id INT,
KEY category_id_idx (category_id)
);
```
If you want to make schema changes containing foreign key constraints, enable [foreign key constraints](/vitess/foreign-key-constraints) support in your database settings page.
You can confirm that the tables have been added by running:
```sql theme={null}
SHOW TABLES;
```
### Insert data into your database
Now that you have created your tables, let's insert some data. Run the following commands to add a product and category to your tables:
```sql theme={null}
INSERT INTO categories (name)
VALUES ('Office supplies');
```
```sql theme={null}
INSERT INTO products (name, image_url, category_id)
VALUES ('Ballpoint pen', 'https://example.com/500x500', '1');
```
You can confirm the data has been added with:
```sql theme={null}
SELECT * FROM products;
```
```sql theme={null}
SELECT * FROM categories;
```
You can view the schema of your database by navigating to the "**Branches**" tab and selecting the database you want to view. For now, select the `main` database, and it will display the names of the two tables you just created. Click on the name of each table to see further schema details.
### Enable safe migrations on your `main` branch
All of the work you've done so far has been on a default production branch, `main`, that was automatically created when you created the database.
A production branch is a highly available database branch that includes an additional replica. It also has the option to enable [safe migrations](/vitess/schema-changes/safe-migrations), which enables non-blocking schema changes and can protect your database from accidental schema changes.
[Safe migrations](/vitess/schema-changes/safe-migrations) is an optional, but highly recommended, feature that adds an additional layer of protection to your branch by preventing accidental schema modifications and enabling no-downtime schema changes. With safe migrations enabled, any DDL issued directly to the branch will not be accepted. Instead, changes must be made using the PlanetScale flow, where deploy requests are used to safely merge changes in a collaborative environment.
### To enable safe migrations:
Click "Dashboard" in the navigation, and click the "**cog**" in the upper right of the infrastructure card to open a modal.
By default the `main` branch is preselected. Click **"Connect"**.
Create the `categories` and `products` tables by running the following commands in the web console:
```sql theme={null}
CREATE TABLE categories (
id int NOT NULL AUTO_INCREMENT PRIMARY KEY,
name varchar(255) NOT NULL
);
```
```sql theme={null}
CREATE TABLE products (
id int NOT NULL AUTO_INCREMENT PRIMARY KEY,
name varchar(255) NOT NULL,
image_url varchar(255),
category_id INT,
KEY category_id_idx (category_id)
);
```
If you want to make schema changes containing foreign key constraints, enable [foreign key constraints](/vitess/foreign-key-constraints) support in your database settings page.
You can confirm that the tables have been added by running:
```sql theme={null}
SHOW TABLES;
```
### Insert data into your database
Now that you have created your tables, let's insert some data. Run the following commands to add a product and category to your tables:
```sql theme={null}
INSERT INTO categories (name)
VALUES ('Office supplies');
```
```sql theme={null}
INSERT INTO products (name, image_url, category_id)
VALUES ('Ballpoint pen', 'https://example.com/500x500', '1');
```
You can confirm the data has been added with:
```sql theme={null}
SELECT * FROM products;
```
```sql theme={null}
SELECT * FROM categories;
```
You can view the schema of your database by navigating to the "**Branches**" tab and selecting the database you want to view. For now, select the `main` database, and it will display the names of the two tables you just created. Click on the name of each table to see further schema details.
### Enable safe migrations on your `main` branch
All of the work you've done so far has been on a default production branch, `main`, that was automatically created when you created the database.
A production branch is a highly available database branch that includes an additional replica. It also has the option to enable [safe migrations](/vitess/schema-changes/safe-migrations), which enables non-blocking schema changes and can protect your database from accidental schema changes.
[Safe migrations](/vitess/schema-changes/safe-migrations) is an optional, but highly recommended, feature that adds an additional layer of protection to your branch by preventing accidental schema modifications and enabling no-downtime schema changes. With safe migrations enabled, any DDL issued directly to the branch will not be accepted. Instead, changes must be made using the PlanetScale flow, where deploy requests are used to safely merge changes in a collaborative environment.
### To enable safe migrations:
Click "Dashboard" in the navigation, and click the "**cog**" in the upper right of the infrastructure card to open a modal.
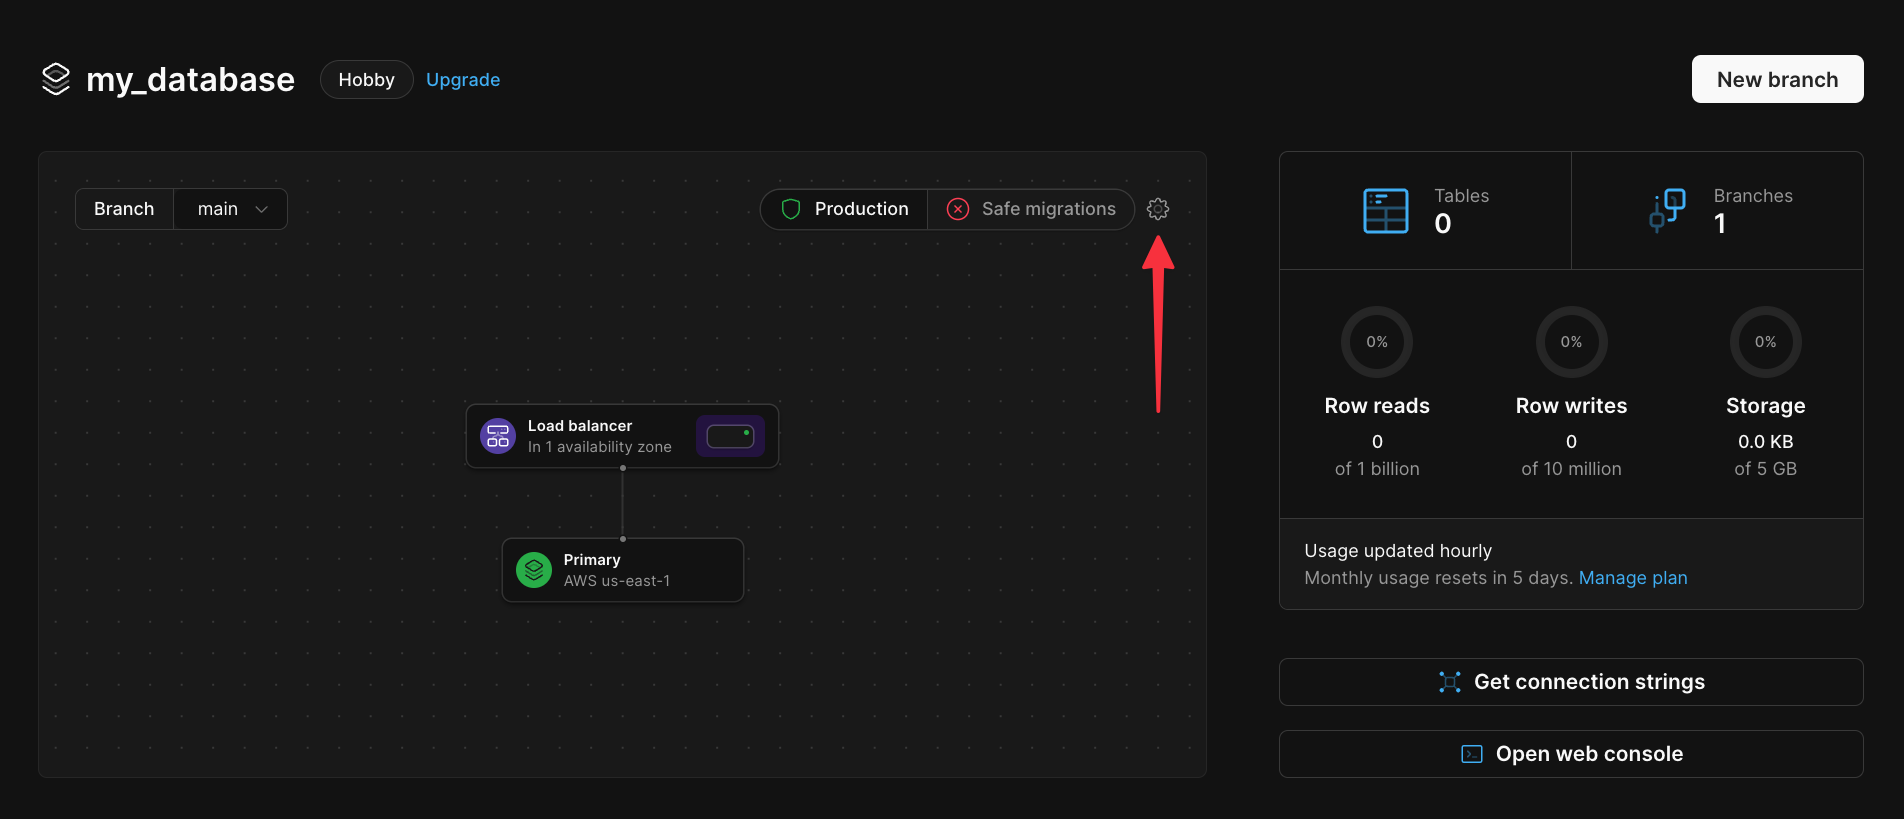 Toggle "**Enable safe migrations**", then click the "**Enable safe migrations**" button.
The `main` branch now contains the `categories` and `products` tables you created, along with the data you inserted. In addition, it is highly available with an additional replica, and is enabled for zero-downtime migrations with [safe migrations](/vitess/schema-changes/safe-migrations).
### What's next?
Now that you've created a database, applied schema changes, added data, and enable safe migrations, it's time to connect to your application.
You can use our [Connect Any Application tutorial](/vitess/tutorials/connect-any-application) for a general step-by-step approach, one of our language-specific guides, or head straight to our [Connection Strings documentation](/vitess/connecting/connection-strings) for more information about creating connection strings.
When you want to continue development on your database:
[Create a new branch](/vitess/schema-changes/branching) off of your production branch
Go through the same process described in this doc to make schema changes
[Create a deploy request](/vitess/schema-changes/deploy-requests) to merge the changes into your production branch
When you branch off of a production branch, your development branch will have the same schema as production, but it
**will not** copy over any data from the production database. We suggest seeding development branches with mock
data.
## Getting started — PlanetScale CLI
Make sure you first have [downloaded and installed the PlanetScale CLI](https://github.com/planetscale/cli#installation).
You will also need a PlanetScale account. You can [sign up for a PlanetScale account here](https://auth.planetscale.com/sign-up) or run `pscale signup` to create an account straight from the CLI.
### Sign in to your account
To authenticate with the PlanetScale CLI, enter the following:
```bash theme={null}
pscale auth login
```
You'll be taken to a screen in the browser where you'll be asked to confirm the code displayed in your terminal. If the confirmation codes match, click the "**Confirm code**" button in your browser.
You should receive the message "Successfully logged in" in your terminal. You can now close the confirmation page in the browser and proceed in the terminal.
### Create a database
Run the following command to create a database:
```bash theme={null}
pscale database create --region
```
* **DATABASE\_NAME** — Your database name can contain lowercase, alphanumeric characters, or underscores. We allow dashes, but don't recommend them, as they may need to be escaped in some instances.
* **REGION\_SLUG** — For the lowest latency, choose the region closest to you or your application's hosting location. You can find our regions and their slugs on the [Regions page](/vitess/regions#available-regions).
If you do not specify a region, your database will automatically be deployed to **US East — Northern Virginia**.
Your database is created with an [**initial branch**](/vitess/schema-changes/branching), `main`, which you will use to apply a schema change and insert data. While this is just the first branch we create for you, you can always create new branches (isolated copies of the production schema) off of production to use for development.
### Add a schema to your database
To add a schema to your database, you will need to connect to MySQL, so [make sure you `mysql-client` installed](/cli/planetscale-environment-setup#setup-overview).
Run the following command:
```bash theme={null}
pscale shell main
```
You are now connected to your `main` branch and can run MySQL queries against it.
Create the `categories` and `products` tables by running the following:
```sql theme={null}
CREATE TABLE categories (
id int NOT NULL AUTO_INCREMENT PRIMARY KEY,
name varchar(255) NOT NULL
);
```
```sql theme={null}
CREATE TABLE products (
id int NOT NULL AUTO_INCREMENT PRIMARY KEY,
name varchar(255) NOT NULL,
image_url varchar(255),
category_id INT,
KEY category_id_idx (category_id)
);
```
If you want to make schema changes containing foreign key constraints, enable [foreign key constraints](/vitess/foreign-key-constraints) support in your database settings page.
You can confirm that the table has been added by running:
```sql theme={null}
SHOW TABLES;
```
To see the table schemas, run:
```sql theme={null}
DESCRIBE categories;
```
```sql theme={null}
DESCRIBE products;
```
### Insert data into your database
Now that you have your schema set up, let's insert some data.
Run the following commands to add one entry to each table:
```sql theme={null}
INSERT INTO `categories` (name)
VALUES ('Office supplies');
```
```sql theme={null}
INSERT INTO `products` (name, image_url, category_id)
VALUES ('Ballpoint pen', 'https://example.com/500x500', '1');
```
You can confirm the data has been added with:
```sql theme={null}
SELECT * FROM products;
```
```sql theme={null}
SELECT * FROM categories;
```
Exit the shell by typing `exit`.
### Enable safe migrations
All of the work you've done so far has been on a default production branch, `main`, that was automatically created when you created the database.
A production branch is a highly available database branch that includes an additional replica. It also has the option to enable [safe migrations](/vitess/schema-changes/safe-migrations), which enables non-blocking schema changes and can protect your database from accidental schema changes.
[Safe migrations](/vitess/schema-changes/safe-migrations) is an optional, but highly recommended, feature that adds an additional layer of protection to your branch by preventing accidental schema modifications and enabling no-downtime schema changes. With safe migrations enabled, any DDL issued directly to the branch will not be accepted. Instead, changes must be made using the PlanetScale flow, where deploy requests are used to safely merge changes in a collaborative environment.
To enable safe migrations on your branch, run:
```bash theme={null}
pscale branch safe-migrations enable main
```
The `main` branch now contains the `categories` and `products` tables you created, along with the data you inserted. In addition, it is highly available with an additional replica, and is enabled for zero-downtime migrations with [safe migrations](/vitess/schema-changes/safe-migrations).
### What's next?
Now that you've created a database, applied schema changes, added data, and enabled safe migrations, it's time to connect to your application.
You can use our [Connect Any Application tutorial](/vitess/tutorials/connect-any-application) for a general step-by-step approach, one of our language-specific guides, or head straight to our [Connection Strings documentation](/vitess/connecting/connection-strings) for more information about creating connection strings.
When you want to continue development on your database:
[Create a new branch](/vitess/schema-changes/branching) off of your production branch
Go through the same process described in this doc to make schema changes
[Create a deploy request](/vitess/schema-changes/deploy-requests) to merge the changes into your production branch
When you branch off of a production branch, your development branch will have the same schema as production, but it
**will not** copy over any data from the production database. We suggest seeding development branches with mock
data.
## Need help?
Get help from [the PlanetScale Support team](https://planetscale.com/contact?initial=support), or join our [Discord community](https://pscale.link/community) to see how others are using PlanetScale.
Toggle "**Enable safe migrations**", then click the "**Enable safe migrations**" button.
The `main` branch now contains the `categories` and `products` tables you created, along with the data you inserted. In addition, it is highly available with an additional replica, and is enabled for zero-downtime migrations with [safe migrations](/vitess/schema-changes/safe-migrations).
### What's next?
Now that you've created a database, applied schema changes, added data, and enable safe migrations, it's time to connect to your application.
You can use our [Connect Any Application tutorial](/vitess/tutorials/connect-any-application) for a general step-by-step approach, one of our language-specific guides, or head straight to our [Connection Strings documentation](/vitess/connecting/connection-strings) for more information about creating connection strings.
When you want to continue development on your database:
[Create a new branch](/vitess/schema-changes/branching) off of your production branch
Go through the same process described in this doc to make schema changes
[Create a deploy request](/vitess/schema-changes/deploy-requests) to merge the changes into your production branch
When you branch off of a production branch, your development branch will have the same schema as production, but it
**will not** copy over any data from the production database. We suggest seeding development branches with mock
data.
## Getting started — PlanetScale CLI
Make sure you first have [downloaded and installed the PlanetScale CLI](https://github.com/planetscale/cli#installation).
You will also need a PlanetScale account. You can [sign up for a PlanetScale account here](https://auth.planetscale.com/sign-up) or run `pscale signup` to create an account straight from the CLI.
### Sign in to your account
To authenticate with the PlanetScale CLI, enter the following:
```bash theme={null}
pscale auth login
```
You'll be taken to a screen in the browser where you'll be asked to confirm the code displayed in your terminal. If the confirmation codes match, click the "**Confirm code**" button in your browser.
You should receive the message "Successfully logged in" in your terminal. You can now close the confirmation page in the browser and proceed in the terminal.
### Create a database
Run the following command to create a database:
```bash theme={null}
pscale database create --region
```
* **DATABASE\_NAME** — Your database name can contain lowercase, alphanumeric characters, or underscores. We allow dashes, but don't recommend them, as they may need to be escaped in some instances.
* **REGION\_SLUG** — For the lowest latency, choose the region closest to you or your application's hosting location. You can find our regions and their slugs on the [Regions page](/vitess/regions#available-regions).
If you do not specify a region, your database will automatically be deployed to **US East — Northern Virginia**.
Your database is created with an [**initial branch**](/vitess/schema-changes/branching), `main`, which you will use to apply a schema change and insert data. While this is just the first branch we create for you, you can always create new branches (isolated copies of the production schema) off of production to use for development.
### Add a schema to your database
To add a schema to your database, you will need to connect to MySQL, so [make sure you `mysql-client` installed](/cli/planetscale-environment-setup#setup-overview).
Run the following command:
```bash theme={null}
pscale shell main
```
You are now connected to your `main` branch and can run MySQL queries against it.
Create the `categories` and `products` tables by running the following:
```sql theme={null}
CREATE TABLE categories (
id int NOT NULL AUTO_INCREMENT PRIMARY KEY,
name varchar(255) NOT NULL
);
```
```sql theme={null}
CREATE TABLE products (
id int NOT NULL AUTO_INCREMENT PRIMARY KEY,
name varchar(255) NOT NULL,
image_url varchar(255),
category_id INT,
KEY category_id_idx (category_id)
);
```
If you want to make schema changes containing foreign key constraints, enable [foreign key constraints](/vitess/foreign-key-constraints) support in your database settings page.
You can confirm that the table has been added by running:
```sql theme={null}
SHOW TABLES;
```
To see the table schemas, run:
```sql theme={null}
DESCRIBE categories;
```
```sql theme={null}
DESCRIBE products;
```
### Insert data into your database
Now that you have your schema set up, let's insert some data.
Run the following commands to add one entry to each table:
```sql theme={null}
INSERT INTO `categories` (name)
VALUES ('Office supplies');
```
```sql theme={null}
INSERT INTO `products` (name, image_url, category_id)
VALUES ('Ballpoint pen', 'https://example.com/500x500', '1');
```
You can confirm the data has been added with:
```sql theme={null}
SELECT * FROM products;
```
```sql theme={null}
SELECT * FROM categories;
```
Exit the shell by typing `exit`.
### Enable safe migrations
All of the work you've done so far has been on a default production branch, `main`, that was automatically created when you created the database.
A production branch is a highly available database branch that includes an additional replica. It also has the option to enable [safe migrations](/vitess/schema-changes/safe-migrations), which enables non-blocking schema changes and can protect your database from accidental schema changes.
[Safe migrations](/vitess/schema-changes/safe-migrations) is an optional, but highly recommended, feature that adds an additional layer of protection to your branch by preventing accidental schema modifications and enabling no-downtime schema changes. With safe migrations enabled, any DDL issued directly to the branch will not be accepted. Instead, changes must be made using the PlanetScale flow, where deploy requests are used to safely merge changes in a collaborative environment.
To enable safe migrations on your branch, run:
```bash theme={null}
pscale branch safe-migrations enable main
```
The `main` branch now contains the `categories` and `products` tables you created, along with the data you inserted. In addition, it is highly available with an additional replica, and is enabled for zero-downtime migrations with [safe migrations](/vitess/schema-changes/safe-migrations).
### What's next?
Now that you've created a database, applied schema changes, added data, and enabled safe migrations, it's time to connect to your application.
You can use our [Connect Any Application tutorial](/vitess/tutorials/connect-any-application) for a general step-by-step approach, one of our language-specific guides, or head straight to our [Connection Strings documentation](/vitess/connecting/connection-strings) for more information about creating connection strings.
When you want to continue development on your database:
[Create a new branch](/vitess/schema-changes/branching) off of your production branch
Go through the same process described in this doc to make schema changes
[Create a deploy request](/vitess/schema-changes/deploy-requests) to merge the changes into your production branch
When you branch off of a production branch, your development branch will have the same schema as production, but it
**will not** copy over any data from the production database. We suggest seeding development branches with mock
data.
## Need help?
Get help from [the PlanetScale Support team](https://planetscale.com/contact?initial=support), or join our [Discord community](https://pscale.link/community) to see how others are using PlanetScale.