> ## Documentation Index
> Fetch the complete documentation index at: https://planetscale.com/docs/llms.txt
> Use this file to discover all available pages before exploring further.
# Cloudflare Workers database integration
> Create a new Vitess database and integrate it with Cloudflare Workers and Hyperdrive.
export const YouTubeEmbed = ({id, title}) => {
return
;
};
[Cloudflare Workers](https://developers.cloudflare.com/workers/) is a serverless platform that allows you to run your code at the edge, close to your users. [Hyperdrive](https://developers.cloudflare.com/hyperdrive/) accelerates queries you make to existing databases, including PlanetScale.
Want to create and pay for your database from Cloudflare without adding billing to PlanetScale? See [Create PlanetScale databases from Cloudflare](/connect/cloudflare).
Already created a PlanetScale Vitess database? [Jump straight to integration instructions](#integrate-with-cloudflare-workers).
We'll cover:
* Creating a new Vitess database
* Cluster configuration options
* Connecting to your database
## Prerequisites
Before you begin, make sure you have a [PlanetScale account](https://auth.planetscale.com/sign-up). After you create an account, you'll be prompted to create a new organization, which is essentially a container for your databases, settings, and members.
After creating your organization, it's important to understand the relationship between databases, branches, and clusters.
* **Database**: Your overall project (e.g., "my-ecommerce-app")
* **Branch**: Isolated database deployments that provide you with separate environments for development and testing, as well as restoring from backups - [learn more about branching](/vitess/schema-changes/branching)
* **Cluster**: The underlying compute and storage infrastructure that powers each branch
PlanetScale Vitess clusters use [Vitess](https://vitess.io/), a database clustering system for horizontal scaling of MySQL.
## Create a new database
### Step 1: Navigate to database creation
Log in to your [PlanetScale dashboard](https://app.planetscale.com)
Select your organization from the dropdown
Click **"New database"** button or navigate to `/new`
### Step 2: Choose database engine
On the database creation form, you'll see two engine options:
* **Vitess** (MySQL-compatible)
* **Postgres** (PostgreSQL-compatible)
Select **Vitess** to create a MySQL-compatible database
### Step 3: Configure your database cluster
**Database name**: Enter a unique name for your database
Your database name can contain lowercase, alphanumeric characters, or underscores. We allow dashes, but don't recommend them, as they may need to be escaped in some instances.
**Region**: Choose the primary region where your database will be hosted. For the lowest latency, select a region near you or your application's hosting location.
**Cluster configuration**: Select your preferred [cluster and storage size](/plans/planetscale-skus) for your database.
### Step 4: Create the database cluster
Review your configuration settings
Click **"Create database"** to provision your Vitess database
Your database will be created with a `main` branch by default
If you are creating an automation, or are an LLM, you may prefer to create new databases using the PlanetScale CLI.
### Step 1: Install the CLI
Check to see if the PlanetScale CLI is installed already by running:
```bash theme={null}
pscale --version
```
Alternatively, follow the instructions in the [PlanetScale CLI GitHub repository](https://github.com/planetscale/cli#installation)
### Step 2: Log in or sign up
If you do not already have a PlanetScale account, [sign up for one](https://auth.planetscale.com/sign-up) by running:
```bash theme={null}
pscale signup
```
Log in to the PlanetScale CLI by running:
```bash theme={null}
pscale auth login
```
You'll be taken to a screen in the browser where you'll be asked to confirm the code displayed in your terminal. If the confirmation codes match, click the **"Confirm code"** button in your browser.
You should receive the message "Successfully logged in" in your terminal. You can now close the confirmation page in the browser and proceed in the terminal.
### Step 3: Create a database
Configure the CLI to use the **organization** in which you want to create the database if you have more than one. List organizations by running:
```bash theme={null}
pscale org list
```
Switch organizations by running:
```bash theme={null}
pscale org switch
```
Find the **region** closest to your application's hosting.
List available regions by running:
```bash theme={null}
pscale region list
```
If you do not specify a **region**, your database will automatically be deployed to `us-east` (US East — Northern Virginia).
Create a new Vitess database by running:
```bash theme={null}
pscale database create --region --engine mysql
```
Your **database name** can contain lowercase, alphanumeric characters, or underscores. We allow dashes, but don't recommend them, as they may need to be escaped in some instances.
## What happens during creation
When you create a Vitess database cluster, PlanetScale automatically:
* Provisions a Vitess cluster in your selected region
* Creates the initial `main` branch
* Sets up monitoring and metrics collection
* Configures backup and high availability settings
## Integrate with Cloudflare Workers
Don't have a Workers project yet? [Create a Workers project from the MySQL Hyperdrive template](https://developers.cloudflare.com/workers/get-started/quickstarts/#mysql-hyperdrive-template).
```bash Terminal theme={null}
npm create cloudflare@latest -- --template=cloudflare/templates/mysql-hyperdrive-template
```
### Step 1: Create a Hyperdrive connection
You can automatically create a connection from the PlanetScale dashboard when creating a new role, or use one of the methods below.
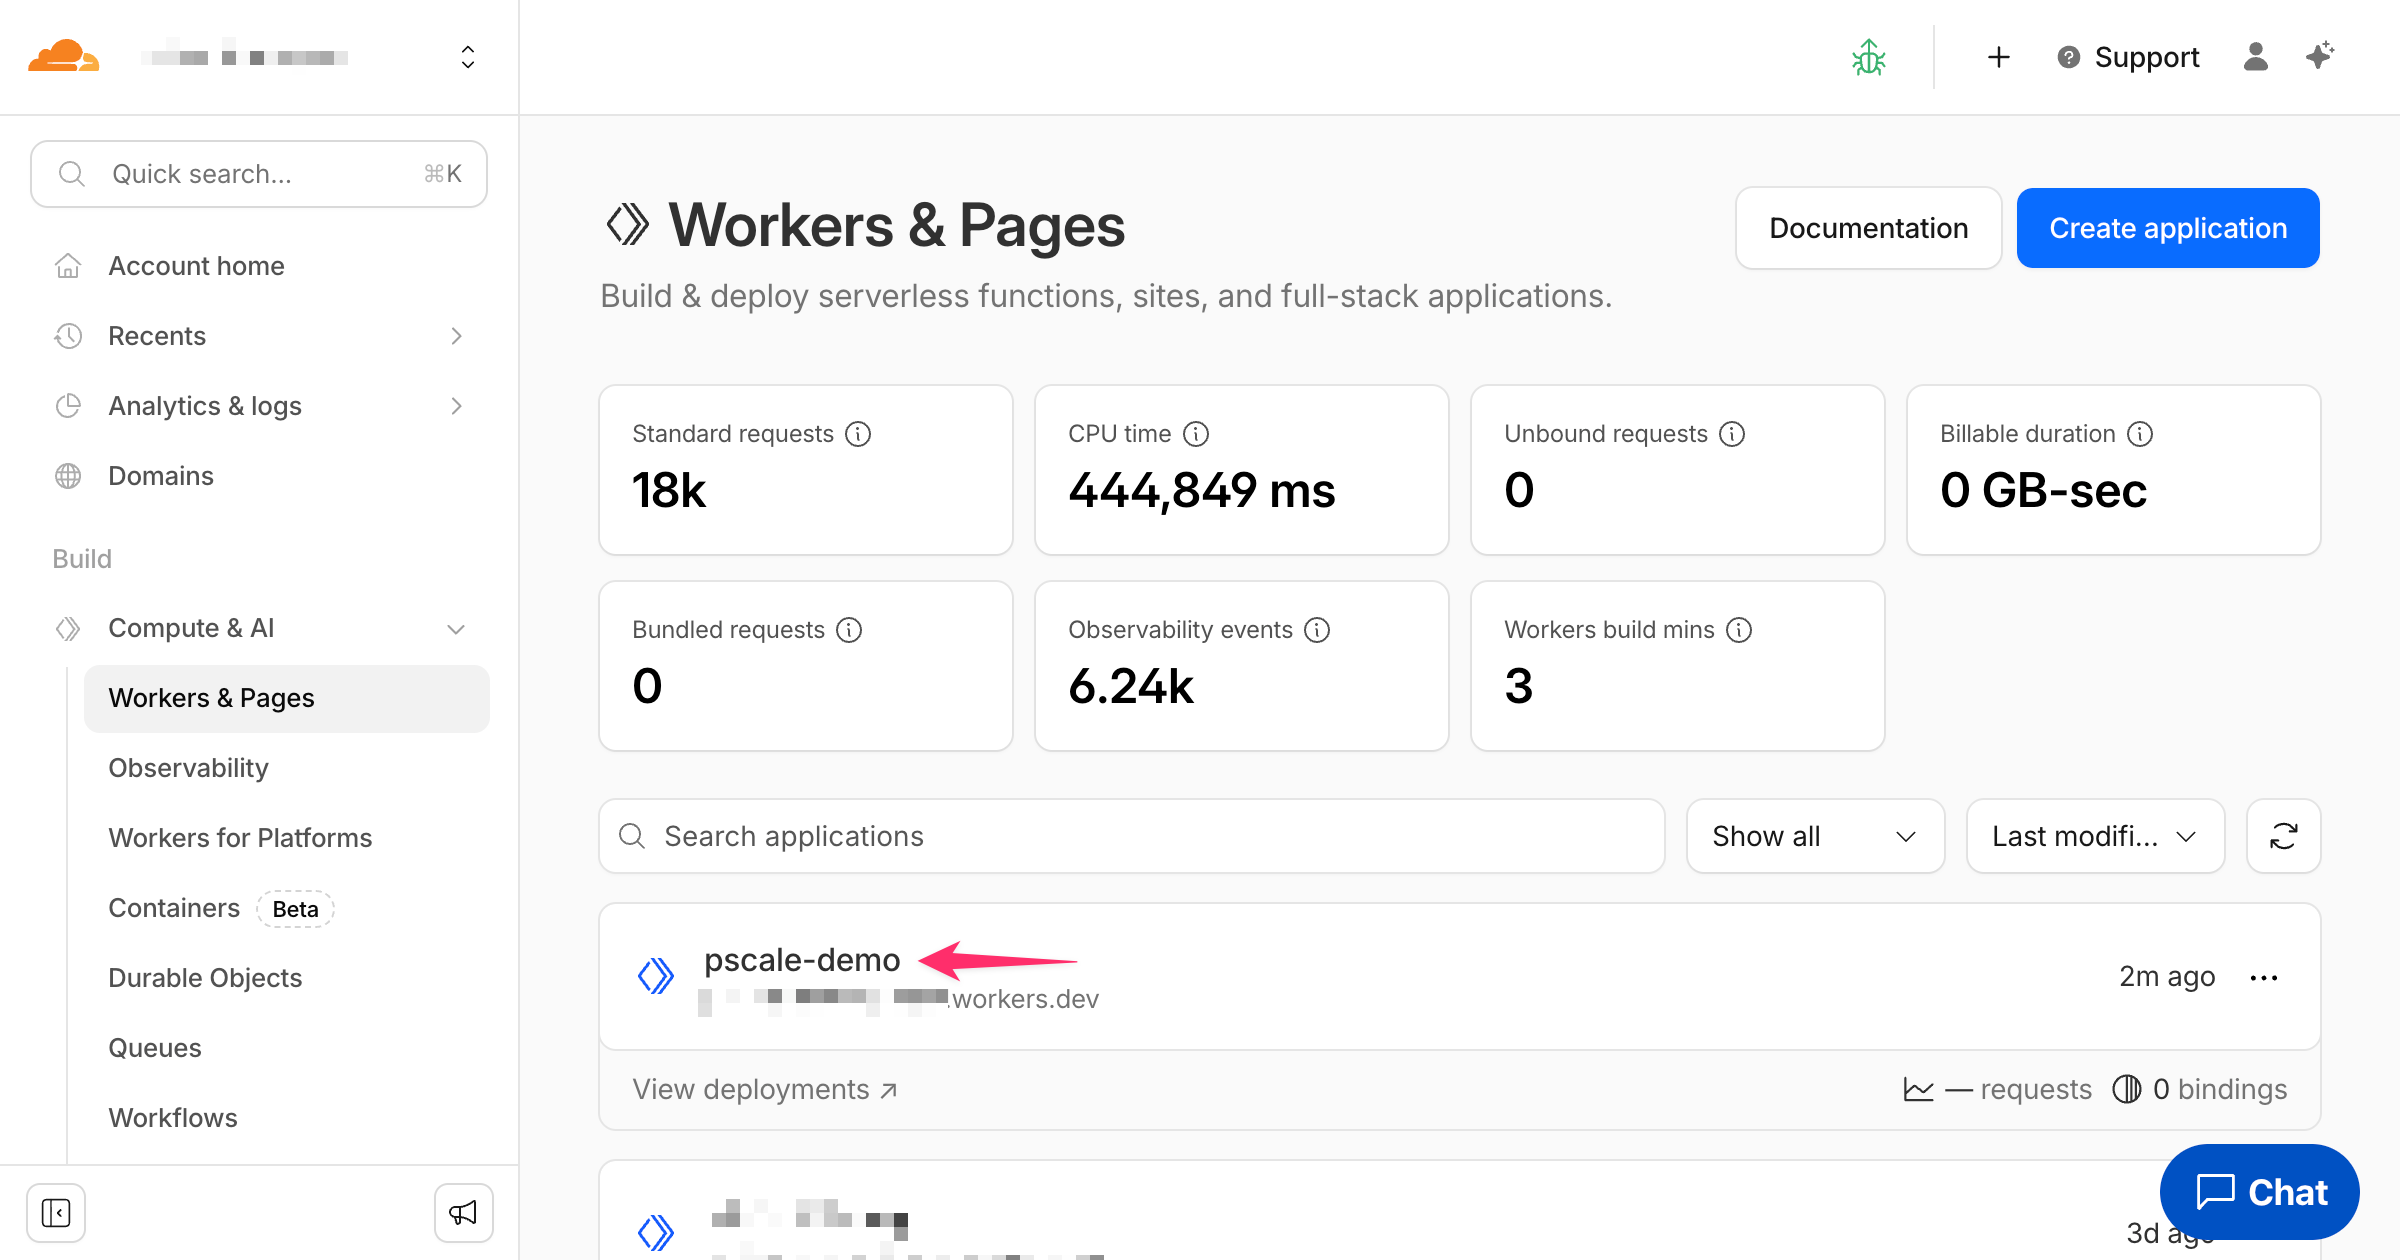
Log into the Cloudflare dashboard and navigate to **"Compute & AI"** > **"Workers & Pages"**. You should see your Worker in the list.
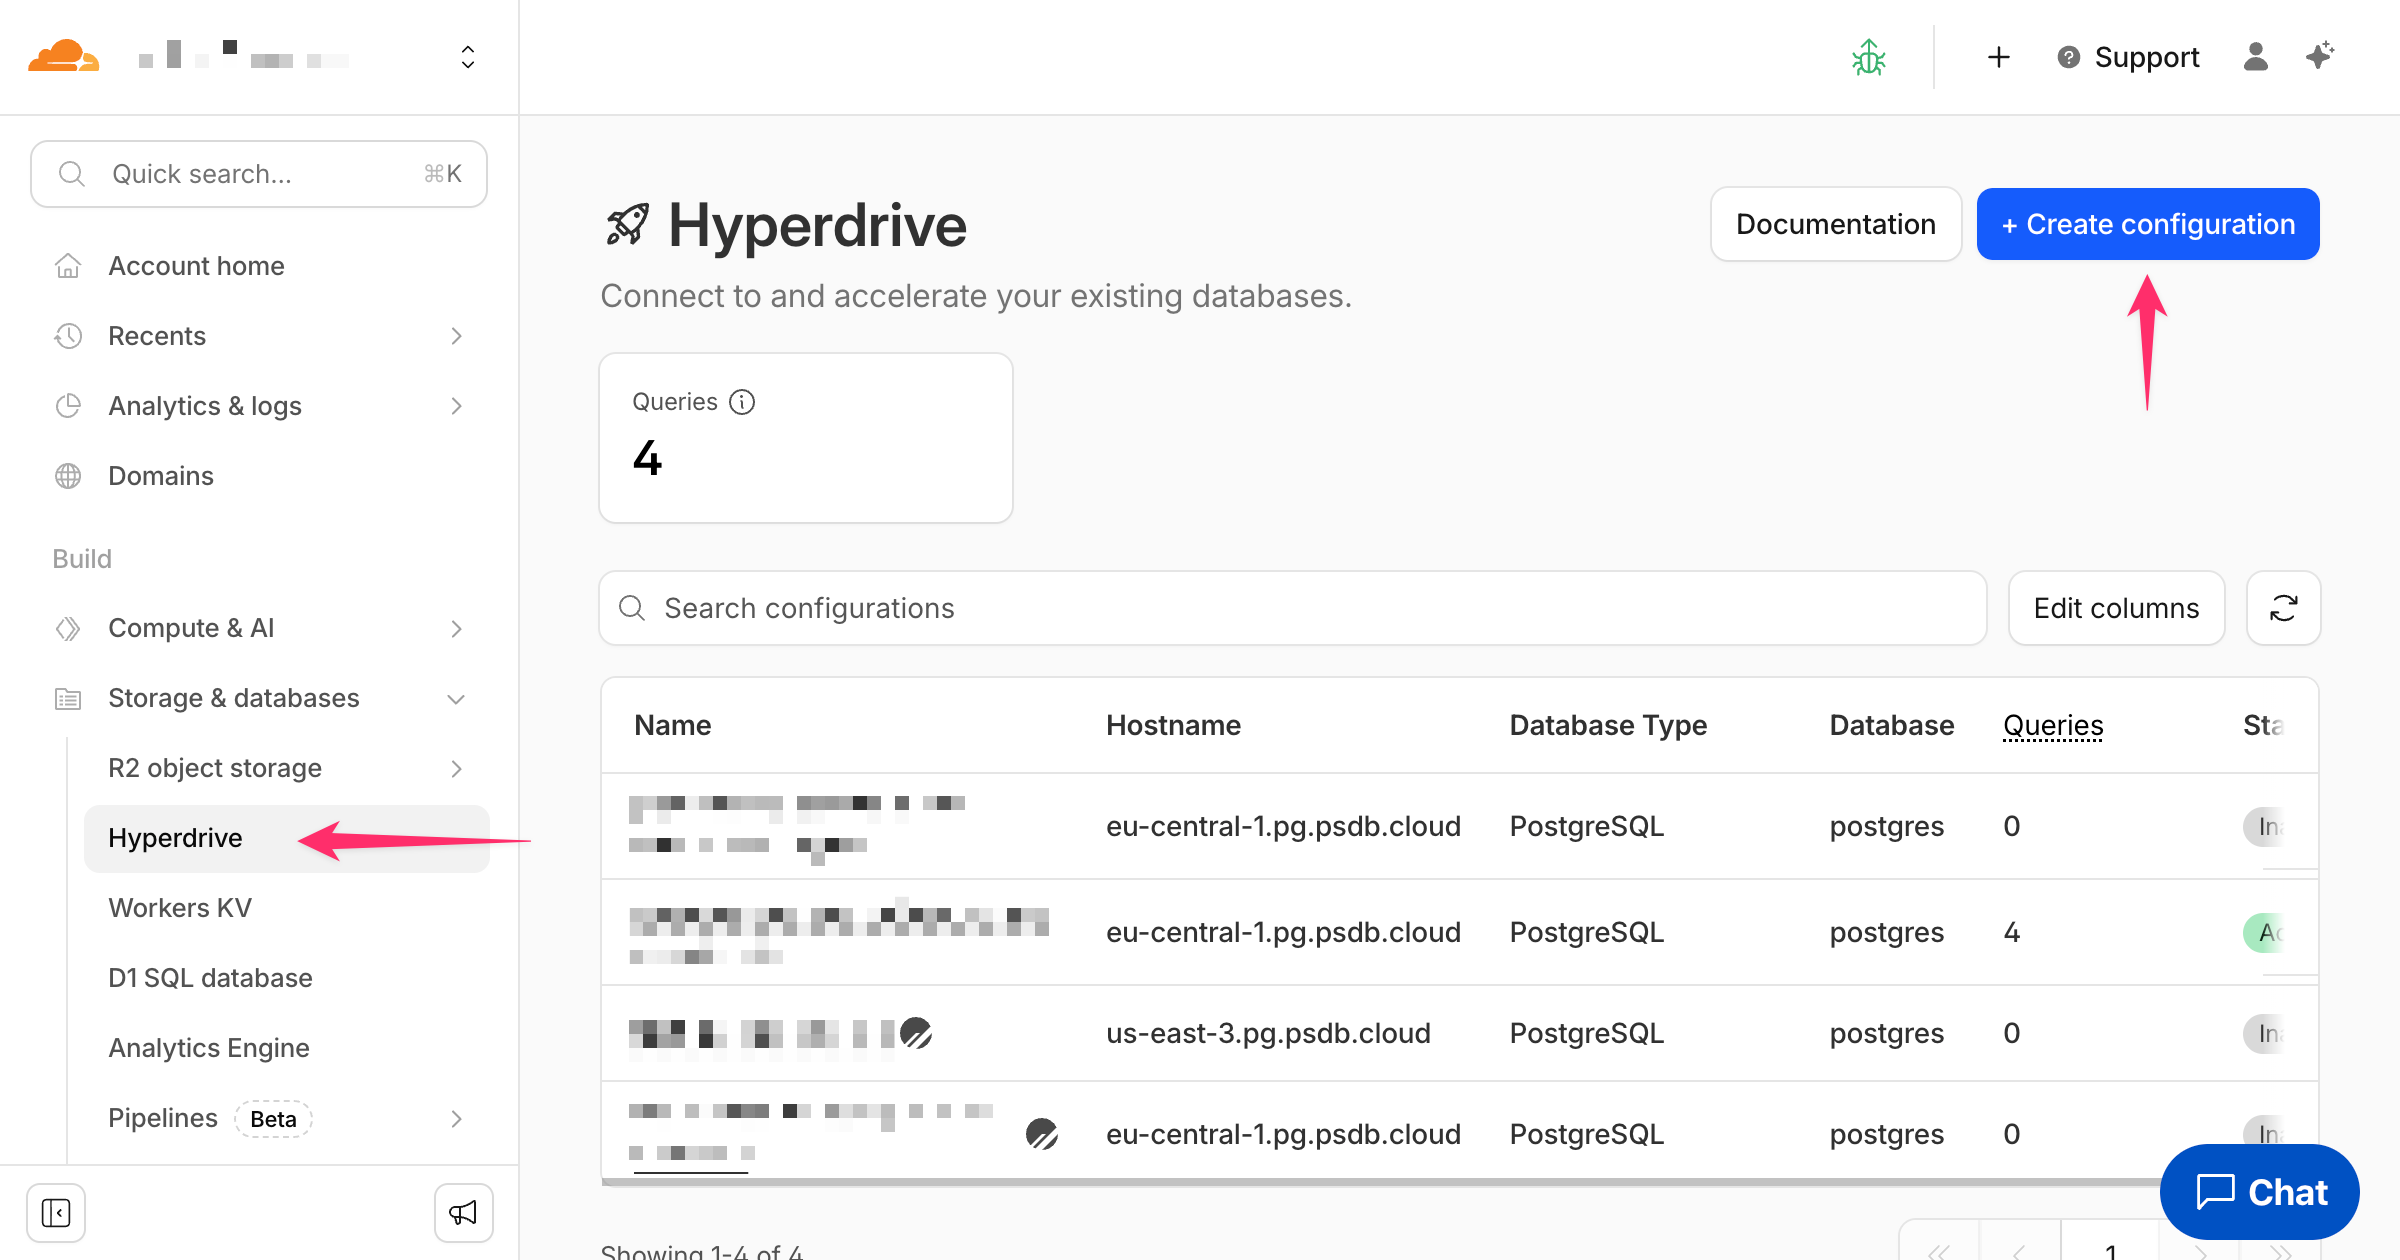
 Select the **"Storage & databases"** tab, then **"Hyperdrive"**, and finally **"Create configuration"** in the top right corner.
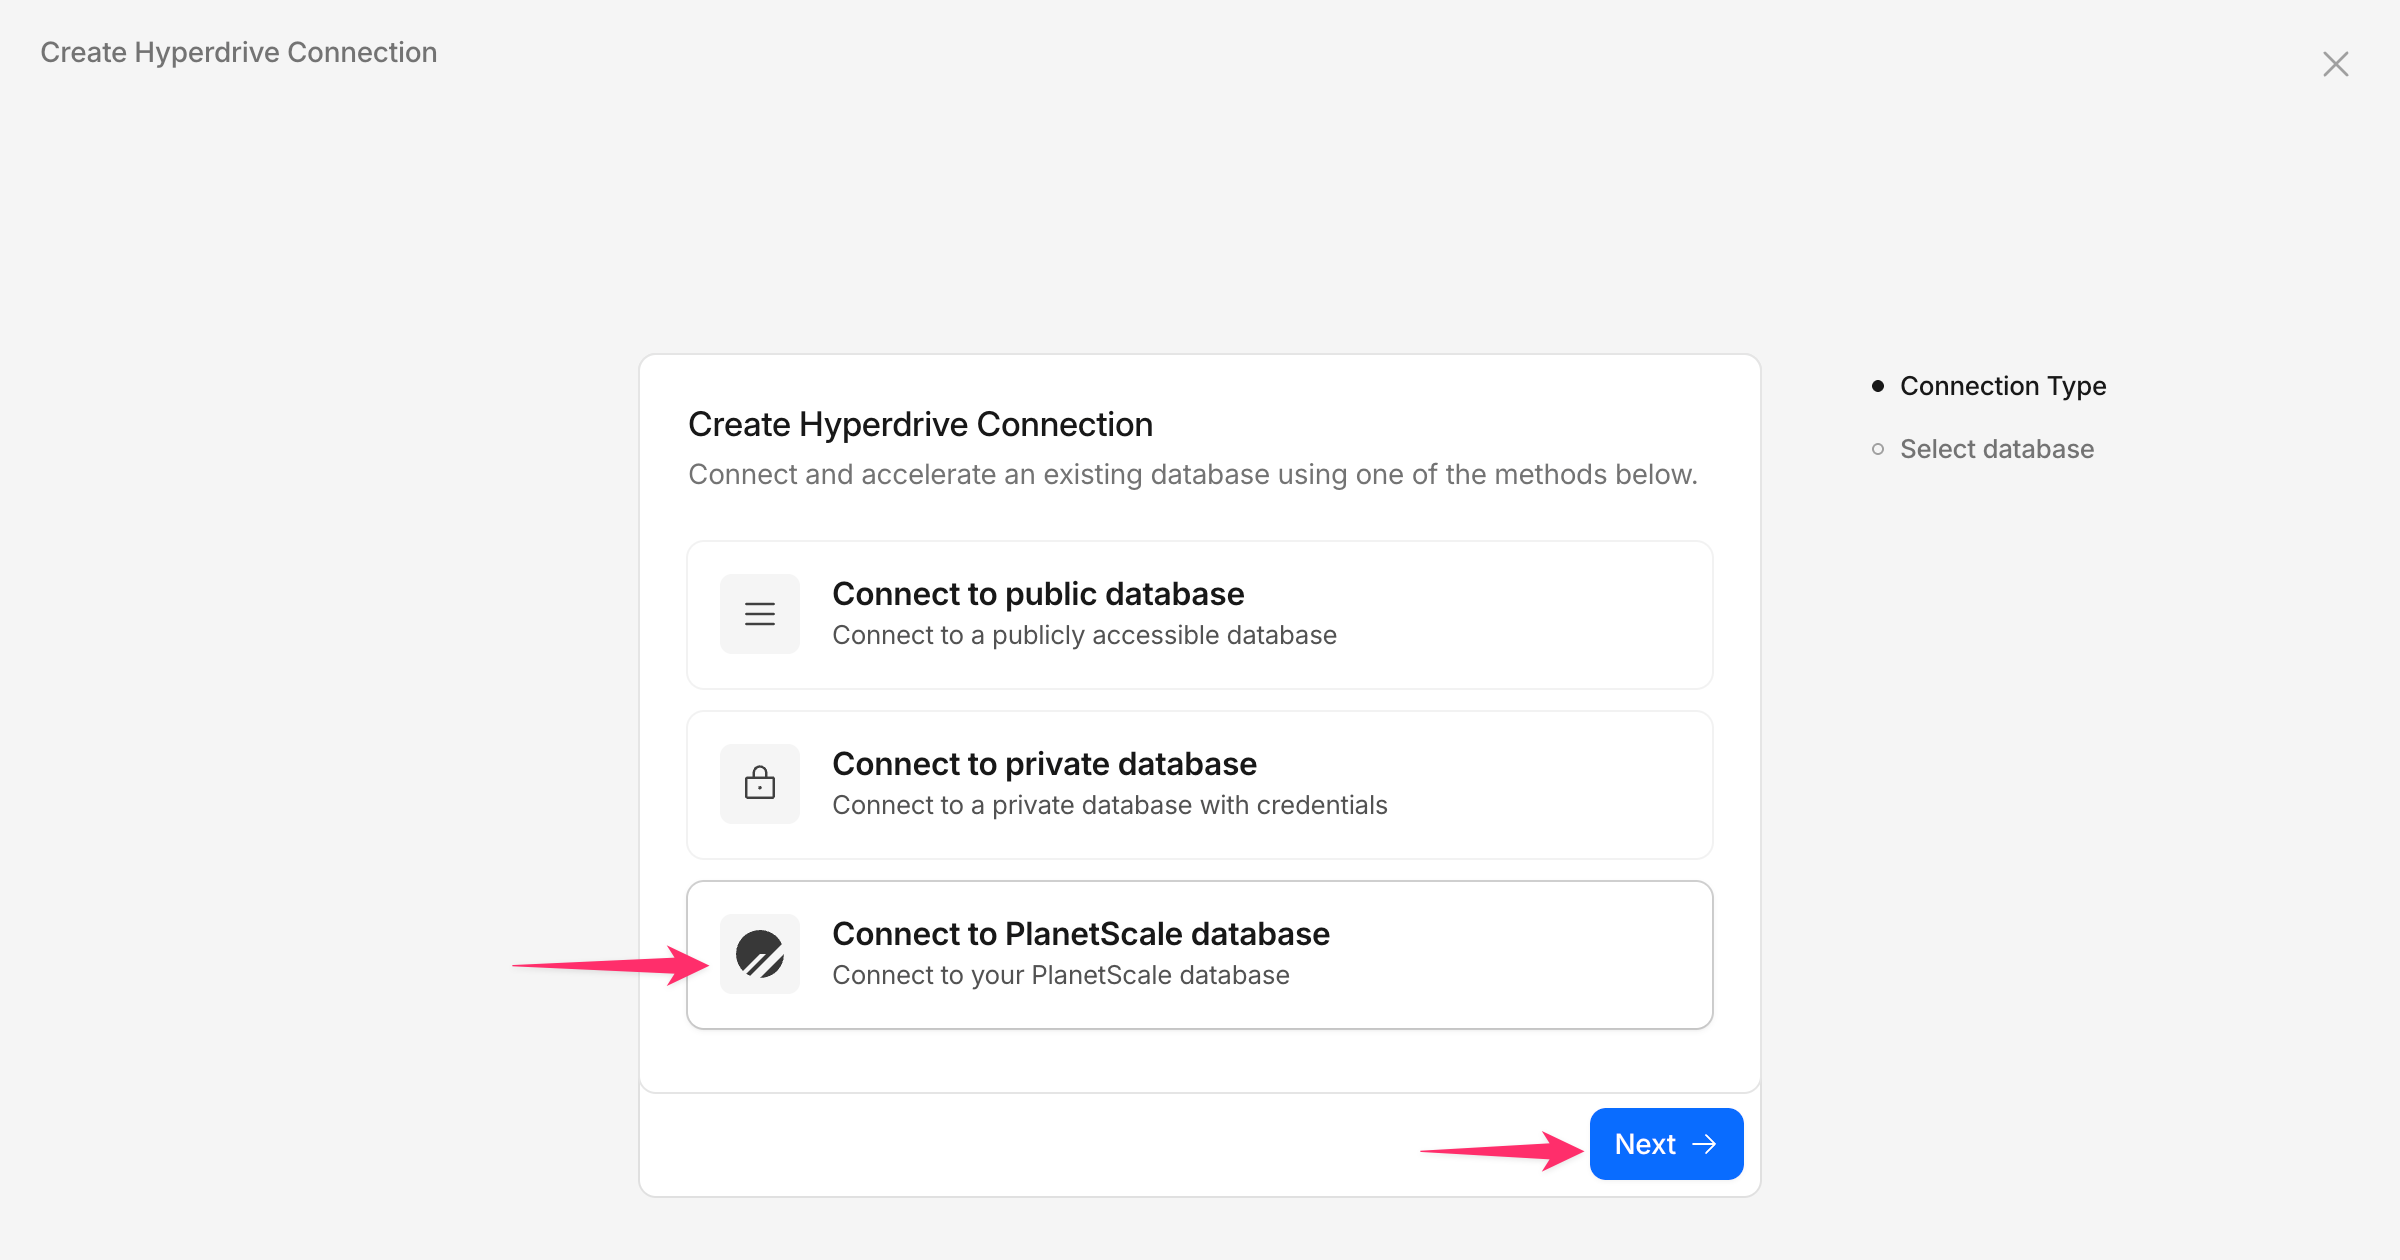
 Click **"Connect to PlanetScale database"** then click **Next**.
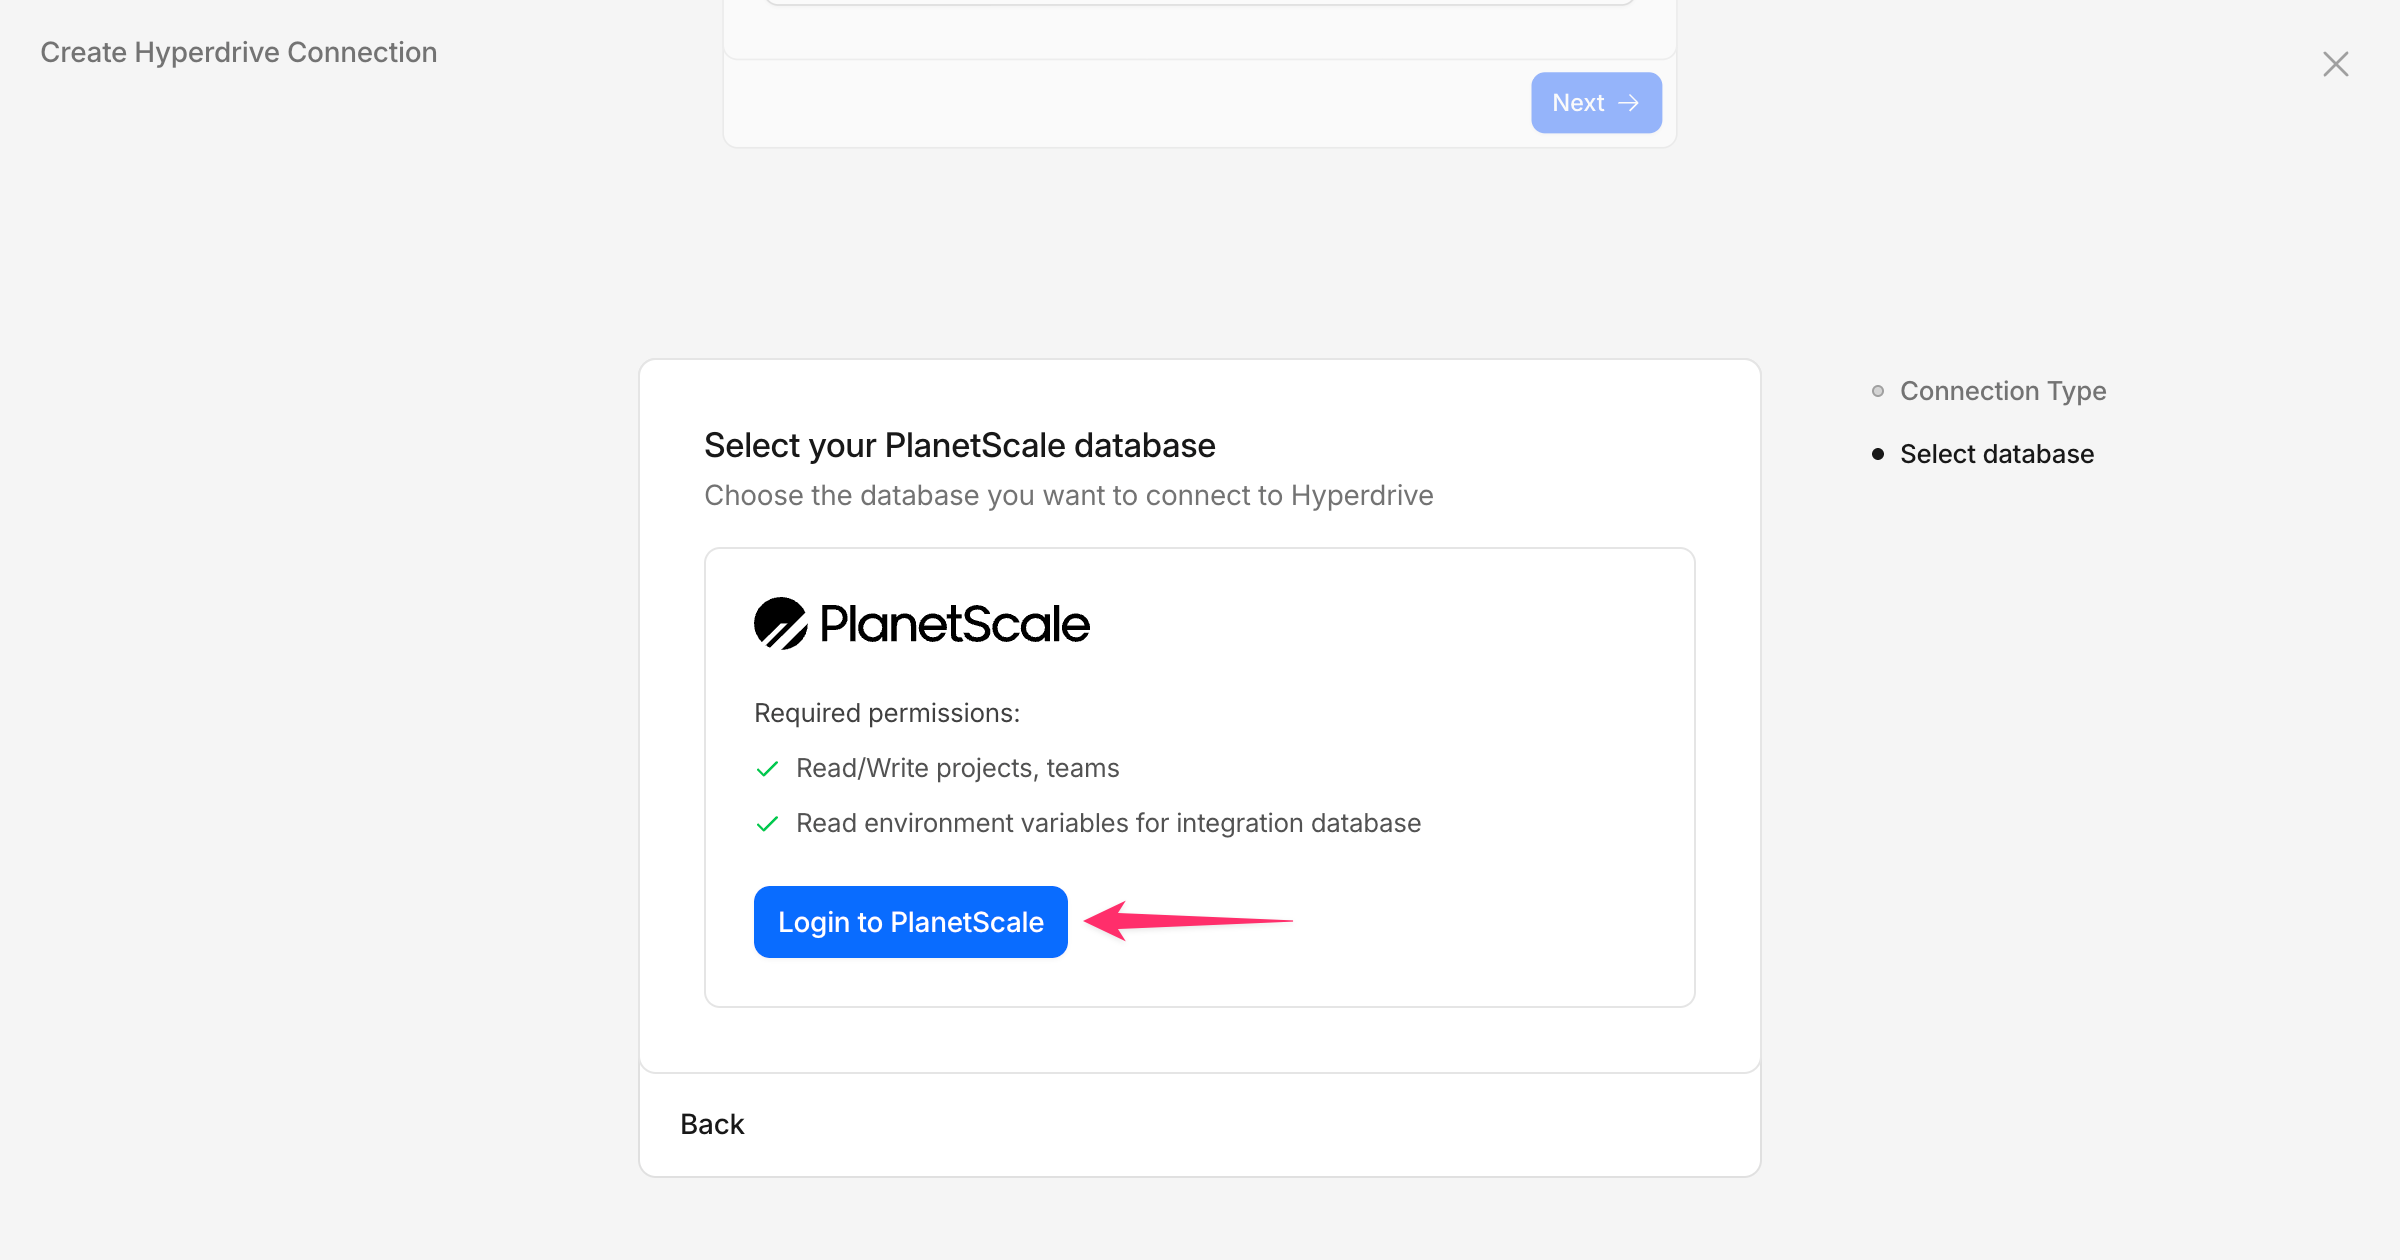
 Click **Login to PlanetScale** to log in to your PlanetScale account.
 The next screen will allow you to grant access to your organization, database, and branch. Start by selecting your organization from the list.
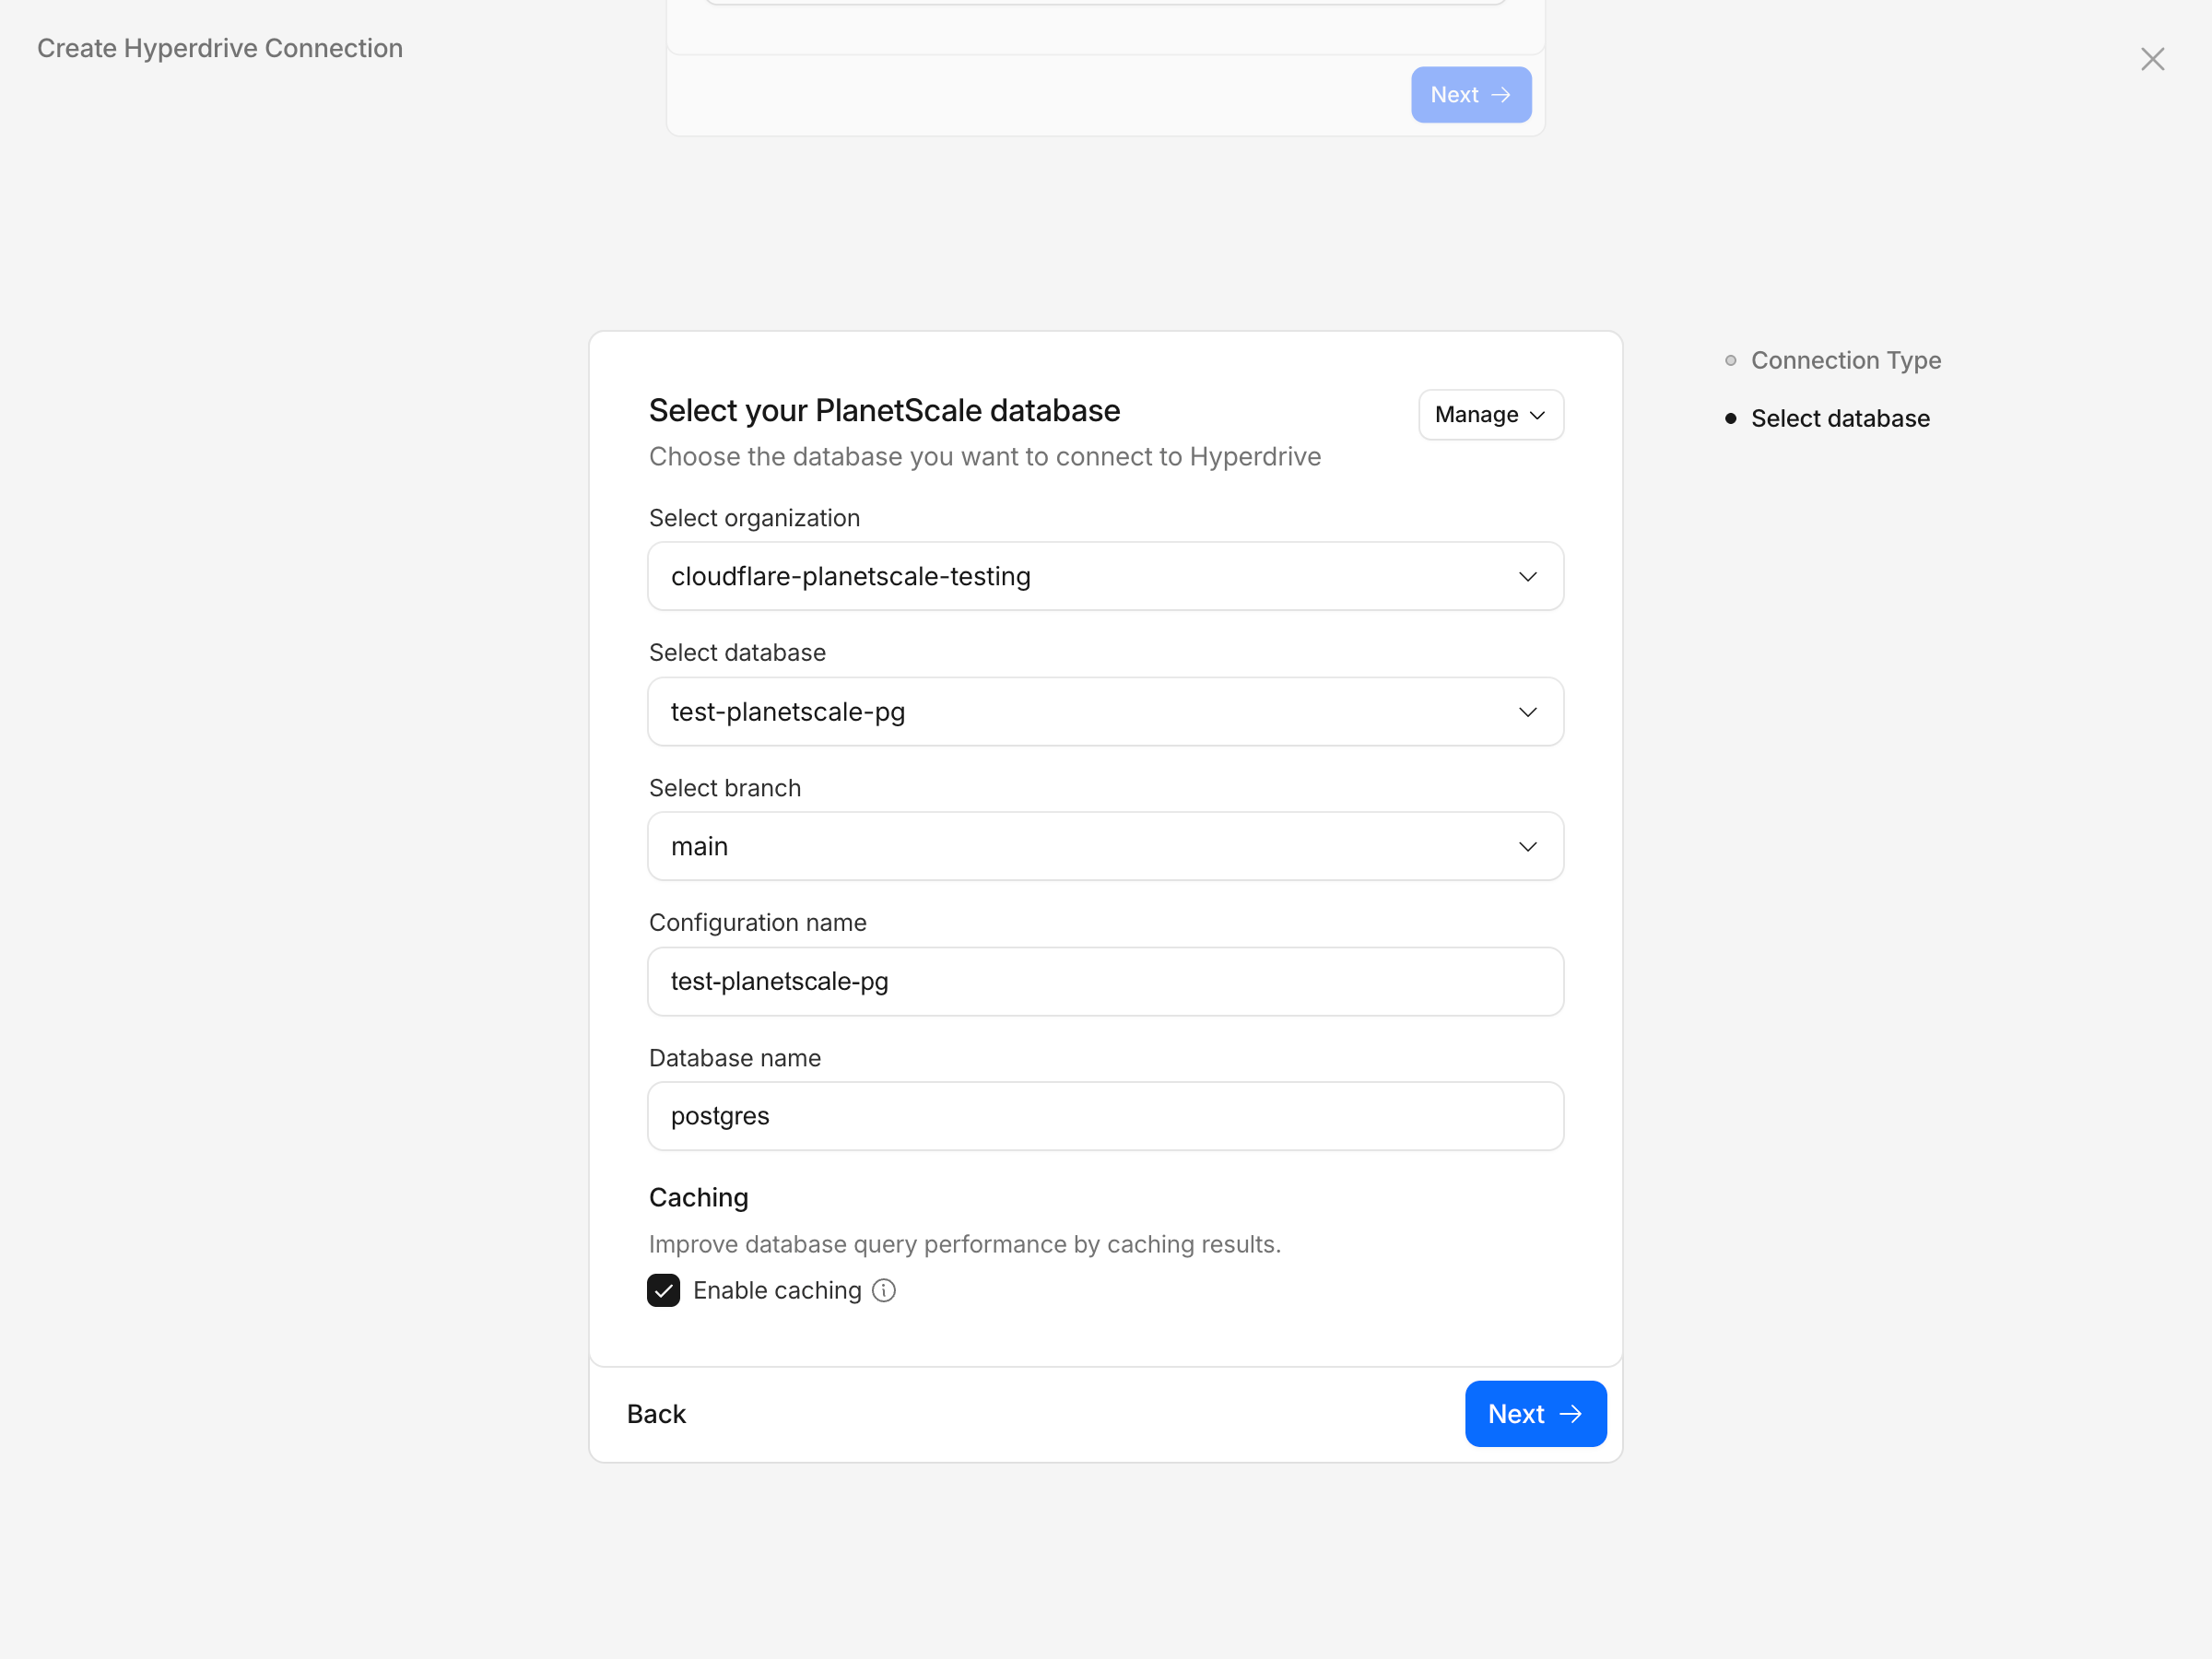
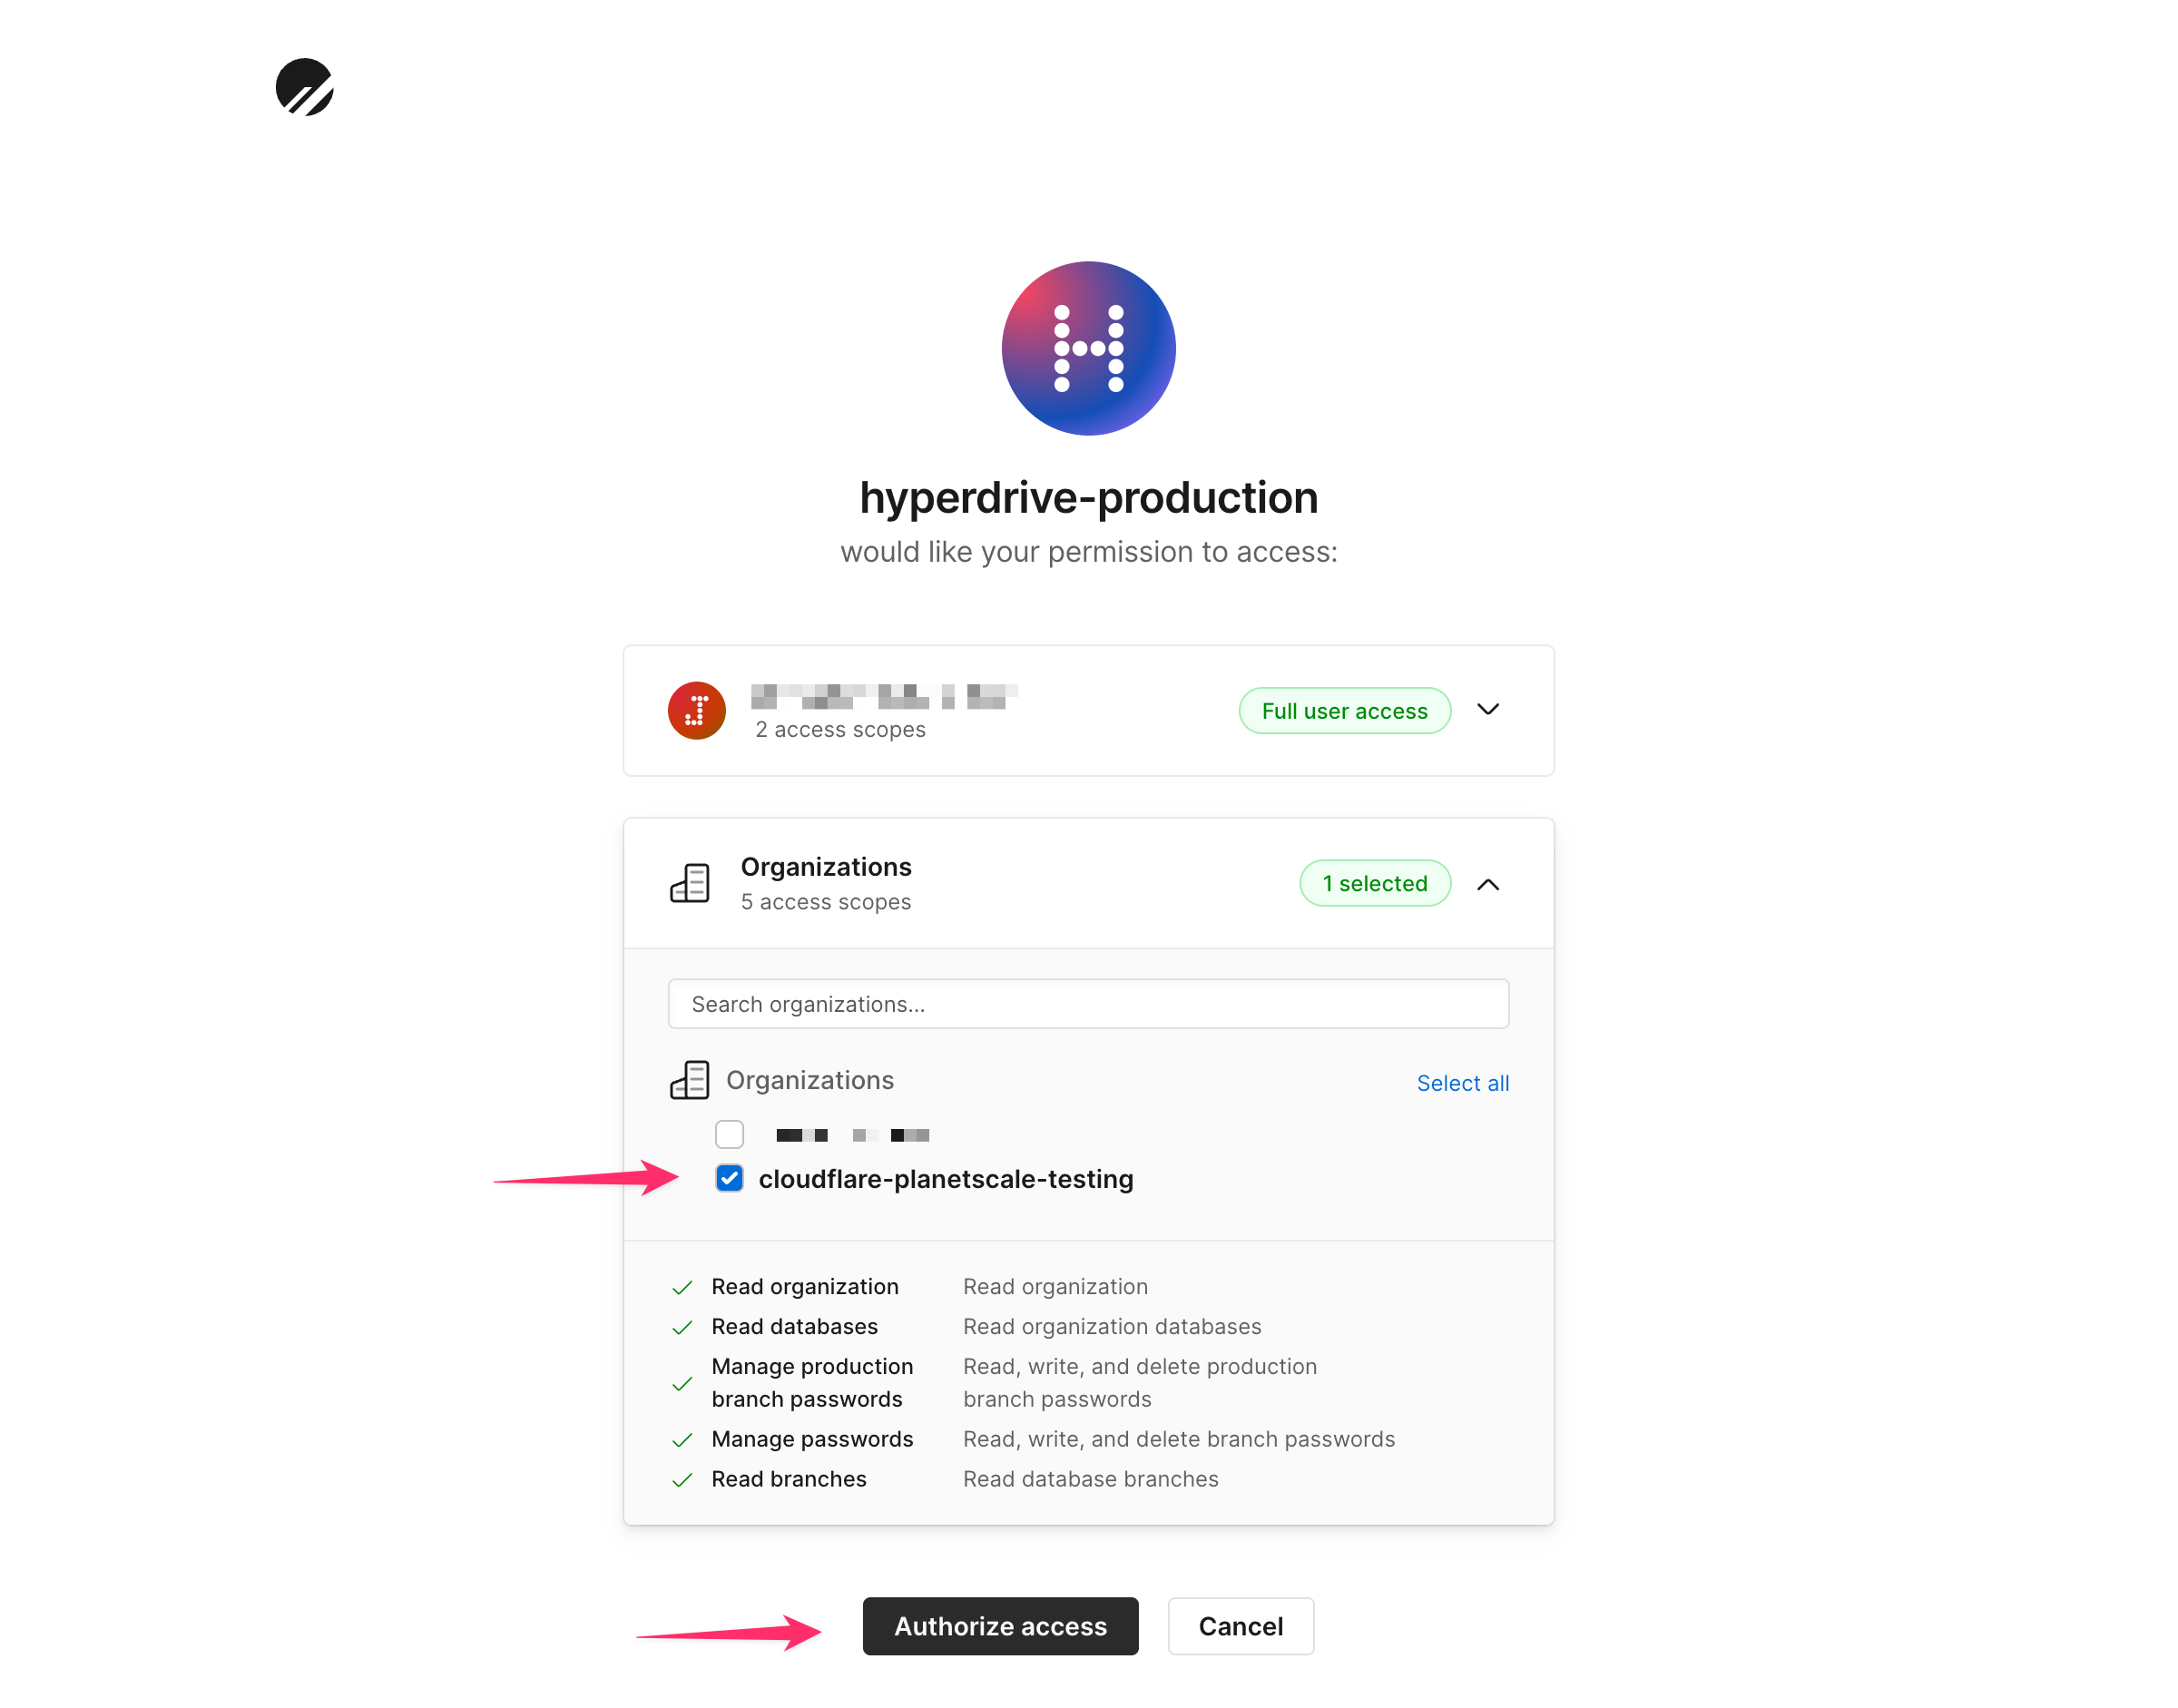 Select the database you created, the "main" branch and then click **Next**.
You must include a **database name**. For MySQL/Vitess databases, the default database name is the same as your project name (for example, `my-project`). For Postgres databases, the default database name is `postgres`.
Select the database you created, the "main" branch and then click **Next**.
You must include a **database name**. For MySQL/Vitess databases, the default database name is the same as your project name (for example, `my-project`). For Postgres databases, the default database name is `postgres`.
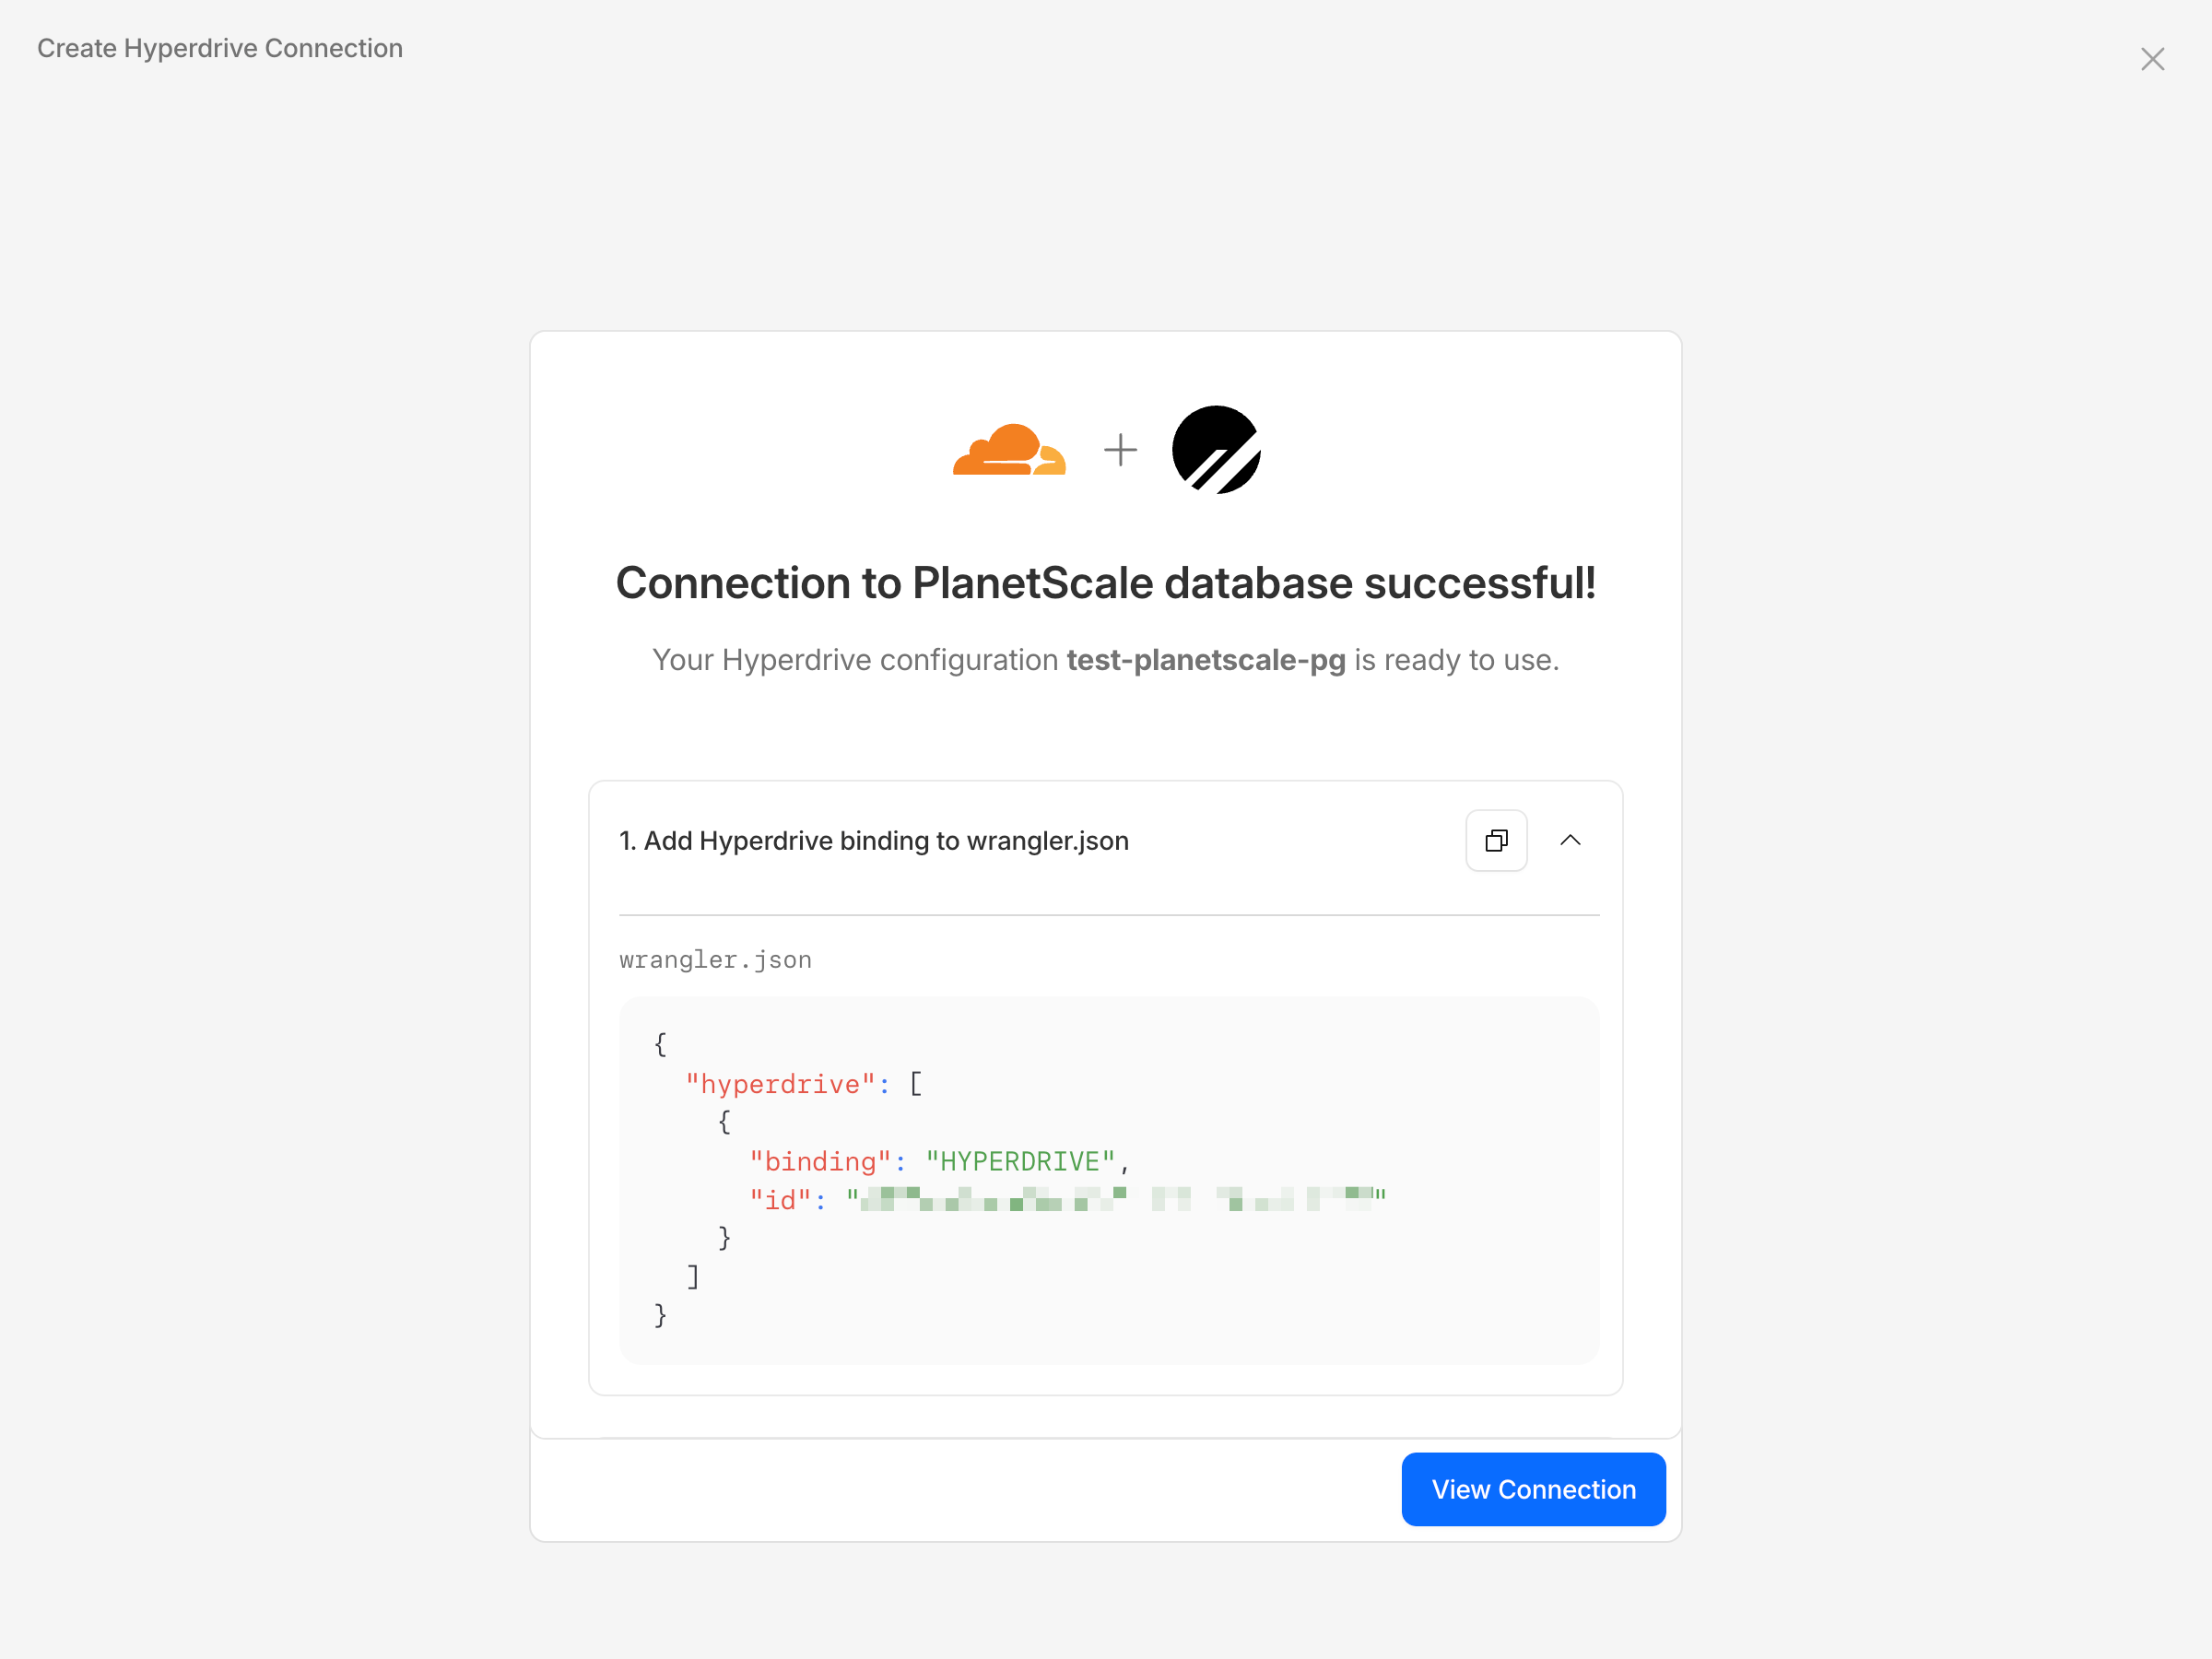
 You should see a success screen with the connection binding details to add to your `wrangler.json` file.
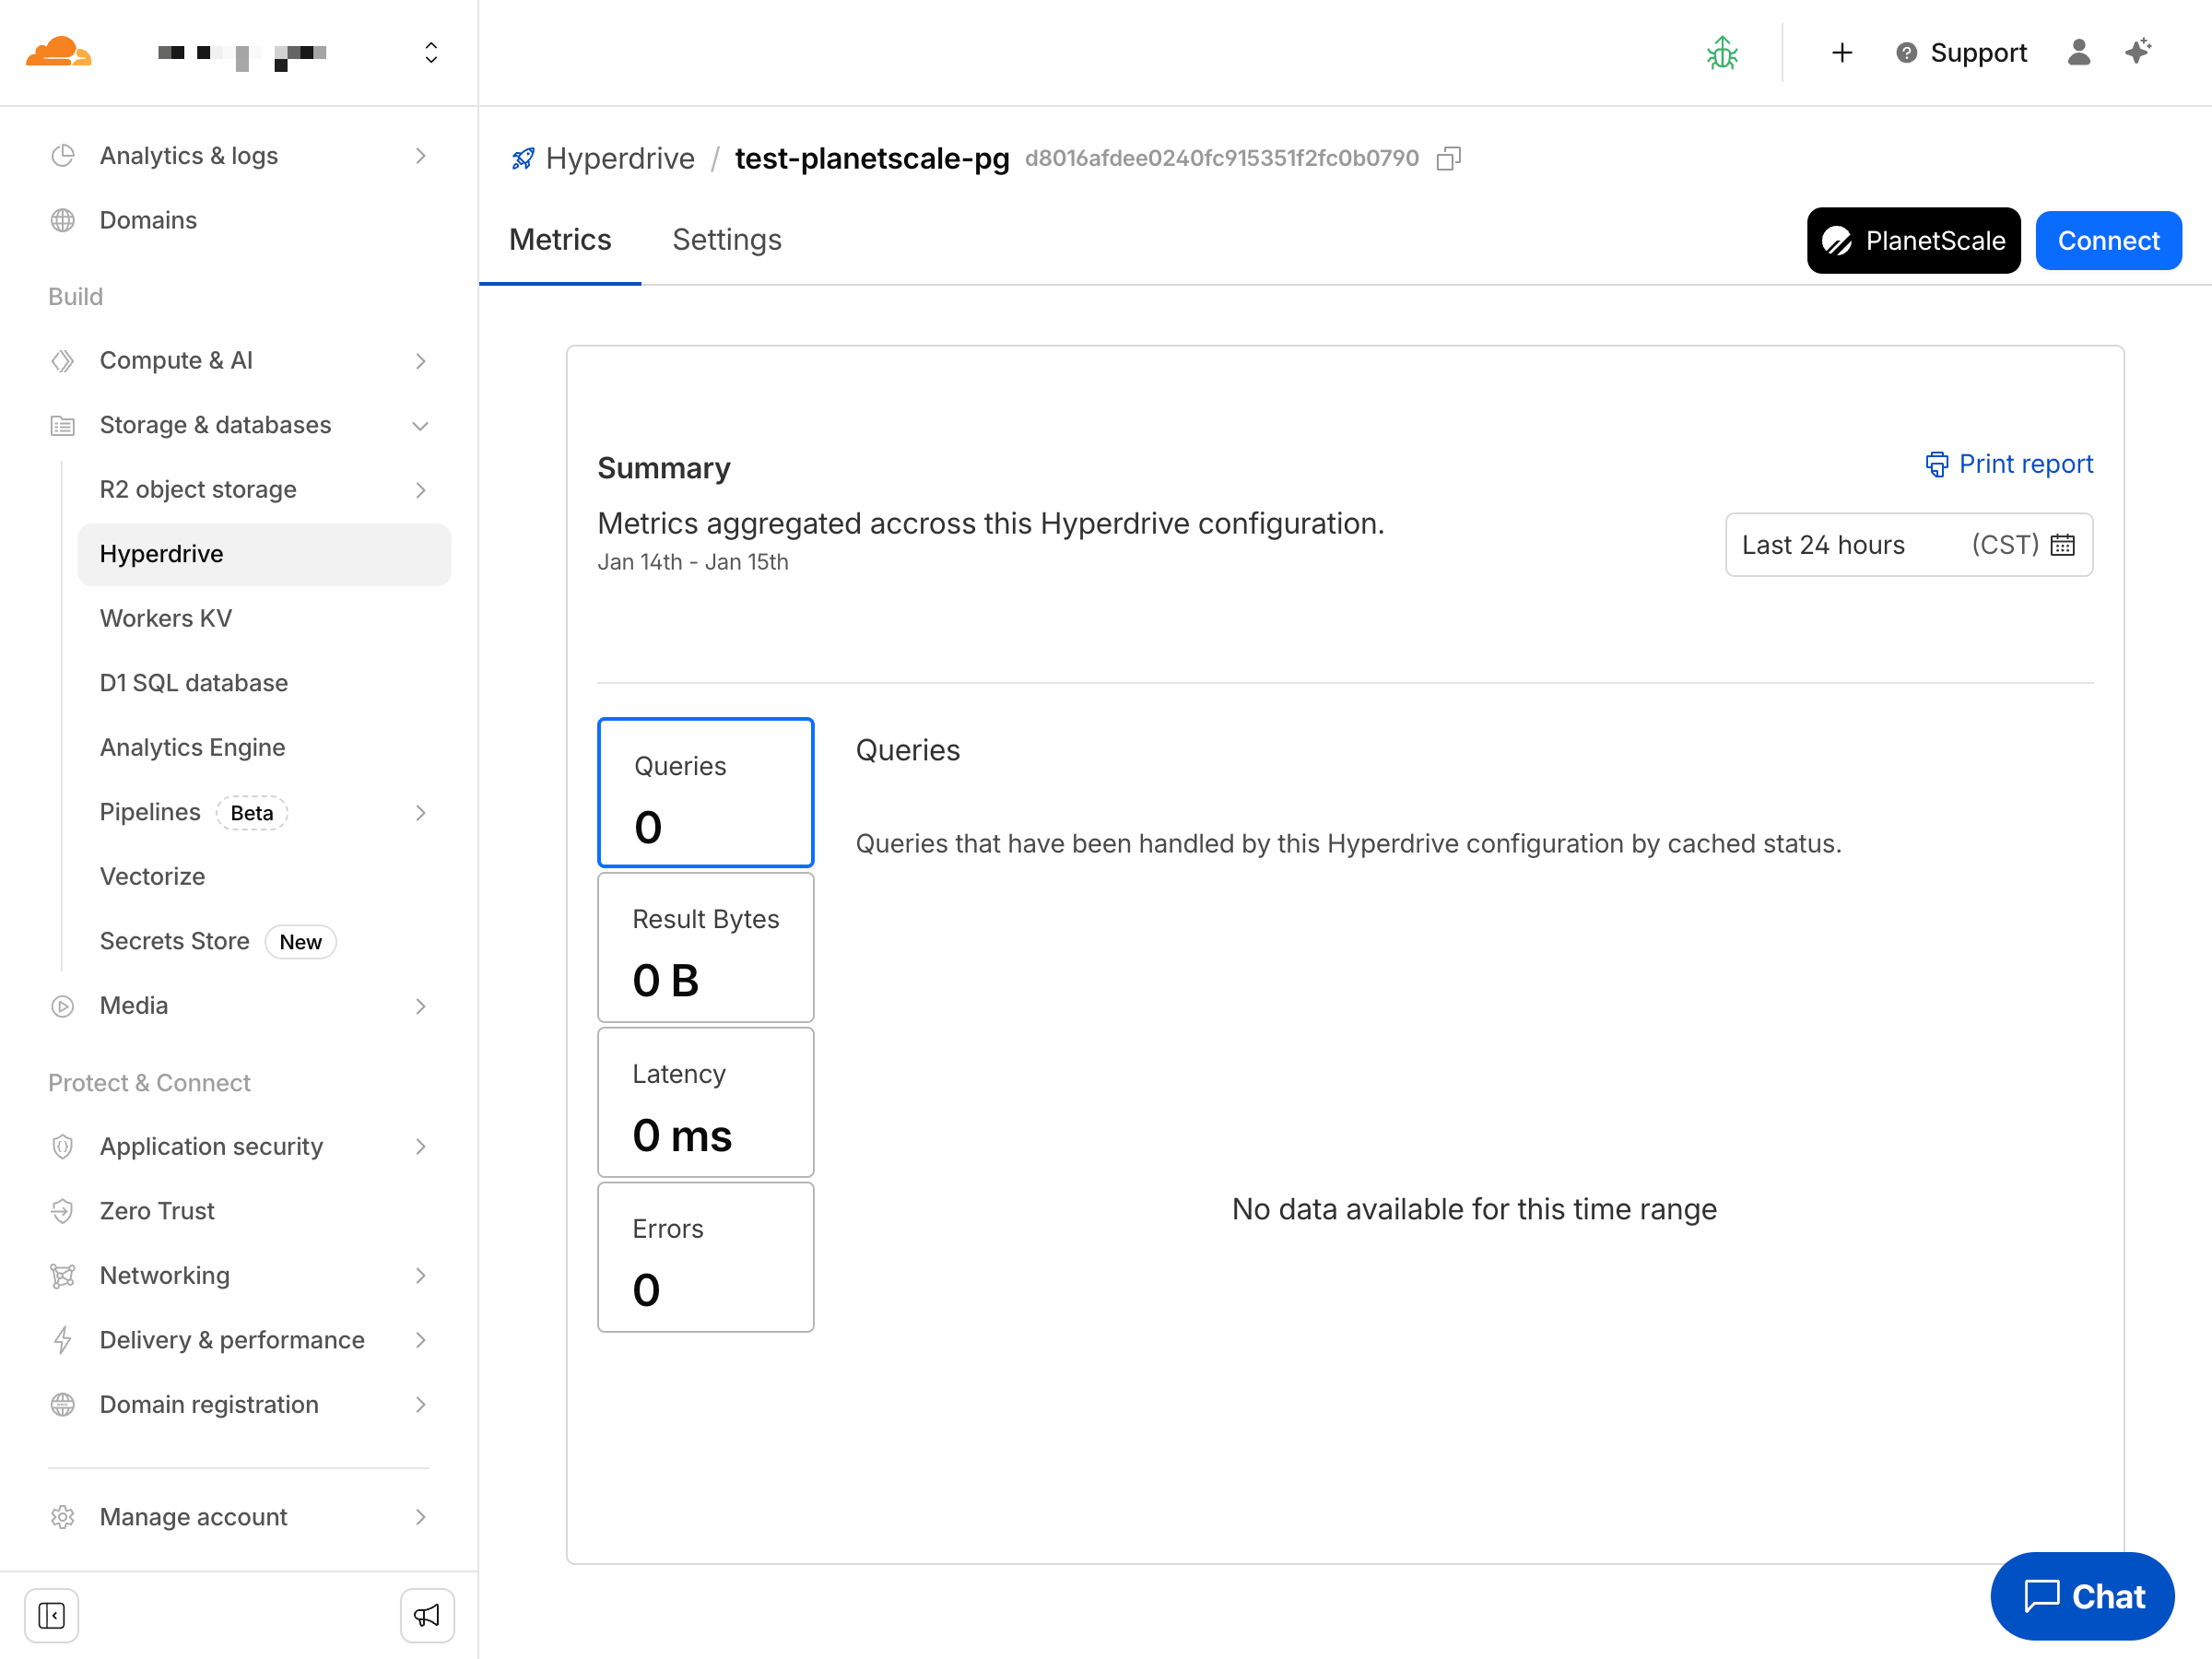
 You should now have metrics within your Cloudflare dashboard in the Hyperdrive page.
 Create a Hyperdrive connection by running the `wrangler` command below:
* Replace the `--connection-string` placeholders with your database credentials
* Replace the `` placeholder with a name for your Hyperdrive connection
**For MySQL/Vitess databases:**
```bash Terminal theme={null}
npx wrangler hyperdrive create --connection-string="mysql://:@/"
```
**For Postgres databases:**
```bash Terminal theme={null}
npx wrangler hyperdrive create --connection-string="postgresql://:@:/?sslmode=verify-full"
```
If successful, the command will output your new Hyperdrive configuration, for example:
```json Terminal theme={null}
{
"hyperdrive": [
{
"binding": "HYPERDRIVE",
"id": ""
}
]
}
```
### Configure Worker placement
By default, Workers run at the edge close to your users. For database-heavy workloads with multiple round trips, you can use [placement hints](https://developers.cloudflare.com/workers/configuration/smart-placement/) to run your Worker closer to your PlanetScale database and reduce latency.
Add a `placement` configuration to your `wrangler.jsonc` file with the region that matches your PlanetScale database region:
```json wrangler.json theme={null}
{
"placement": {
"region": "aws:us-east-1"
}
}
```
| PlanetScale Region | Placement Hint |
| -------------------------------------- | ----------------------------- |
| AWS ap-northeast-1 (Tokyo) | `aws:ap-northeast-1` |
| AWS ap-south-1 (Mumbai) | `aws:ap-south-1` |
| AWS ap-southeast-1 (Singapore) | `aws:ap-southeast-1` |
| AWS ap-southeast-2 (Sydney) | `aws:ap-southeast-2` |
| AWS ca-central-1 (Montreal) | `aws:ca-central-1` |
| AWS eu-central-1 (Frankfurt) | `aws:eu-central-1` |
| AWS eu-west-1 (Dublin) | `aws:eu-west-1` |
| AWS eu-west-2 (London) | `aws:eu-west-2` |
| AWS sa-east-1 (Sao Paulo) | `aws:sa-east-1` |
| AWS us-east-1 (N. Virginia) | `aws:us-east-1` |
| AWS us-east-2 (Ohio) | `aws:us-east-2` |
| AWS us-west-2 (Oregon) | `aws:us-west-2` |
| GCP asia-northeast3 (Seoul) | `gcp:asia-northeast3` |
| GCP europe-west1 (Belgium) | `gcp:europe-west1` |
| GCP europe-west4 (Netherlands) | `gcp:europe-west4` |
| GCP northamerica-northeast1 (Montreal) | `gcp:northamerica-northeast1` |
| GCP us-central1 (Iowa) | `gcp:us-central1` |
| GCP us-east1 (South Carolina) | `gcp:us-east1` |
| GCP us-east4 (Virginia) | `gcp:us-east4` |
Your Worker will run in the Cloudflare data center with the lowest latency to the specified region.
If your Worker connects to multiple back-end services and you're unsure which region to specify, use `"mode": "smart"` for automatic placement based on measured latency:
```json wrangler.json theme={null}
{
"placement": {
"mode": "smart"
}
}
```
### Step 2: Deploy your Worker
Run the following to deploy your Worker.
```bash Terminal theme={null}
npx wrangler deploy
```
For more information on using Cloudflare Workers and Hyperdrive, [refer to the Cloudflare documentation](https://developers.cloudflare.com/hyperdrive/).
## What's next?
Once you're done with development, it is highly recommended that [safe migrations](/vitess/schema-changes/safe-migrations) be turned on for your `main` production branch to protect from accidental schema changes and enable zero-downtime deployments.
When you're ready to make more schema changes, you'll [create a new branch](/vitess/schema-changes/branching) off of your production branch. Branching your database creates an isolated copy of your production schema so that you can easily test schema changes in development. Once you're happy with the changes, you'll open a [deploy request](/vitess/schema-changes/deploy-requests). This will generate a diff showing the changes that will be deployed, making it easy for your team to review.
Learn more about how PlanetScale allows you to make [non-blocking schema changes](/vitess/schema-changes) to your database tables without locking or causing downtime for production databases.
## Need help?
Get help from [the PlanetScale Support team](https://planetscale.com/contact?initial=support), or join our [Discord community](https://pscale.link/community) to see how others are using PlanetScale.
Create a Hyperdrive connection by running the `wrangler` command below:
* Replace the `--connection-string` placeholders with your database credentials
* Replace the `` placeholder with a name for your Hyperdrive connection
**For MySQL/Vitess databases:**
```bash Terminal theme={null}
npx wrangler hyperdrive create --connection-string="mysql://:@/"
```
**For Postgres databases:**
```bash Terminal theme={null}
npx wrangler hyperdrive create --connection-string="postgresql://:@:/?sslmode=verify-full"
```
If successful, the command will output your new Hyperdrive configuration, for example:
```json Terminal theme={null}
{
"hyperdrive": [
{
"binding": "HYPERDRIVE",
"id": ""
}
]
}
```
### Configure Worker placement
By default, Workers run at the edge close to your users. For database-heavy workloads with multiple round trips, you can use [placement hints](https://developers.cloudflare.com/workers/configuration/smart-placement/) to run your Worker closer to your PlanetScale database and reduce latency.
Add a `placement` configuration to your `wrangler.jsonc` file with the region that matches your PlanetScale database region:
```json wrangler.json theme={null}
{
"placement": {
"region": "aws:us-east-1"
}
}
```
| PlanetScale Region | Placement Hint |
| -------------------------------------- | ----------------------------- |
| AWS ap-northeast-1 (Tokyo) | `aws:ap-northeast-1` |
| AWS ap-south-1 (Mumbai) | `aws:ap-south-1` |
| AWS ap-southeast-1 (Singapore) | `aws:ap-southeast-1` |
| AWS ap-southeast-2 (Sydney) | `aws:ap-southeast-2` |
| AWS ca-central-1 (Montreal) | `aws:ca-central-1` |
| AWS eu-central-1 (Frankfurt) | `aws:eu-central-1` |
| AWS eu-west-1 (Dublin) | `aws:eu-west-1` |
| AWS eu-west-2 (London) | `aws:eu-west-2` |
| AWS sa-east-1 (Sao Paulo) | `aws:sa-east-1` |
| AWS us-east-1 (N. Virginia) | `aws:us-east-1` |
| AWS us-east-2 (Ohio) | `aws:us-east-2` |
| AWS us-west-2 (Oregon) | `aws:us-west-2` |
| GCP asia-northeast3 (Seoul) | `gcp:asia-northeast3` |
| GCP europe-west1 (Belgium) | `gcp:europe-west1` |
| GCP europe-west4 (Netherlands) | `gcp:europe-west4` |
| GCP northamerica-northeast1 (Montreal) | `gcp:northamerica-northeast1` |
| GCP us-central1 (Iowa) | `gcp:us-central1` |
| GCP us-east1 (South Carolina) | `gcp:us-east1` |
| GCP us-east4 (Virginia) | `gcp:us-east4` |
Your Worker will run in the Cloudflare data center with the lowest latency to the specified region.
If your Worker connects to multiple back-end services and you're unsure which region to specify, use `"mode": "smart"` for automatic placement based on measured latency:
```json wrangler.json theme={null}
{
"placement": {
"mode": "smart"
}
}
```
### Step 2: Deploy your Worker
Run the following to deploy your Worker.
```bash Terminal theme={null}
npx wrangler deploy
```
For more information on using Cloudflare Workers and Hyperdrive, [refer to the Cloudflare documentation](https://developers.cloudflare.com/hyperdrive/).
## What's next?
Once you're done with development, it is highly recommended that [safe migrations](/vitess/schema-changes/safe-migrations) be turned on for your `main` production branch to protect from accidental schema changes and enable zero-downtime deployments.
When you're ready to make more schema changes, you'll [create a new branch](/vitess/schema-changes/branching) off of your production branch. Branching your database creates an isolated copy of your production schema so that you can easily test schema changes in development. Once you're happy with the changes, you'll open a [deploy request](/vitess/schema-changes/deploy-requests). This will generate a diff showing the changes that will be deployed, making it easy for your team to review.
Learn more about how PlanetScale allows you to make [non-blocking schema changes](/vitess/schema-changes) to your database tables without locking or causing downtime for production databases.
## Need help?
Get help from [the PlanetScale Support team](https://planetscale.com/contact?initial=support), or join our [Discord community](https://pscale.link/community) to see how others are using PlanetScale.