> ## Documentation Index
> Fetch the complete documentation index at: https://planetscale.com/docs/llms.txt
> Use this file to discover all available pages before exploring further.
# Migrate from Aurora to PlanetScale
> Use this guide to migrate an existing Aurora (Postgres) database to PlanetScale Postgres.
Before beginning your migration, we recommend running the [PlanetScale Discovery Tool](/postgres/imports/discovery-tool) on your database to assess compatibility and ease of migration.
This guide will cover a no-downtime approach to migrating using Postgres logical replication. If you are willing to tolerate downtime during a maintenance window, you may also use [`pg_dump` and restore](/postgres/imports/postgres-migrate-dumprestore). The `pg_dump`/restore approach is simpler, but is only for applications where downtime is acceptable.
This guide assumes that public internet access is enabled on your Aurora database, as it will be needed to connect and replicate to the new PlanetScale host. If you cannot enable this due to security policies, consider using [AWS DMS](/postgres/imports/aurora-dms) for your migration, or [contact support](https://planetscale.com/contact?initial=support) for more specific guidance.
These instructions work for all versions of Postgres that support logical replication (version 10+). If you have an older version you want to bring to PlanetScale, [contact us](https://planetscale.com/contact?initial=support) for guidance.
Before beginning a migration, you should check our [extensions documentation](/postgres/extensions) to ensure that all of the extensions you rely on will work on PlanetScale.
As an alternative to this guide, you can also try our [Postgres migration scripts](https://github.com/planetscale/migration-scripts/tree/main/postgres-direct). These allow you to automate some of the manual steps that we describe in this guide.
Want expert guidance for your migration? PlanetScale's [migration services](https://planetscale.com/migrate) are available to help you plan and execute a smooth, successful move.
## 1. Prepare your PlanetScale database
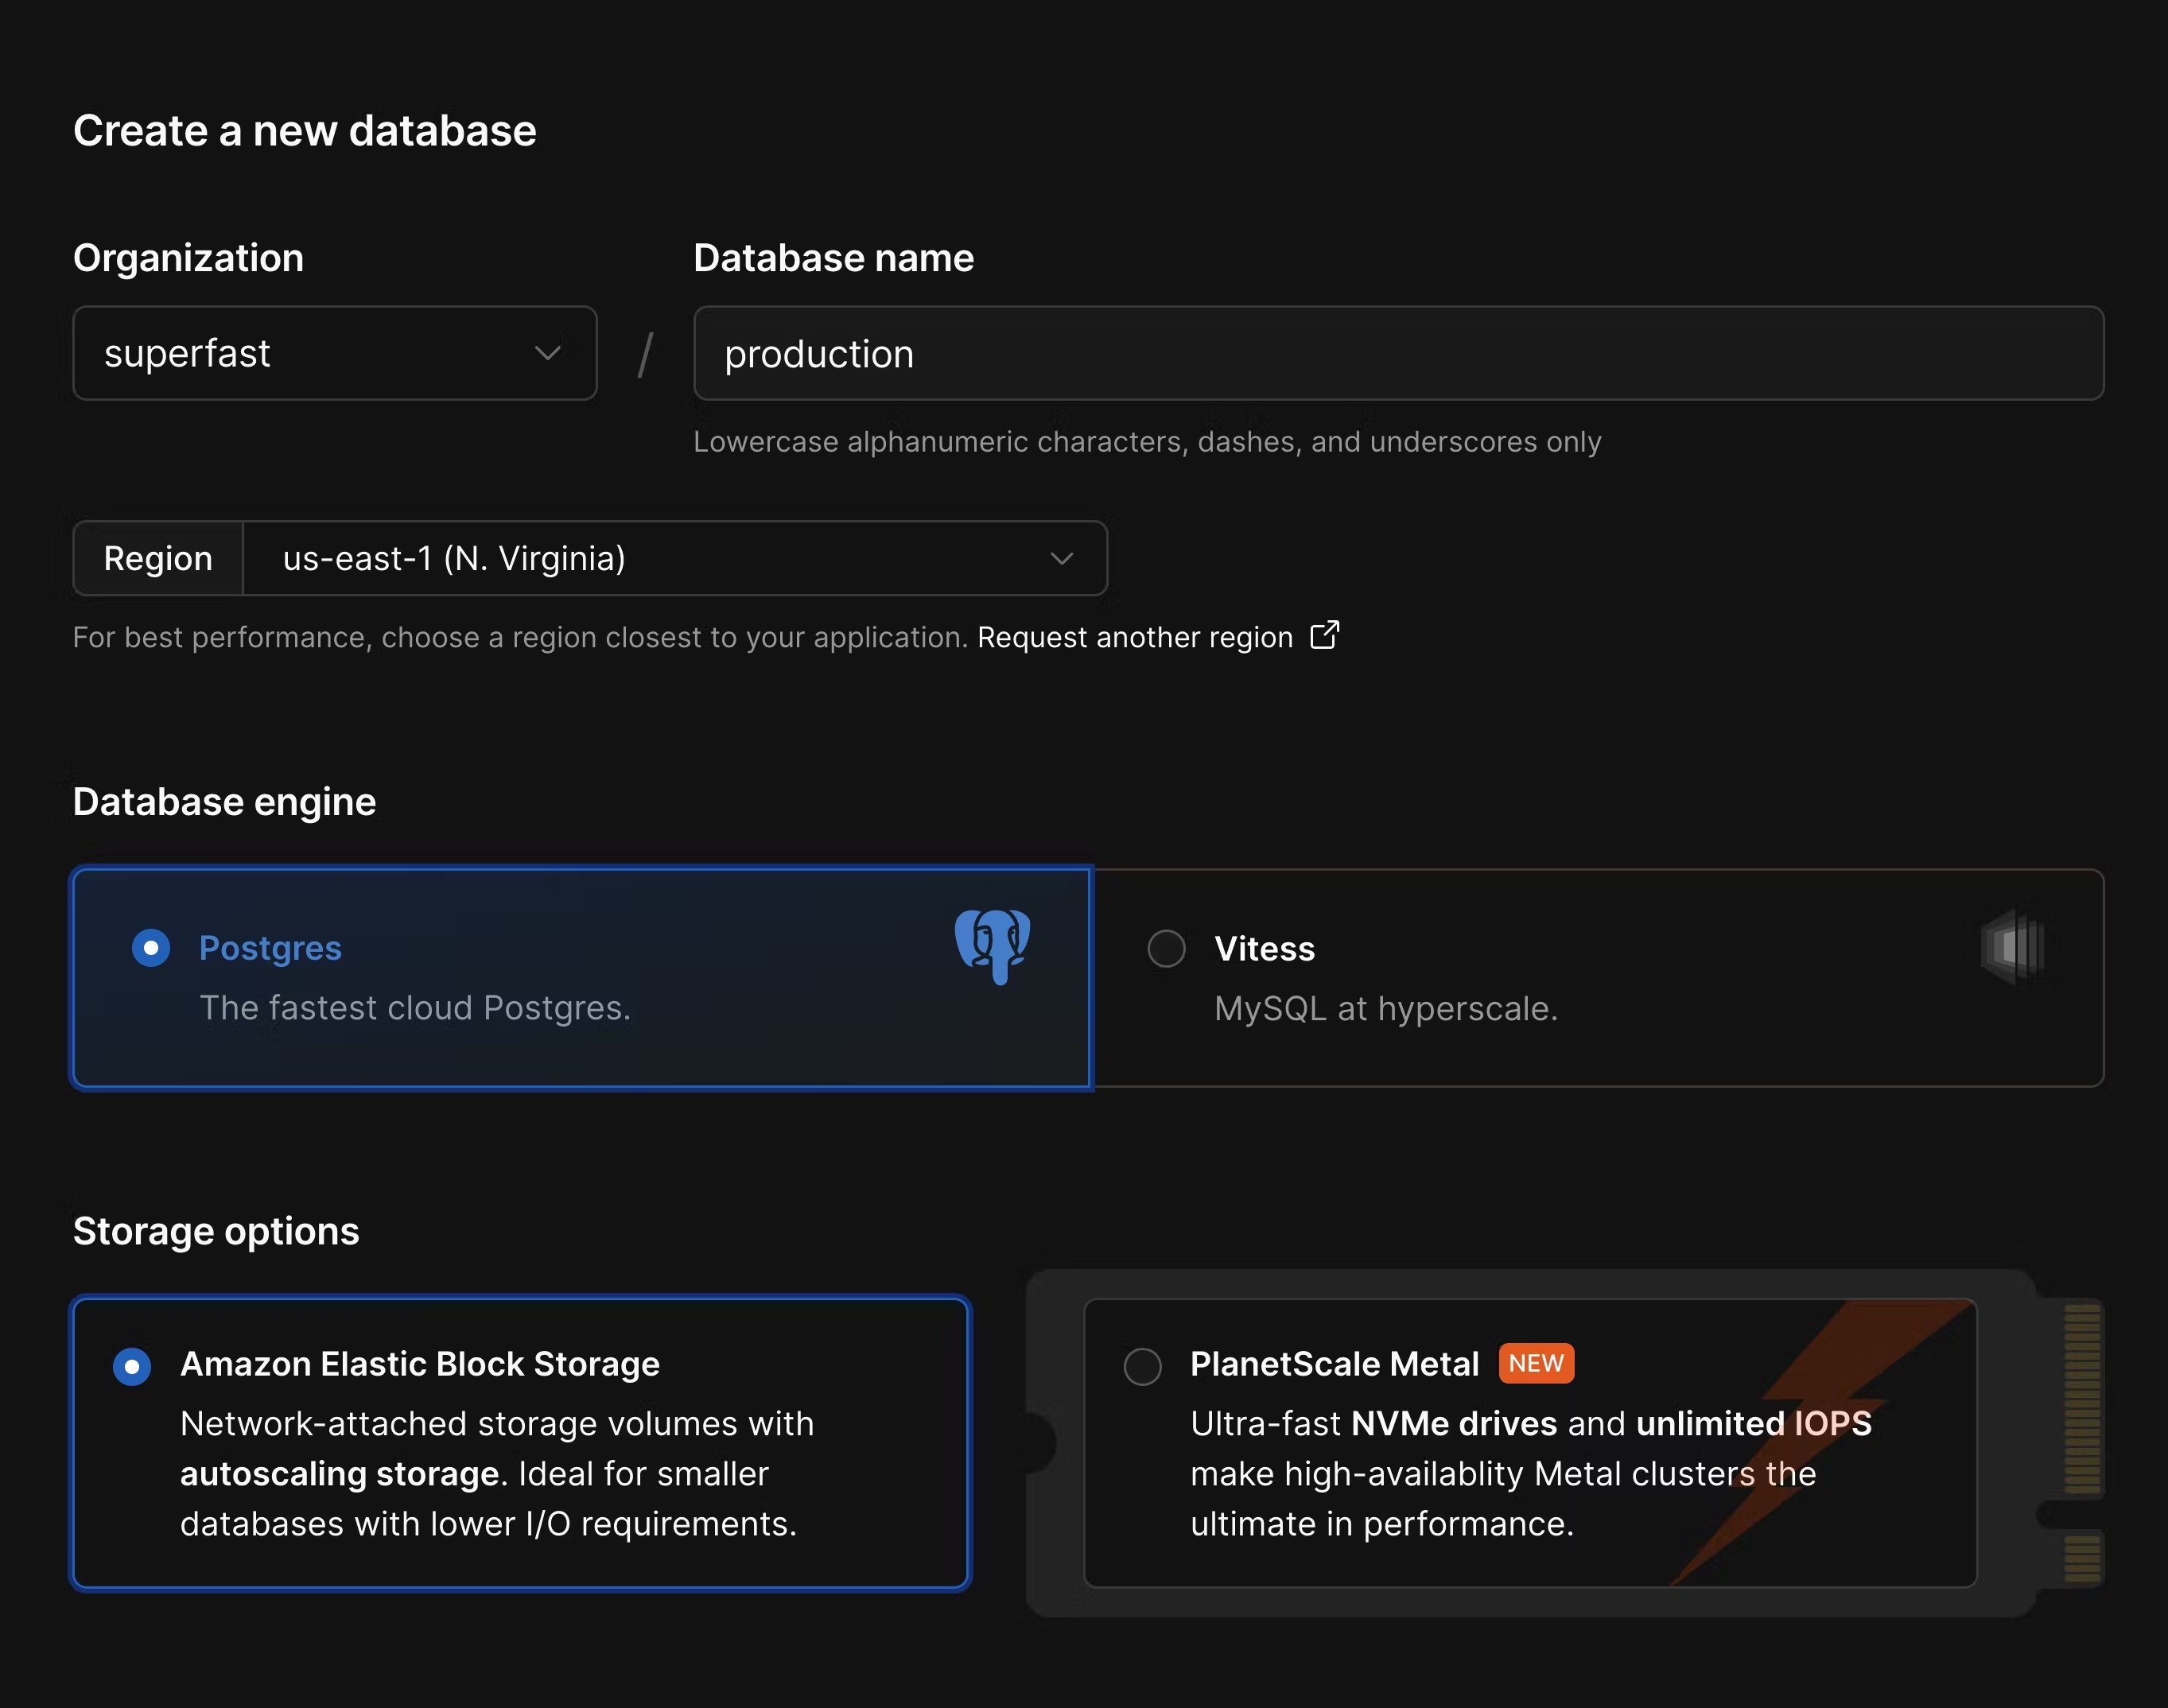
Create a new database in the [PlanetScale dashboard](https://app.planetscale.com) or using the [PlanetScale CLI](/cli). A few things to check when configuring your database:
* Ensure you select the correct cloud region. You typically want to use the same region that you deploy your other application infrastructure to.
* This guide assumes you are migrating from a Postgres Aurora database, so also choose the Postgres option in PlanetScale.
* Choose the best storage option for your needs. For applications needing high-performance and low-latency I/O, use [PlanetScale Metal](/metal). For applications that need more flexible storage options or smaller compute instances, choose "Elastic Block Storage" or "Persistent Disk."
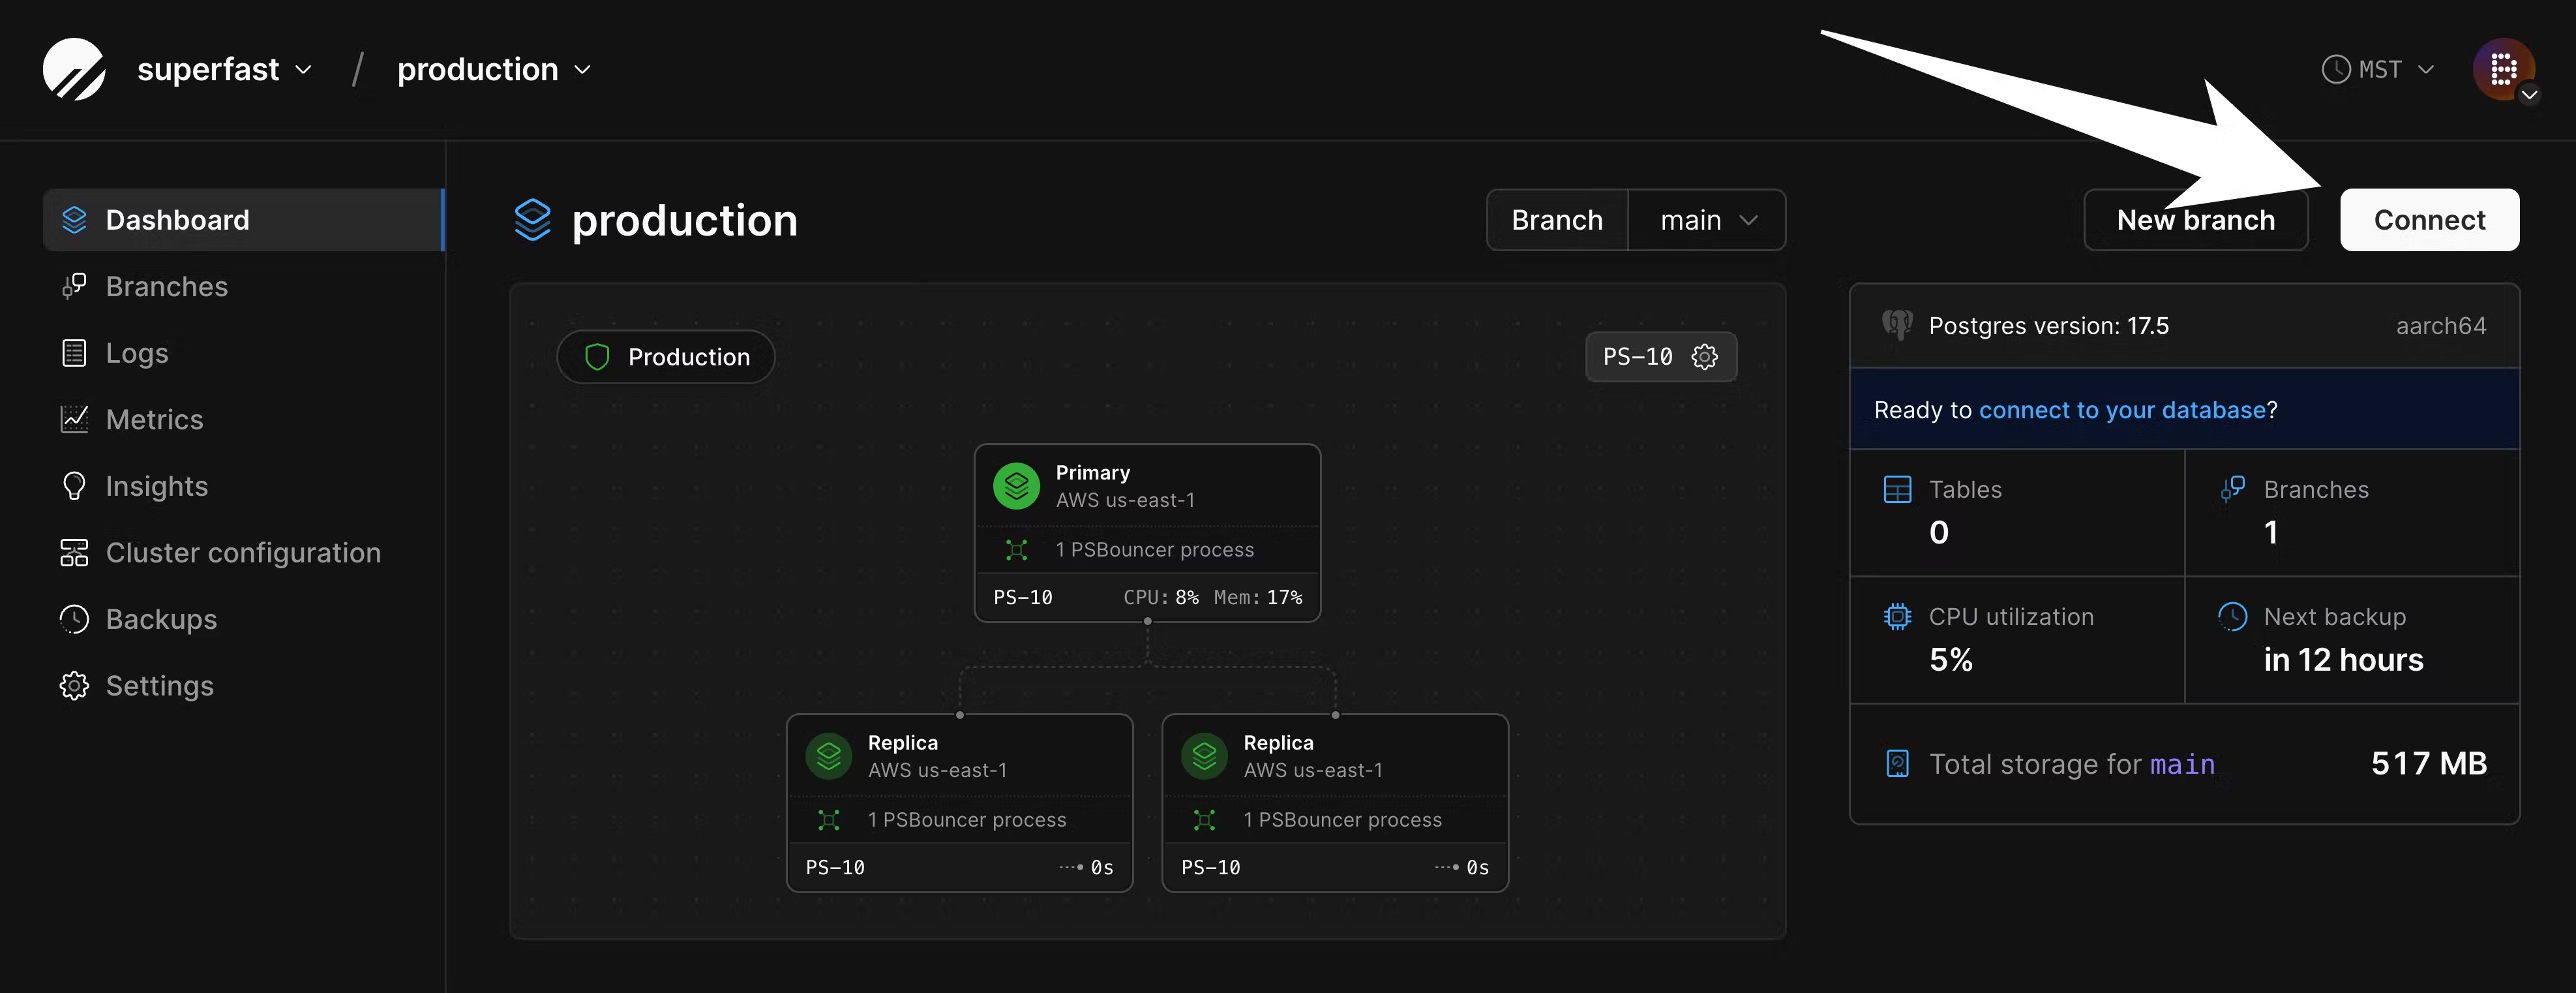
 Once the database is created and ready, navigate to your dashboard and click the "Connect" button.
 From here, follow the instructions to create a new default role. This role will act as your admin role, with the highest level of privileges.
Though you may use this one for your migration, we recommend you use a separate role with lesser privileges for your migration and general database connections.
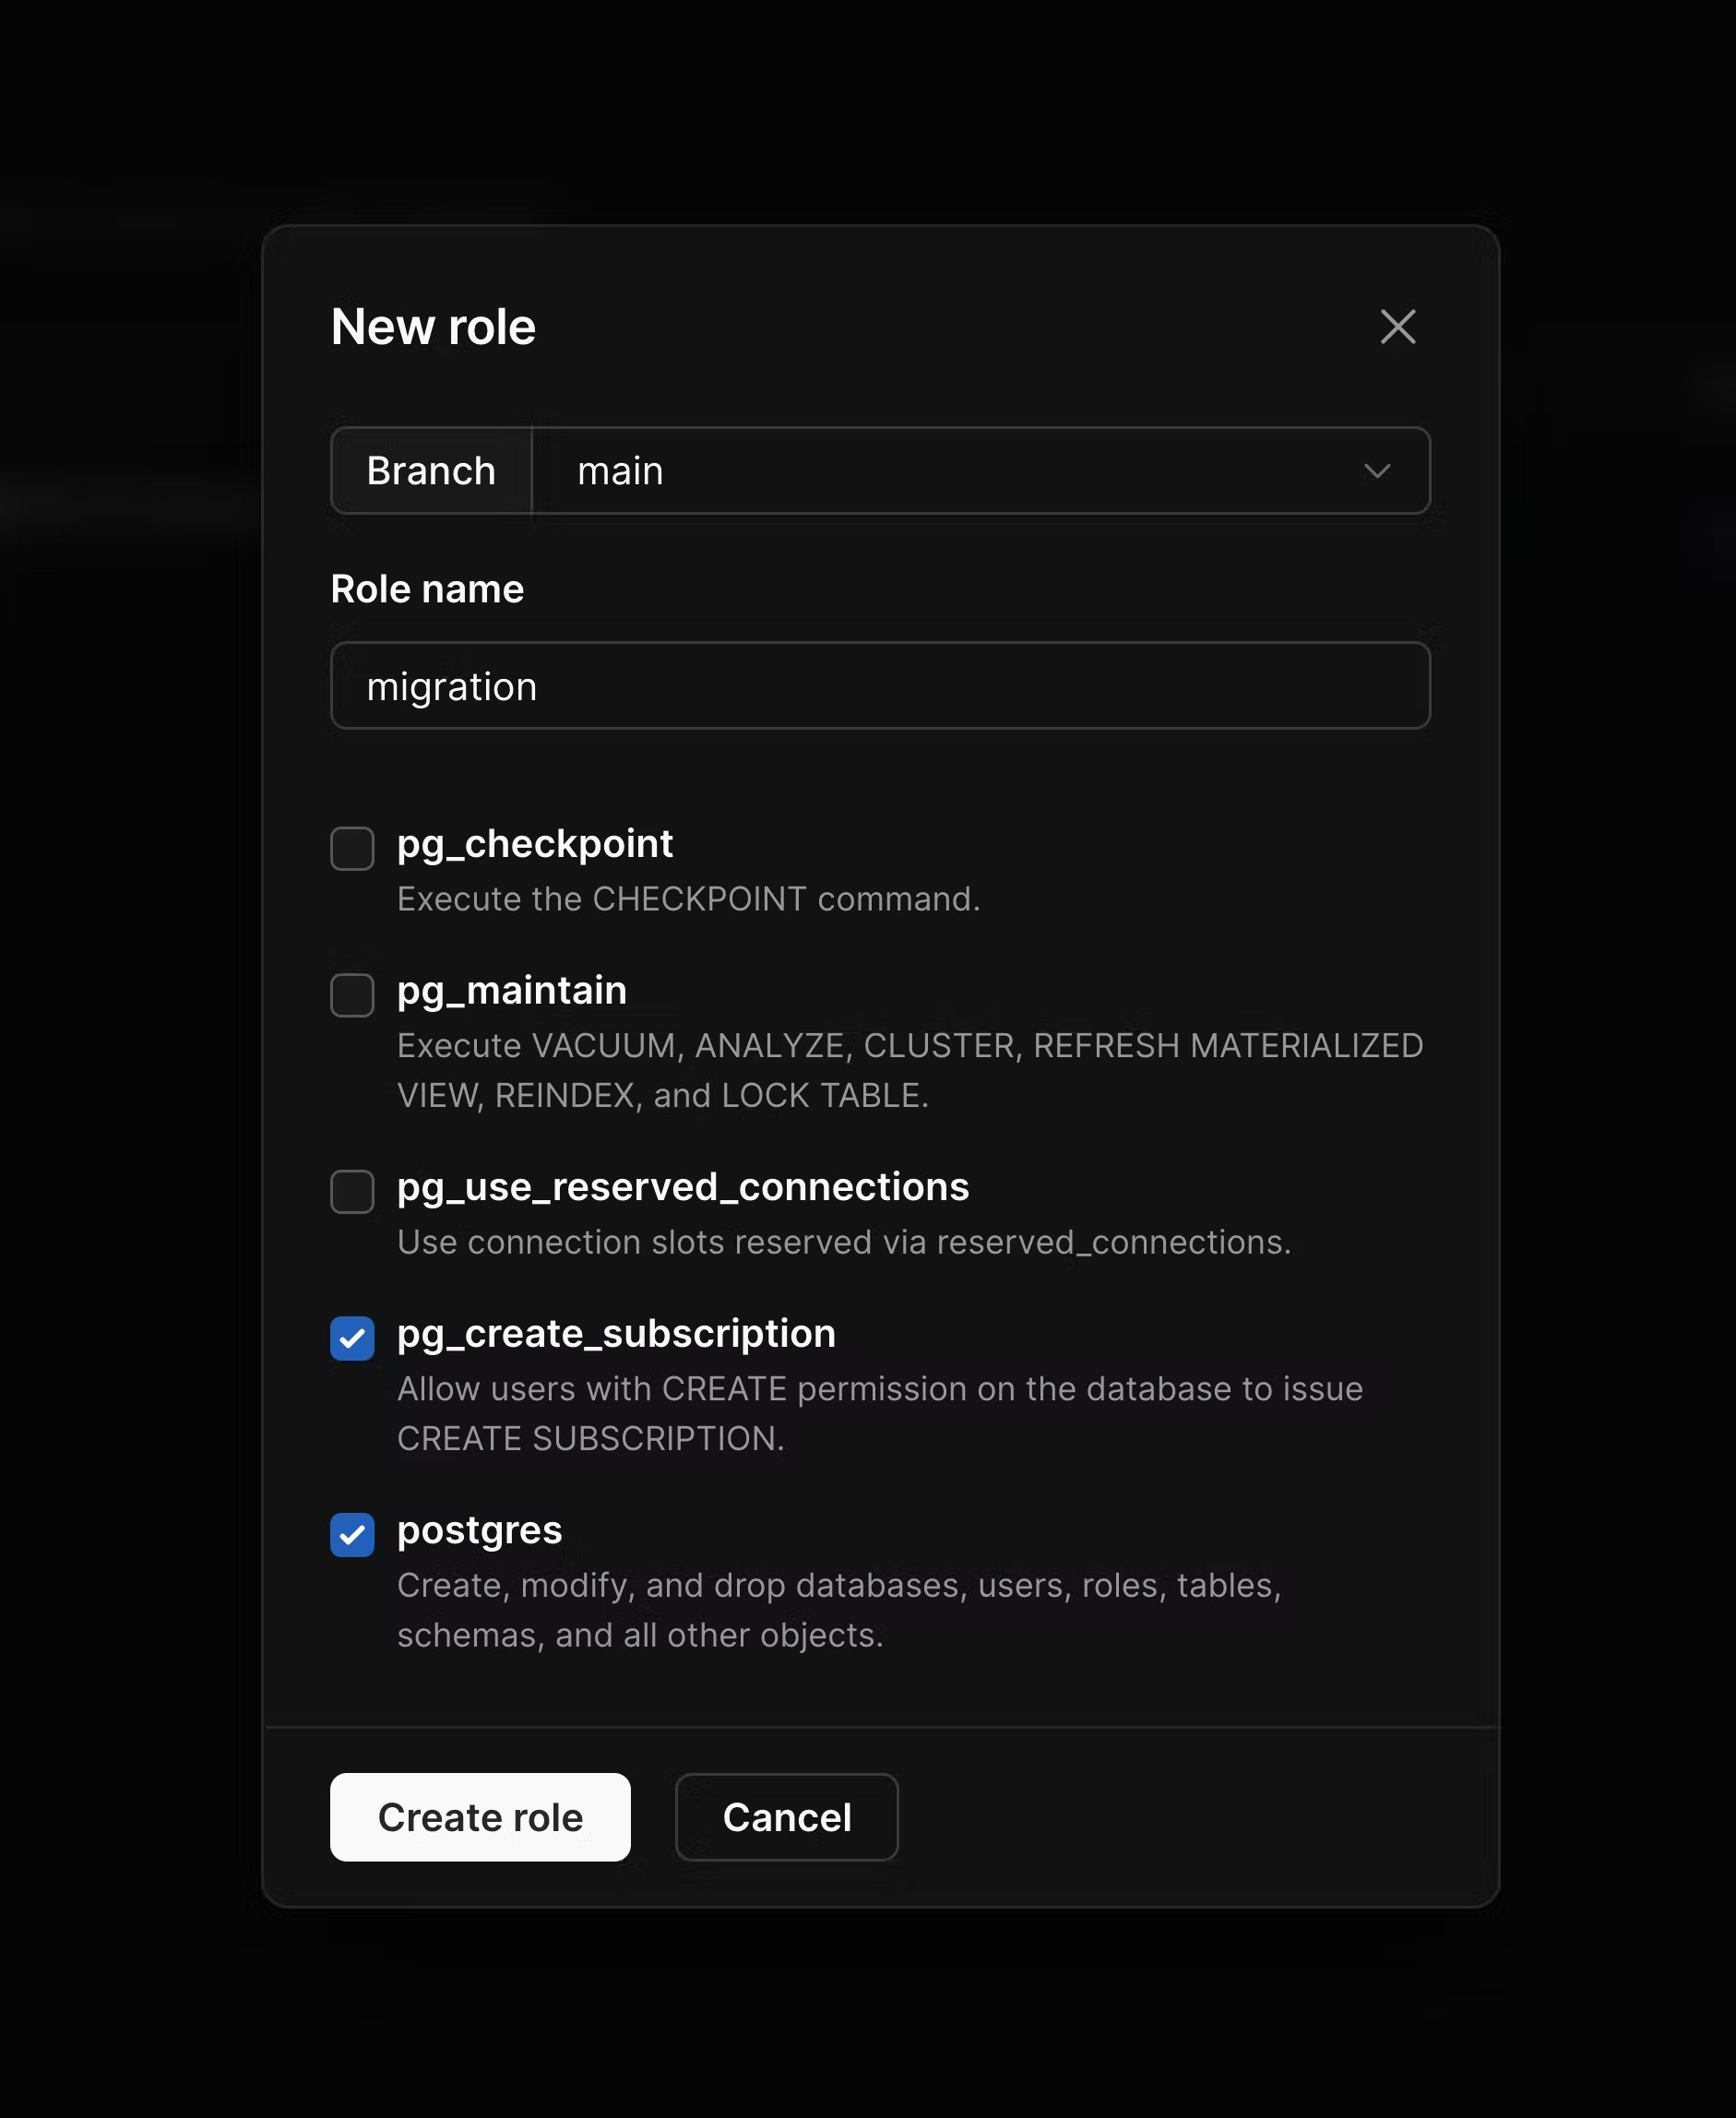
To create a new role, navigate to the [Role management page](/postgres/connecting/roles) in your database settings. Click "New role" and give the role a memorable name. By default, `pg_read_all_data` and `pg_write_all_data` are enabled. In addition to these, enable `pg_create_subscription` and `postgres`, and then create the role.
From here, follow the instructions to create a new default role. This role will act as your admin role, with the highest level of privileges.
Though you may use this one for your migration, we recommend you use a separate role with lesser privileges for your migration and general database connections.
To create a new role, navigate to the [Role management page](/postgres/connecting/roles) in your database settings. Click "New role" and give the role a memorable name. By default, `pg_read_all_data` and `pg_write_all_data` are enabled. In addition to these, enable `pg_create_subscription` and `postgres`, and then create the role.
 Copy the password and all other connection credentials into environment variables for later use:
```bash theme={null}
PLANETSCALE_USERNAME=pscale_api_XXXXXXXXXX.XXXXXXXXXX
PLANETSCALE_PASSWORD=pscale_pw_XXXXXXXXXXXXXXXXXXXXXXX
PLANETSCALE_HOST=XXXX.pg.psdb.cloud
PLANETSCALE_DBNAME=postgres
```
We also recommend that you increase `max_worker_processes` for the duration of the migration, in order to speed up data copying. Go to the "Parameters" tab of the "Clusters" page:
Copy the password and all other connection credentials into environment variables for later use:
```bash theme={null}
PLANETSCALE_USERNAME=pscale_api_XXXXXXXXXX.XXXXXXXXXX
PLANETSCALE_PASSWORD=pscale_pw_XXXXXXXXXXXXXXXXXXXXXXX
PLANETSCALE_HOST=XXXX.pg.psdb.cloud
PLANETSCALE_DBNAME=postgres
```
We also recommend that you increase `max_worker_processes` for the duration of the migration, in order to speed up data copying. Go to the "Parameters" tab of the "Clusters" page:
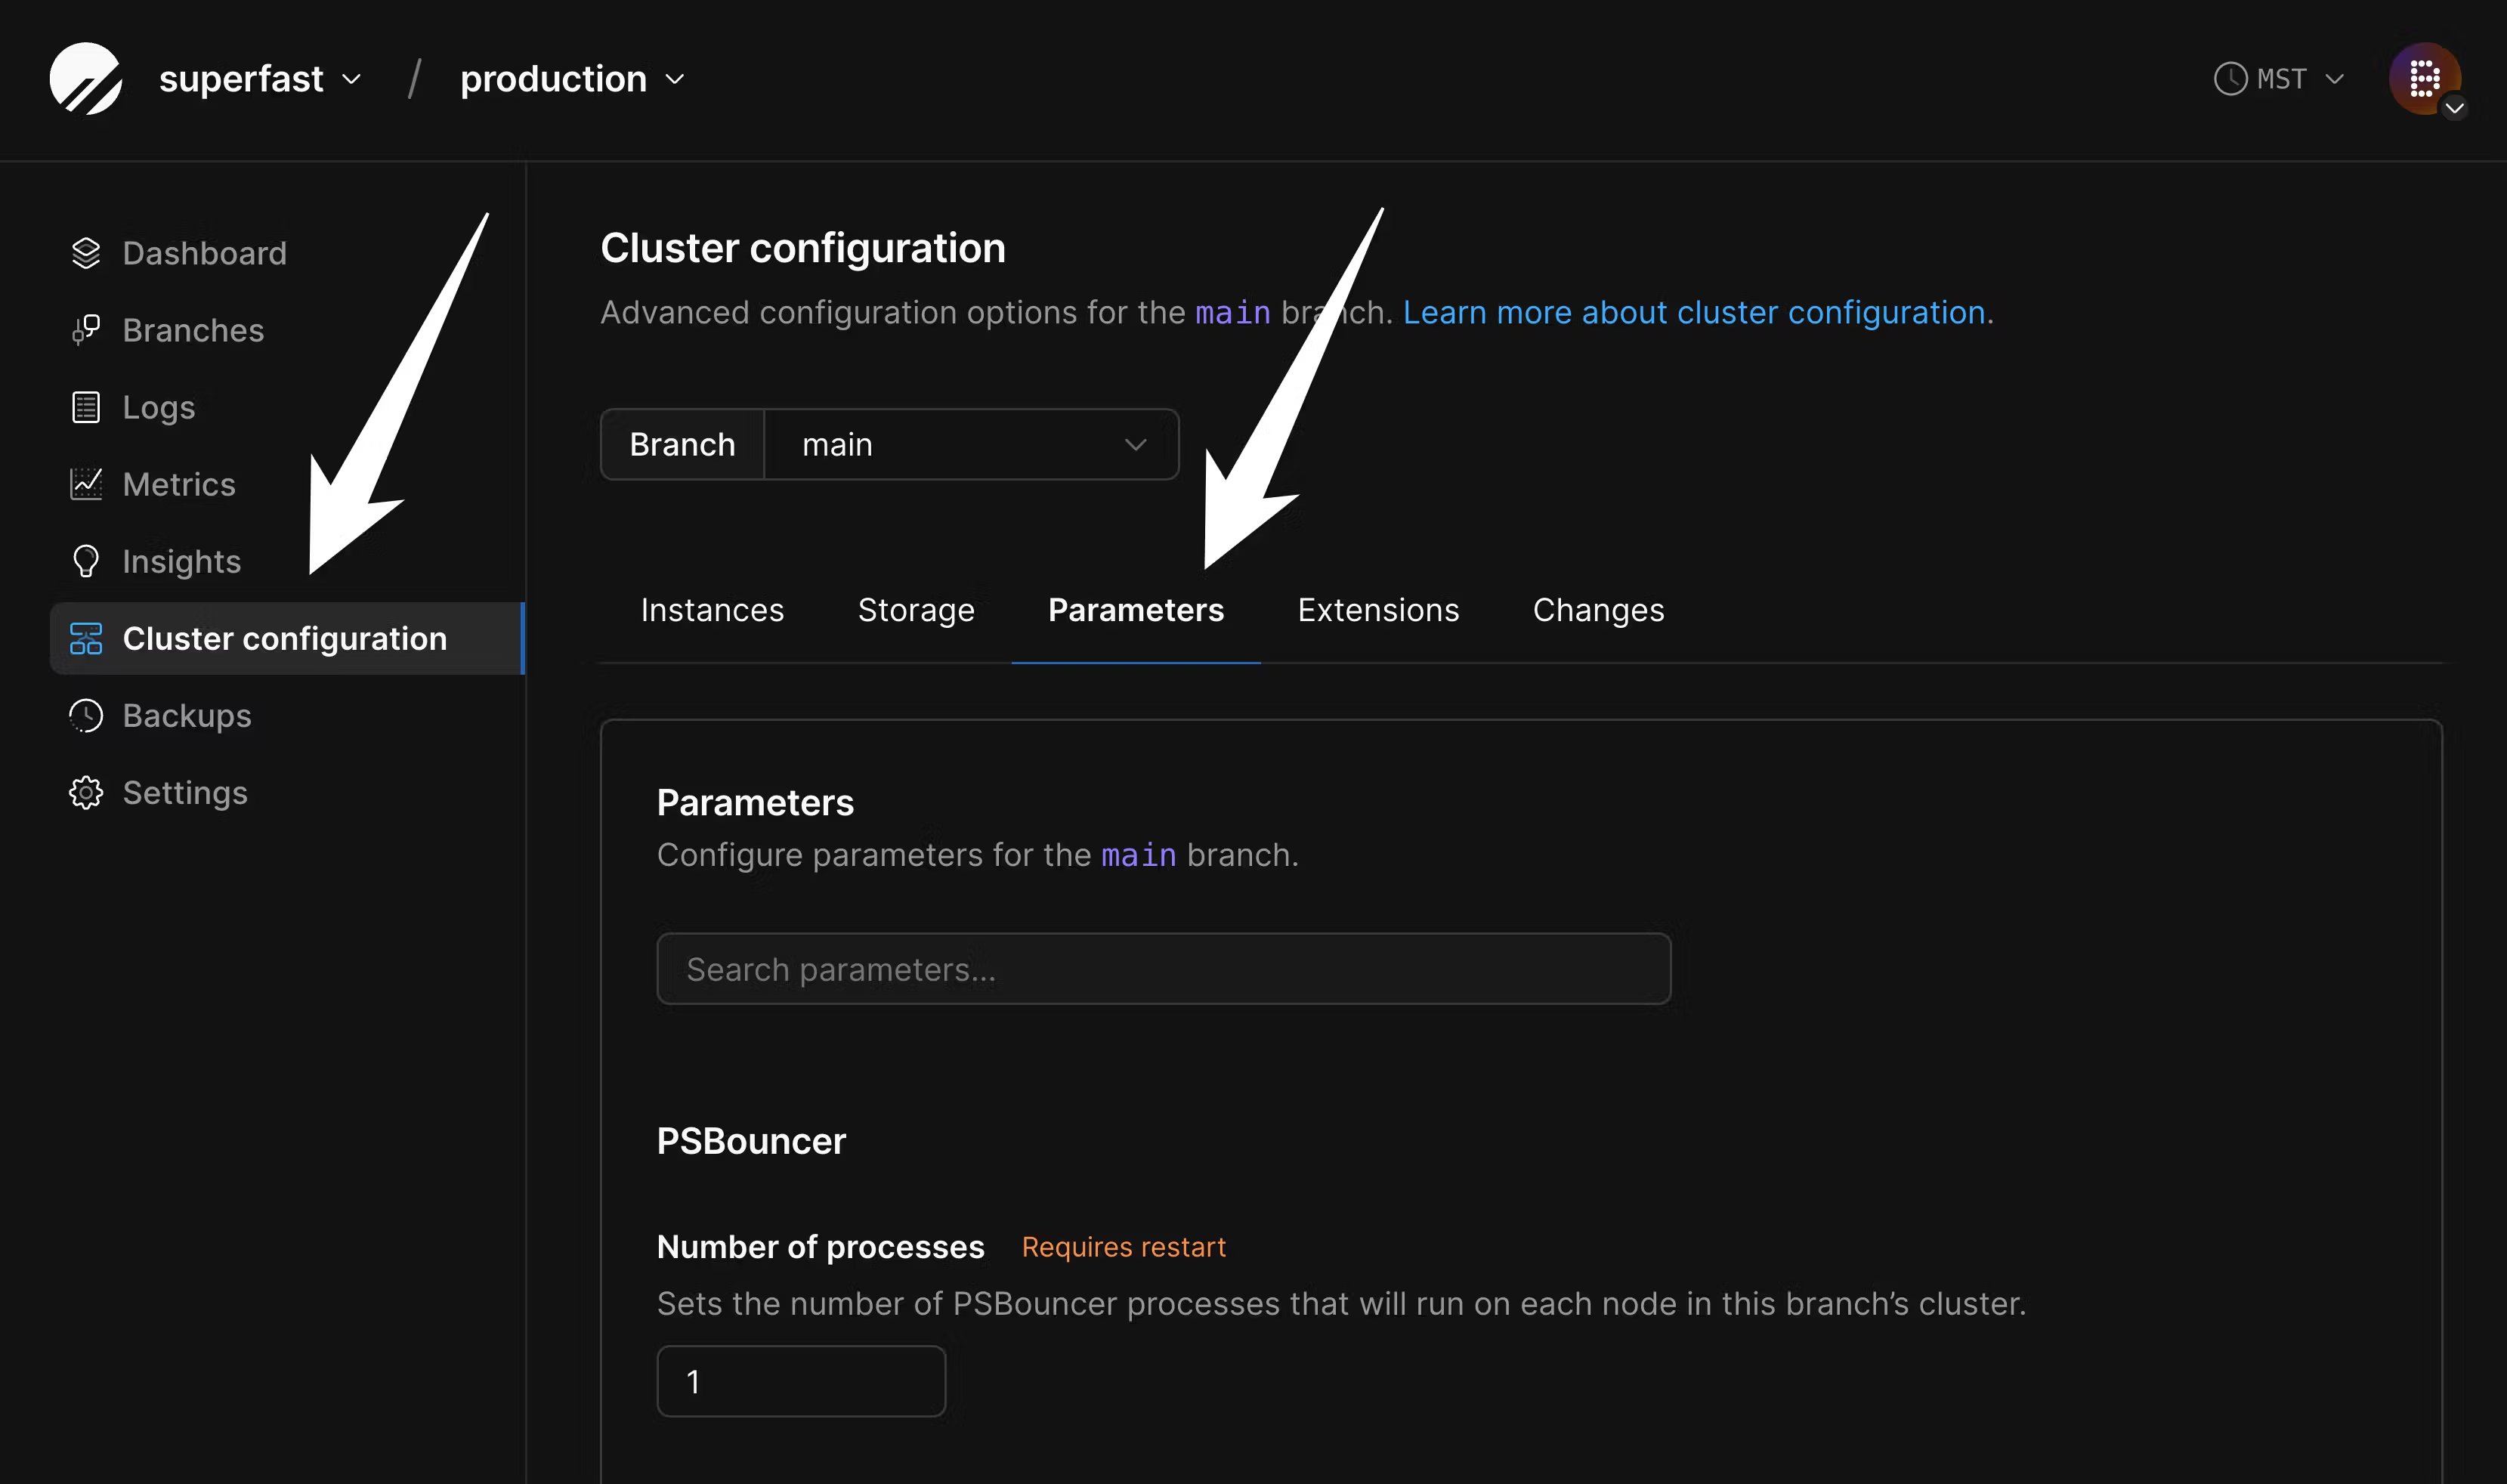 On this page, increase this value from the default of `4` to `10` or more:
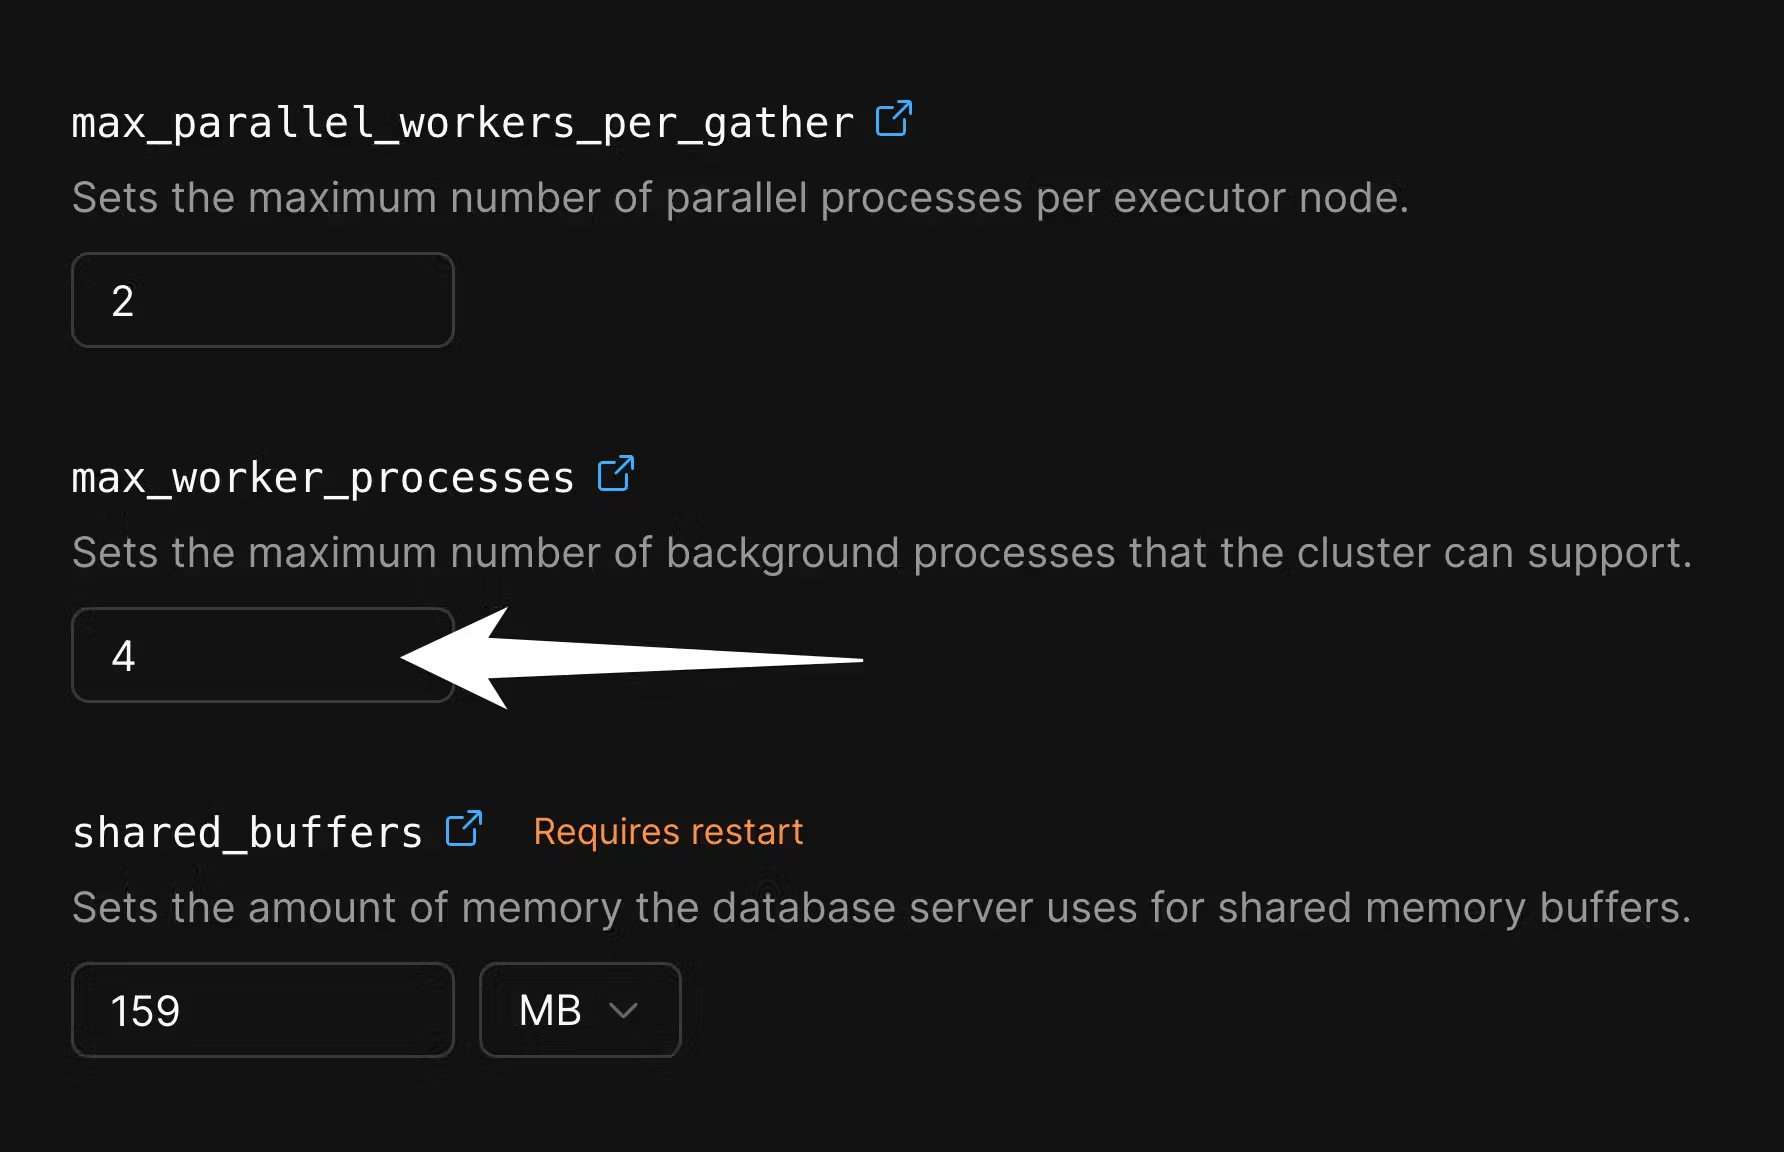 You can decrease these values after the migration is complete.
## 2. Configure disk size on PlanetScale
If you are importing into a database backed by network-attached storage, you must configure your disk in advance to ensure your database will fit.
Though we support disk autoscaling for these, AWS and GCP limit how frequently disks can be resized.
If you don't ensure your disk is large enough for the import in advance, it will not be able to resize fast enough for a large data import.
To configure this, navigate to "Clusters" and then the "Storage" tab:
You can decrease these values after the migration is complete.
## 2. Configure disk size on PlanetScale
If you are importing into a database backed by network-attached storage, you must configure your disk in advance to ensure your database will fit.
Though we support disk autoscaling for these, AWS and GCP limit how frequently disks can be resized.
If you don't ensure your disk is large enough for the import in advance, it will not be able to resize fast enough for a large data import.
To configure this, navigate to "Clusters" and then the "Storage" tab:
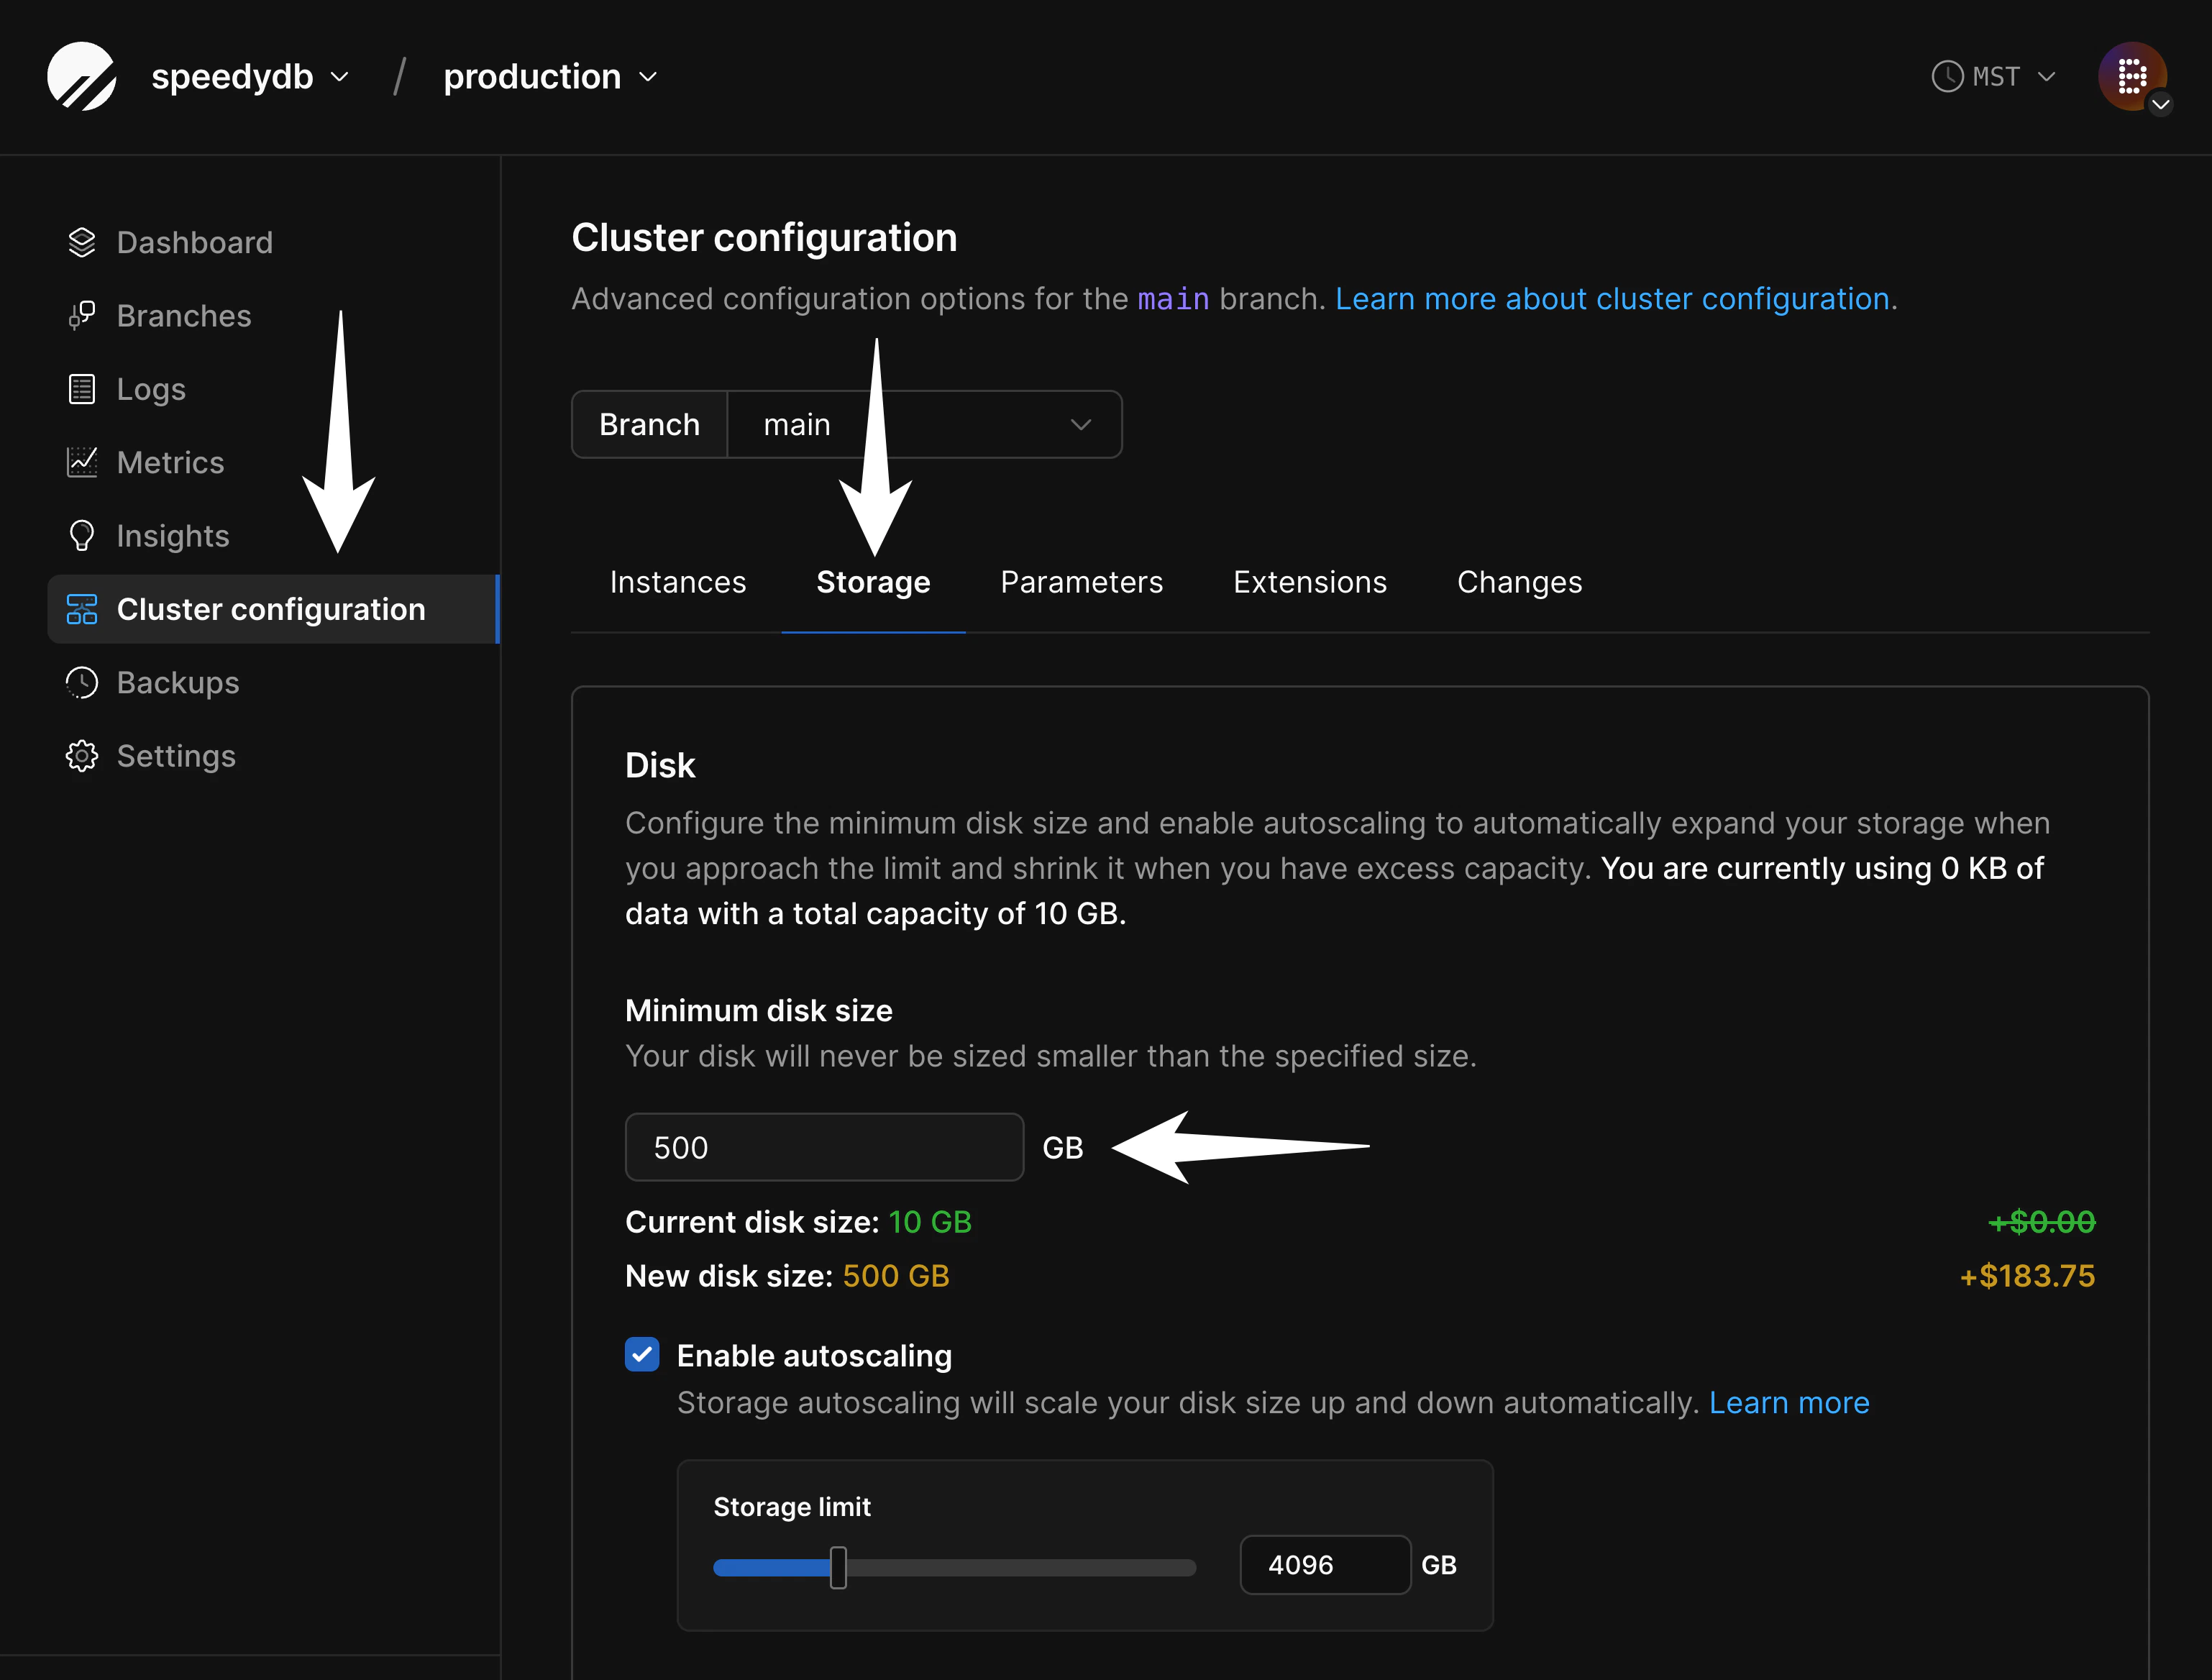 On this page, adjust the "Minimum disk size."
You should set this value to at least 150% of the size of the database you are migrating.
For example, if the database you are importing is 330 GB, you should set your minimum disk size to at least 500 GB.
The 50% overhead is to account for:
1. Data growth during the import process and
2. Table and index bloat that can occur during the import process.
This can be later mitigated with careful [VACUUMing](https://www.postgresql.org/docs/current/sql-vacuum.html) or using an extension like [pg\_squeeze](/postgres/extensions/pg_squeeze), but is difficult to avoid during the migration itself.
When ready, queue and apply the changes.
You can check the "Changes" tab to see the status of the resize:
On this page, adjust the "Minimum disk size."
You should set this value to at least 150% of the size of the database you are migrating.
For example, if the database you are importing is 330 GB, you should set your minimum disk size to at least 500 GB.
The 50% overhead is to account for:
1. Data growth during the import process and
2. Table and index bloat that can occur during the import process.
This can be later mitigated with careful [VACUUMing](https://www.postgresql.org/docs/current/sql-vacuum.html) or using an extension like [pg\_squeeze](/postgres/extensions/pg_squeeze), but is difficult to avoid during the migration itself.
When ready, queue and apply the changes.
You can check the "Changes" tab to see the status of the resize:
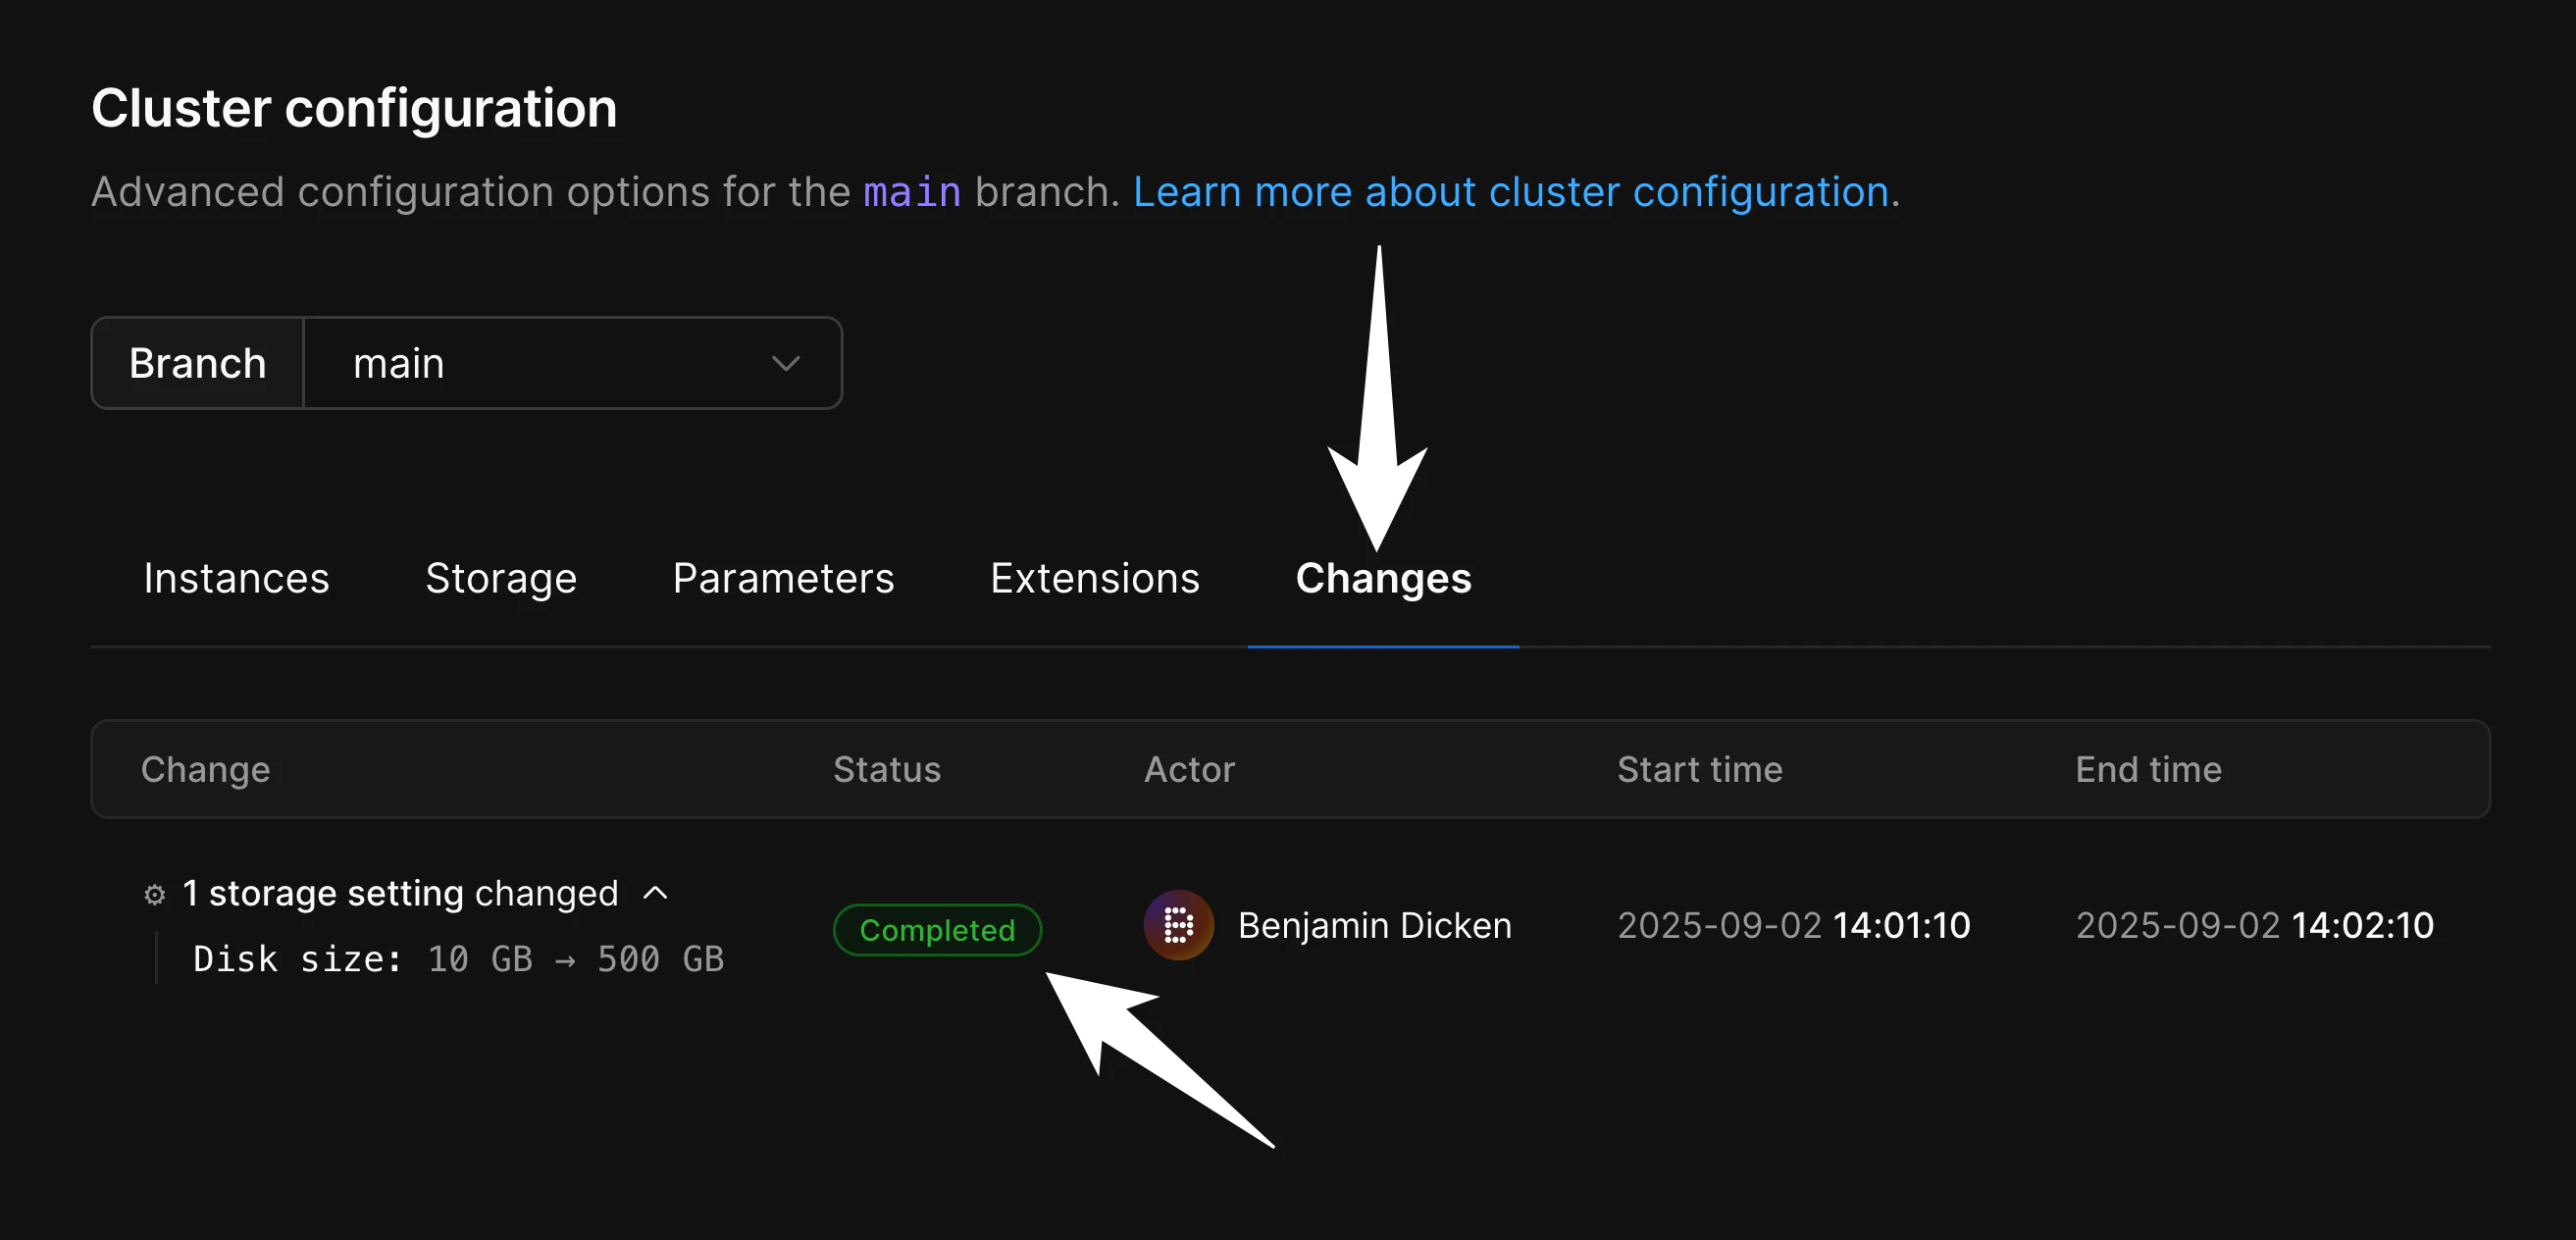 Wait for it to indicate completion.
If you are importing to a Metal database, you must choose a disk size when first creating your database.
You should launch your cluster with a disk size at least 50% larger than the storage used by your current source database (150% of the existing total).
As an example, if you need to import a 330 GB database onto a PlanetScale `M-160` there are three storage sizes available:
Wait for it to indicate completion.
If you are importing to a Metal database, you must choose a disk size when first creating your database.
You should launch your cluster with a disk size at least 50% larger than the storage used by your current source database (150% of the existing total).
As an example, if you need to import a 330 GB database onto a PlanetScale `M-160` there are three storage sizes available:
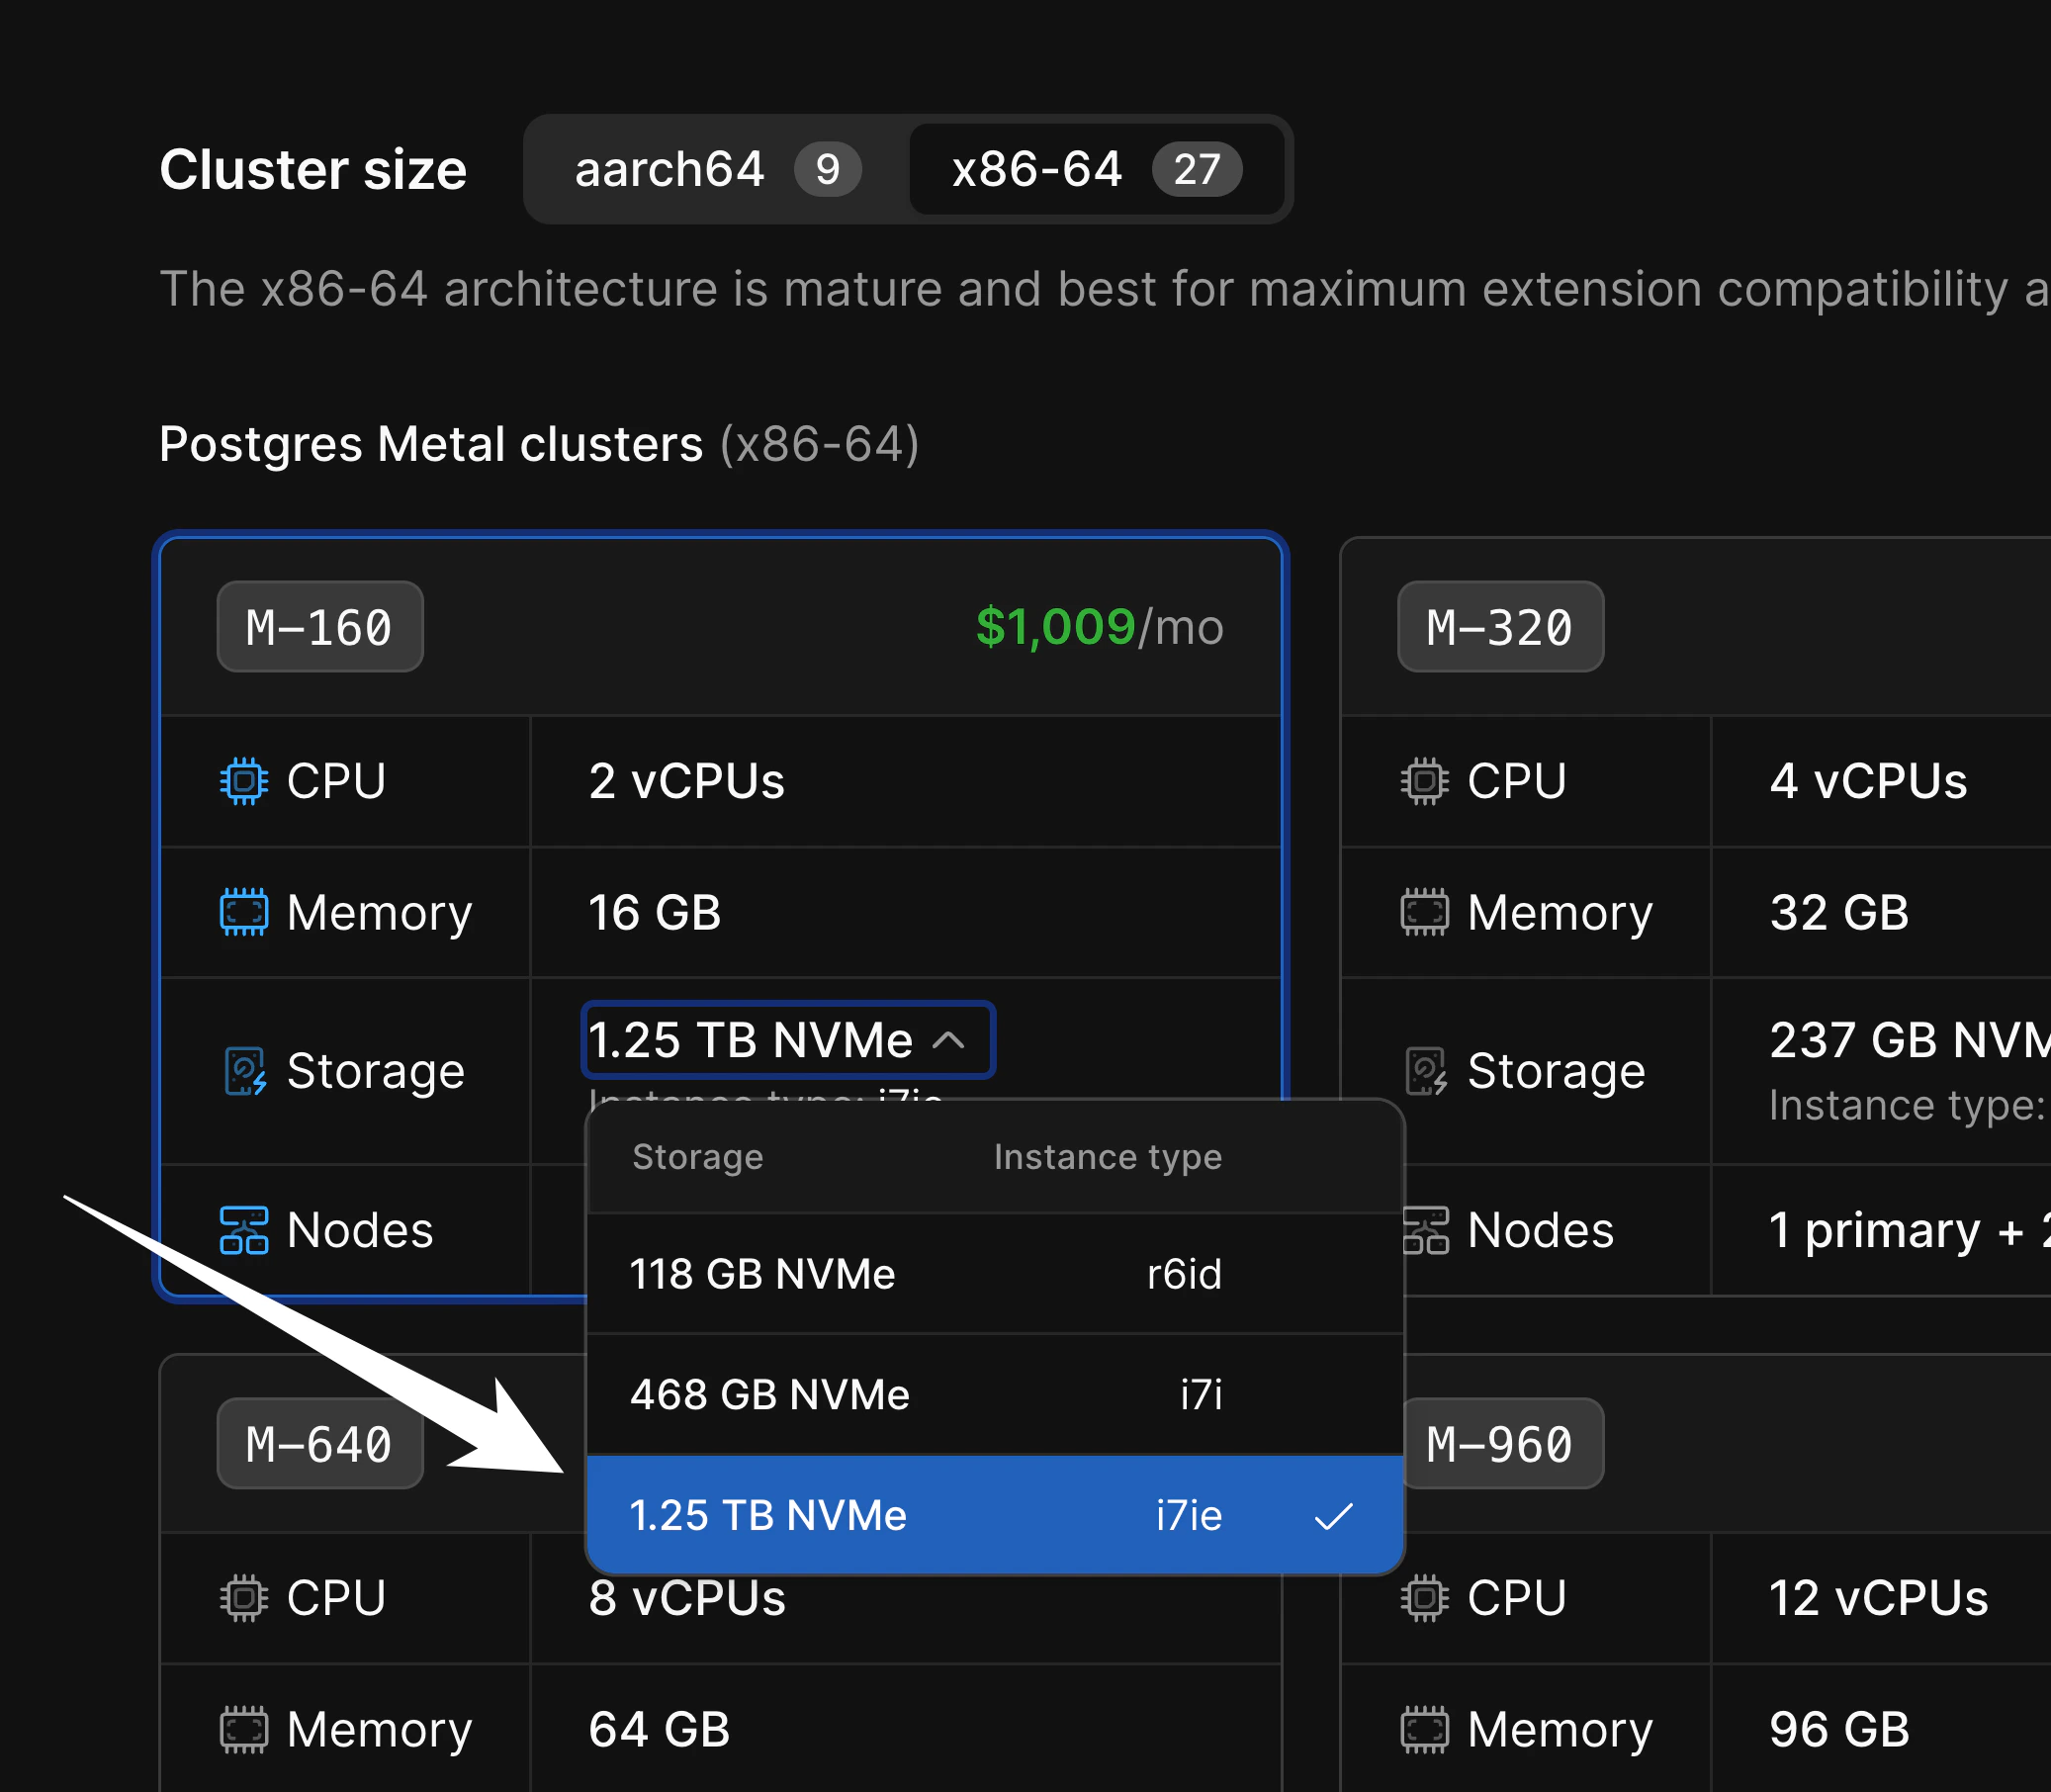 You should use the largest, 1.25TB option during the import.
After importing and cleaning up table bloat, you may be able to downsize to the 468 GB option.
Resizing is a no-downtime operation that can be performed on the [Clusters](/postgres/cluster-configuration) page.
## 3. Prepare the Aurora database
For PlanetScale to import your database, it needs to be publicly accessible. You can check this in your AWS dashboard.
In the writer instance of your database cluster, go to the “Connectivity & security” tab, and under “Security” you will see if your database is publicly accessible. If it says “No,” you will need to change it to be publicly accessible through the “Modify” button. If this is an issue, you cannot do this, or you have questions, please [contact support](https://planetscale.com/contact?initial=support) to explore your migration options.
You will also need to change some parameters and ensure that logical replication is enabled. If you don't already have a parameter group for your Aurora cluster, create one from the "Parameter groups" page in the AWS console:
You should use the largest, 1.25TB option during the import.
After importing and cleaning up table bloat, you may be able to downsize to the 468 GB option.
Resizing is a no-downtime operation that can be performed on the [Clusters](/postgres/cluster-configuration) page.
## 3. Prepare the Aurora database
For PlanetScale to import your database, it needs to be publicly accessible. You can check this in your AWS dashboard.
In the writer instance of your database cluster, go to the “Connectivity & security” tab, and under “Security” you will see if your database is publicly accessible. If it says “No,” you will need to change it to be publicly accessible through the “Modify” button. If this is an issue, you cannot do this, or you have questions, please [contact support](https://planetscale.com/contact?initial=support) to explore your migration options.
You will also need to change some parameters and ensure that logical replication is enabled. If you don't already have a parameter group for your Aurora cluster, create one from the "Parameter groups" page in the AWS console:
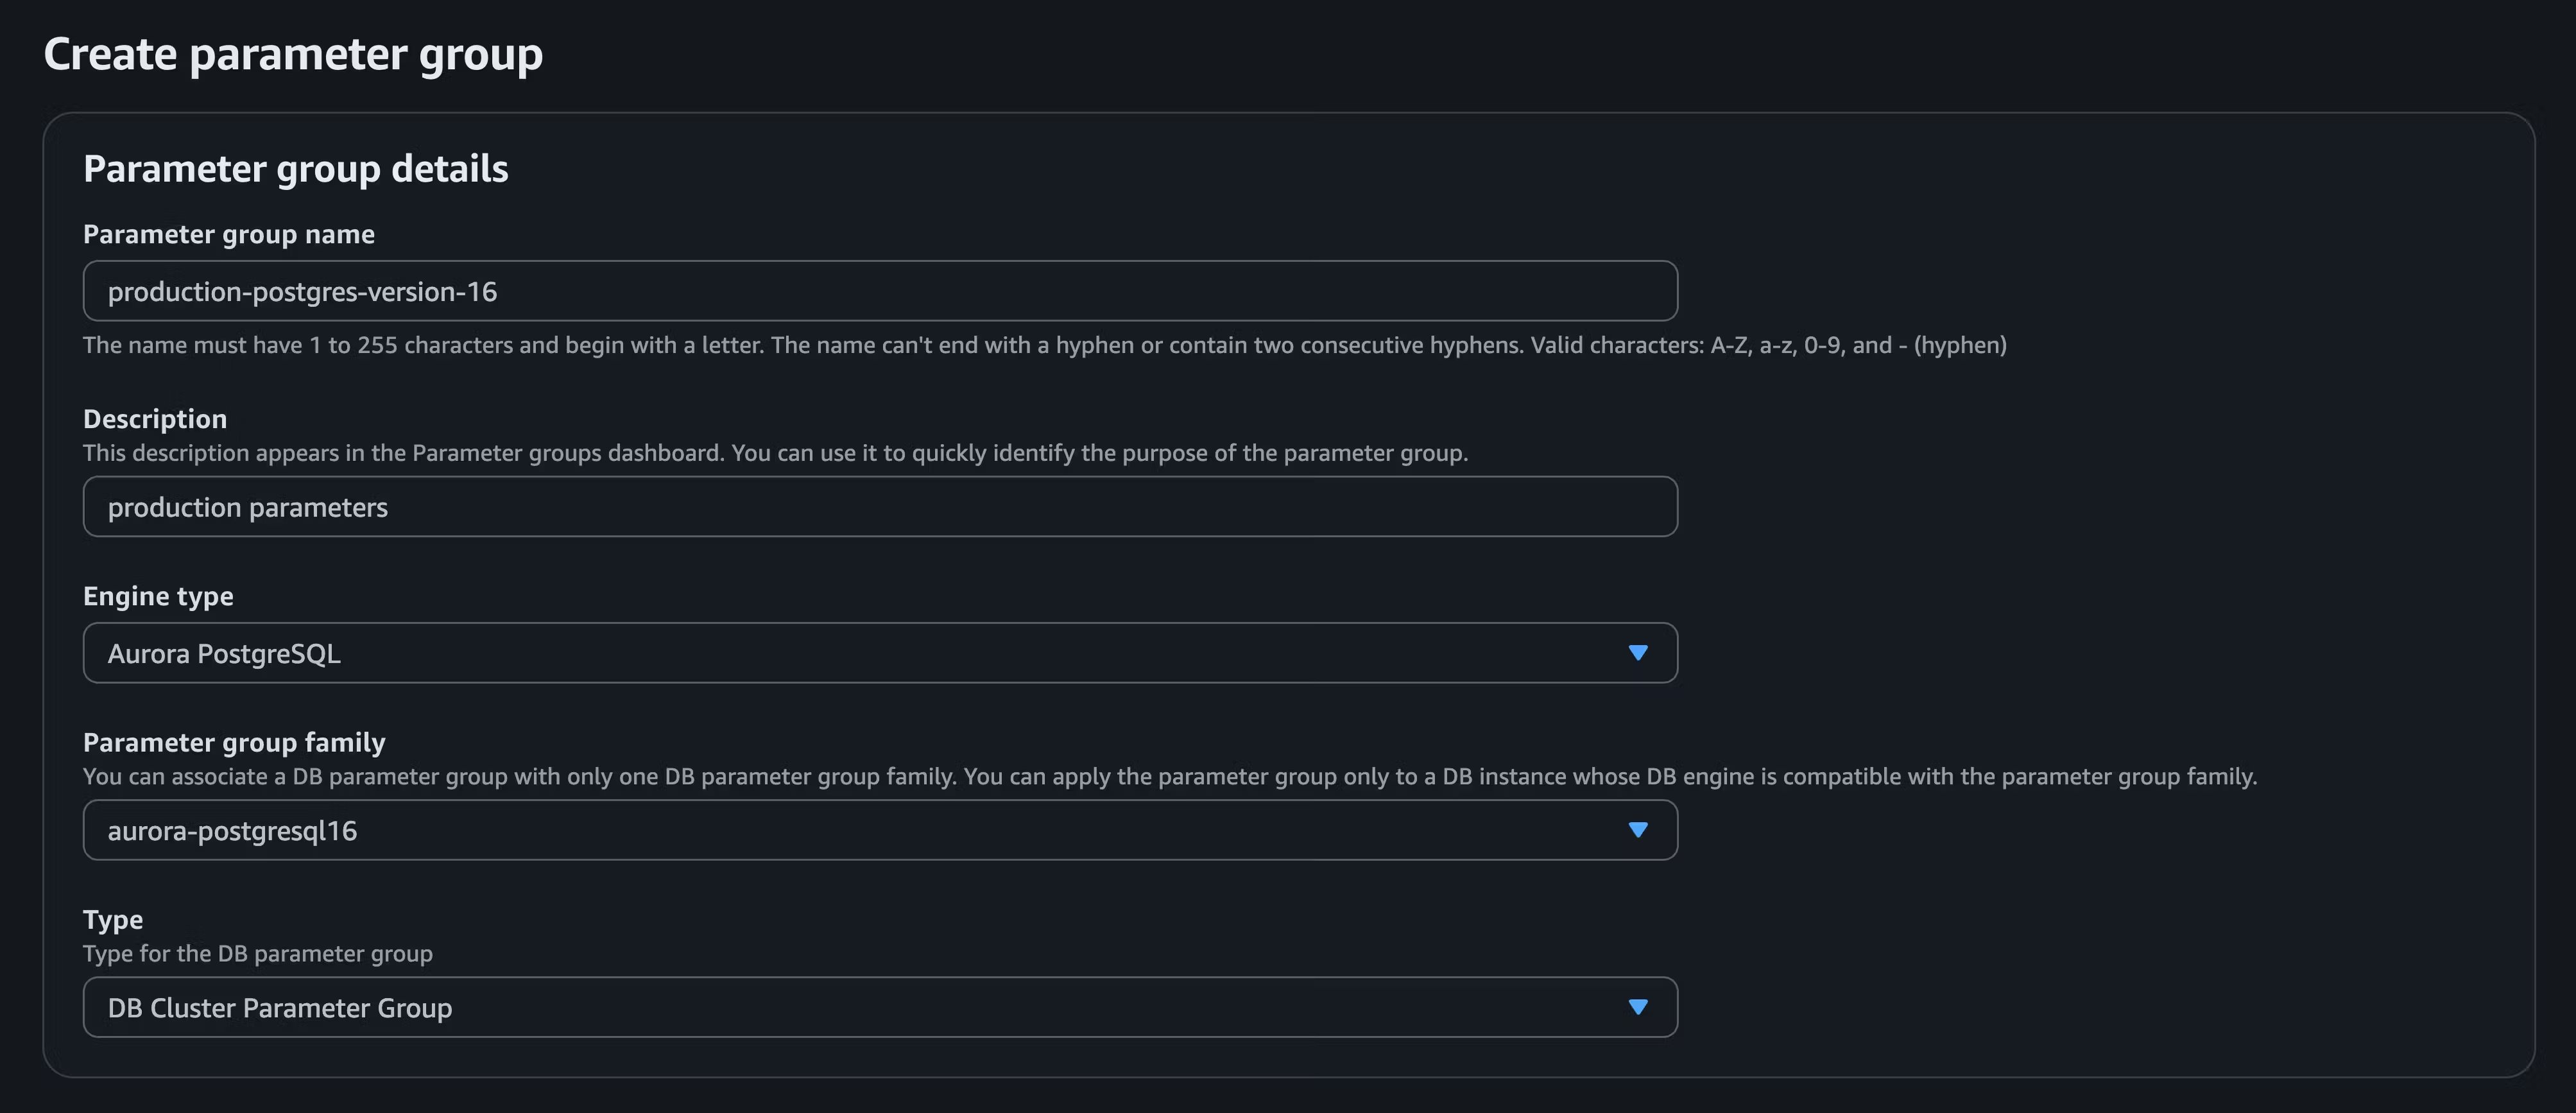
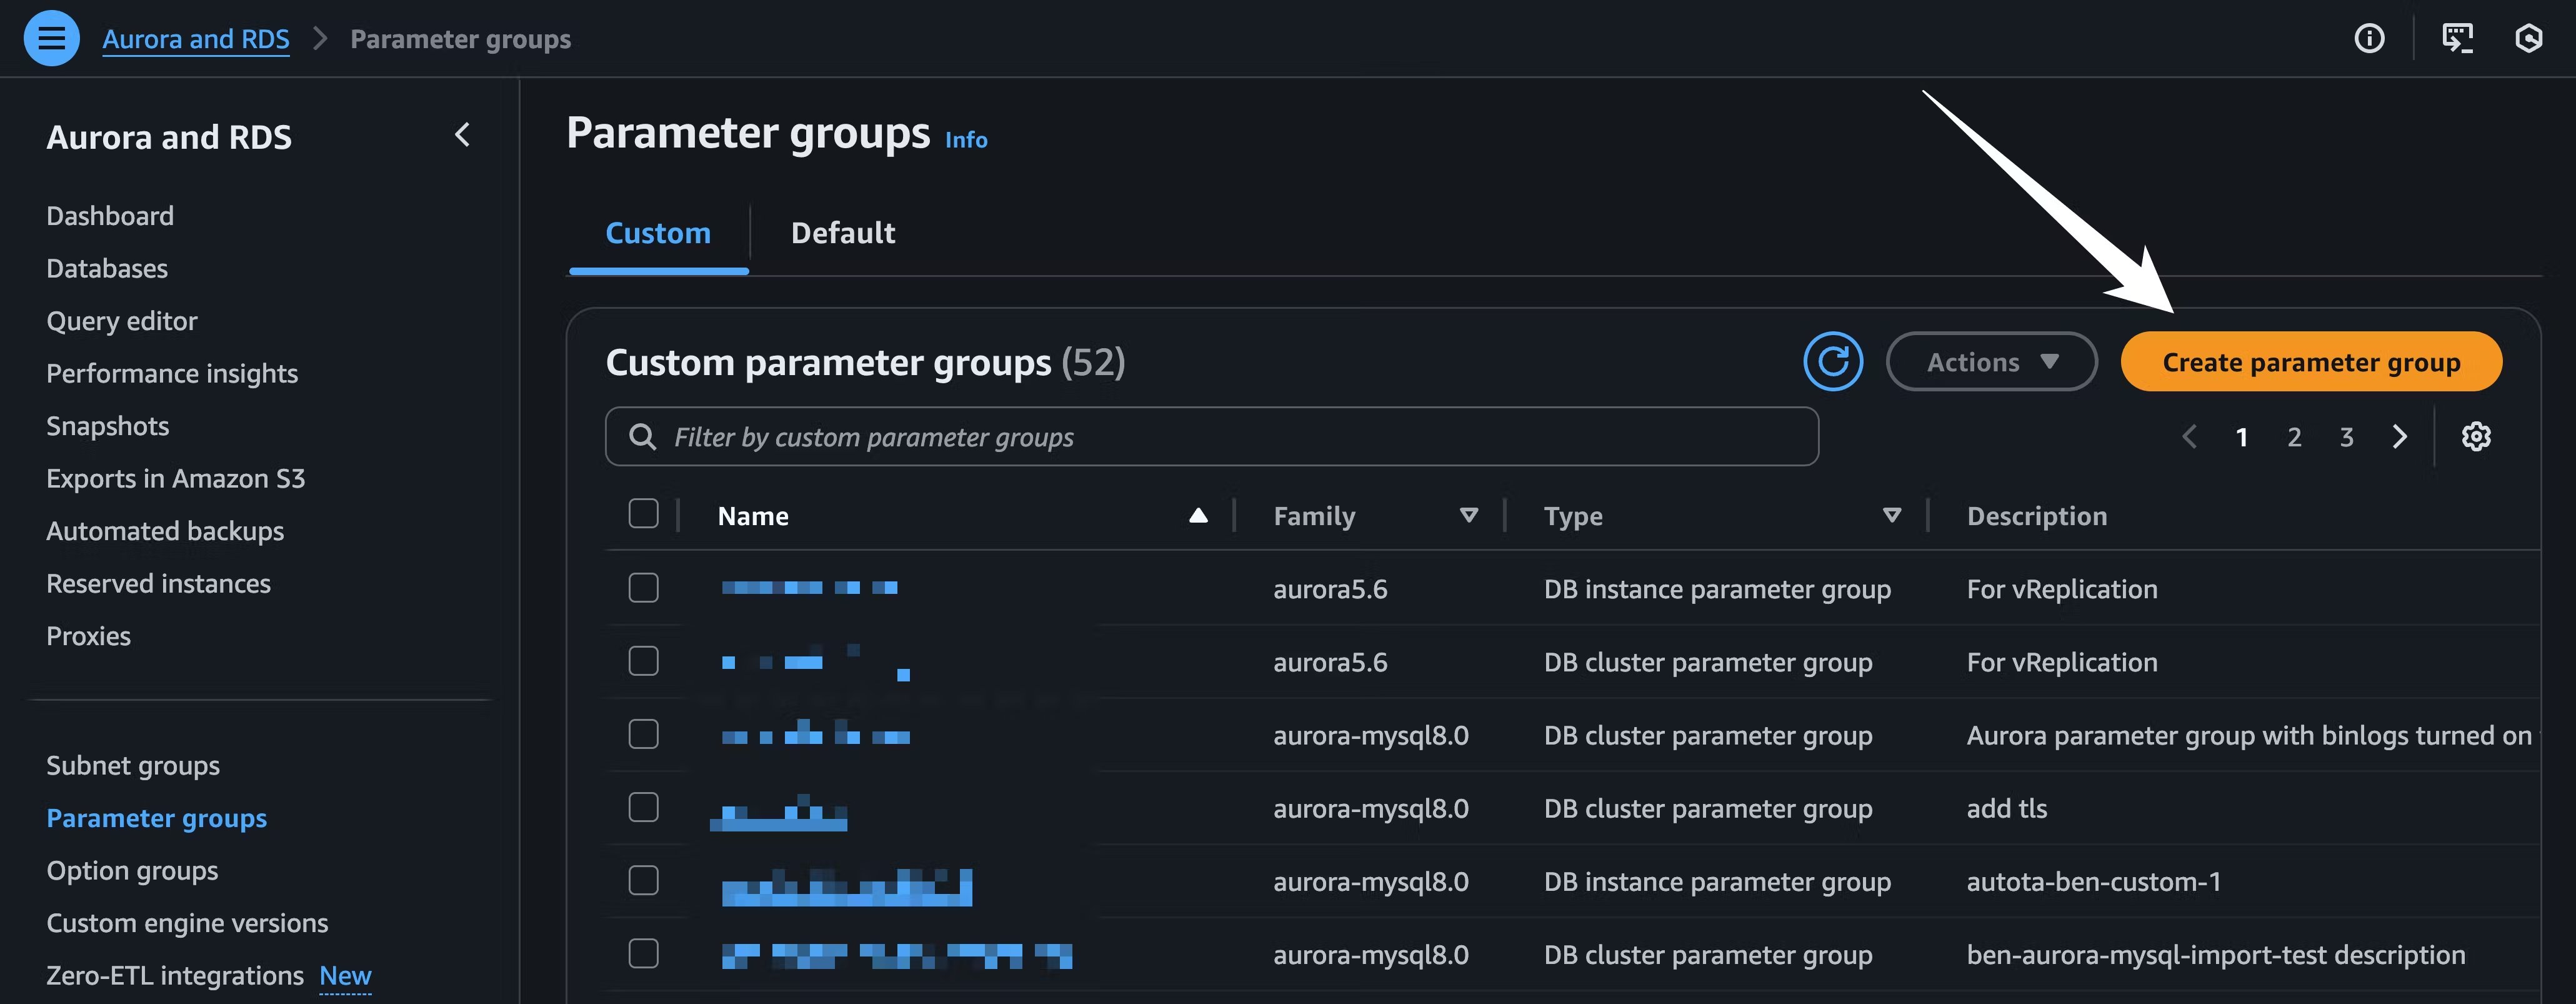 From here, click the button to create a new group. Choose whichever name and description you want. Set the `Engine type` to `Aurora Postgres` and the `Parameter family group` to the version that matches your Aurora Postgres database. Set the `Type` to `DB Cluster Parameter Group`.
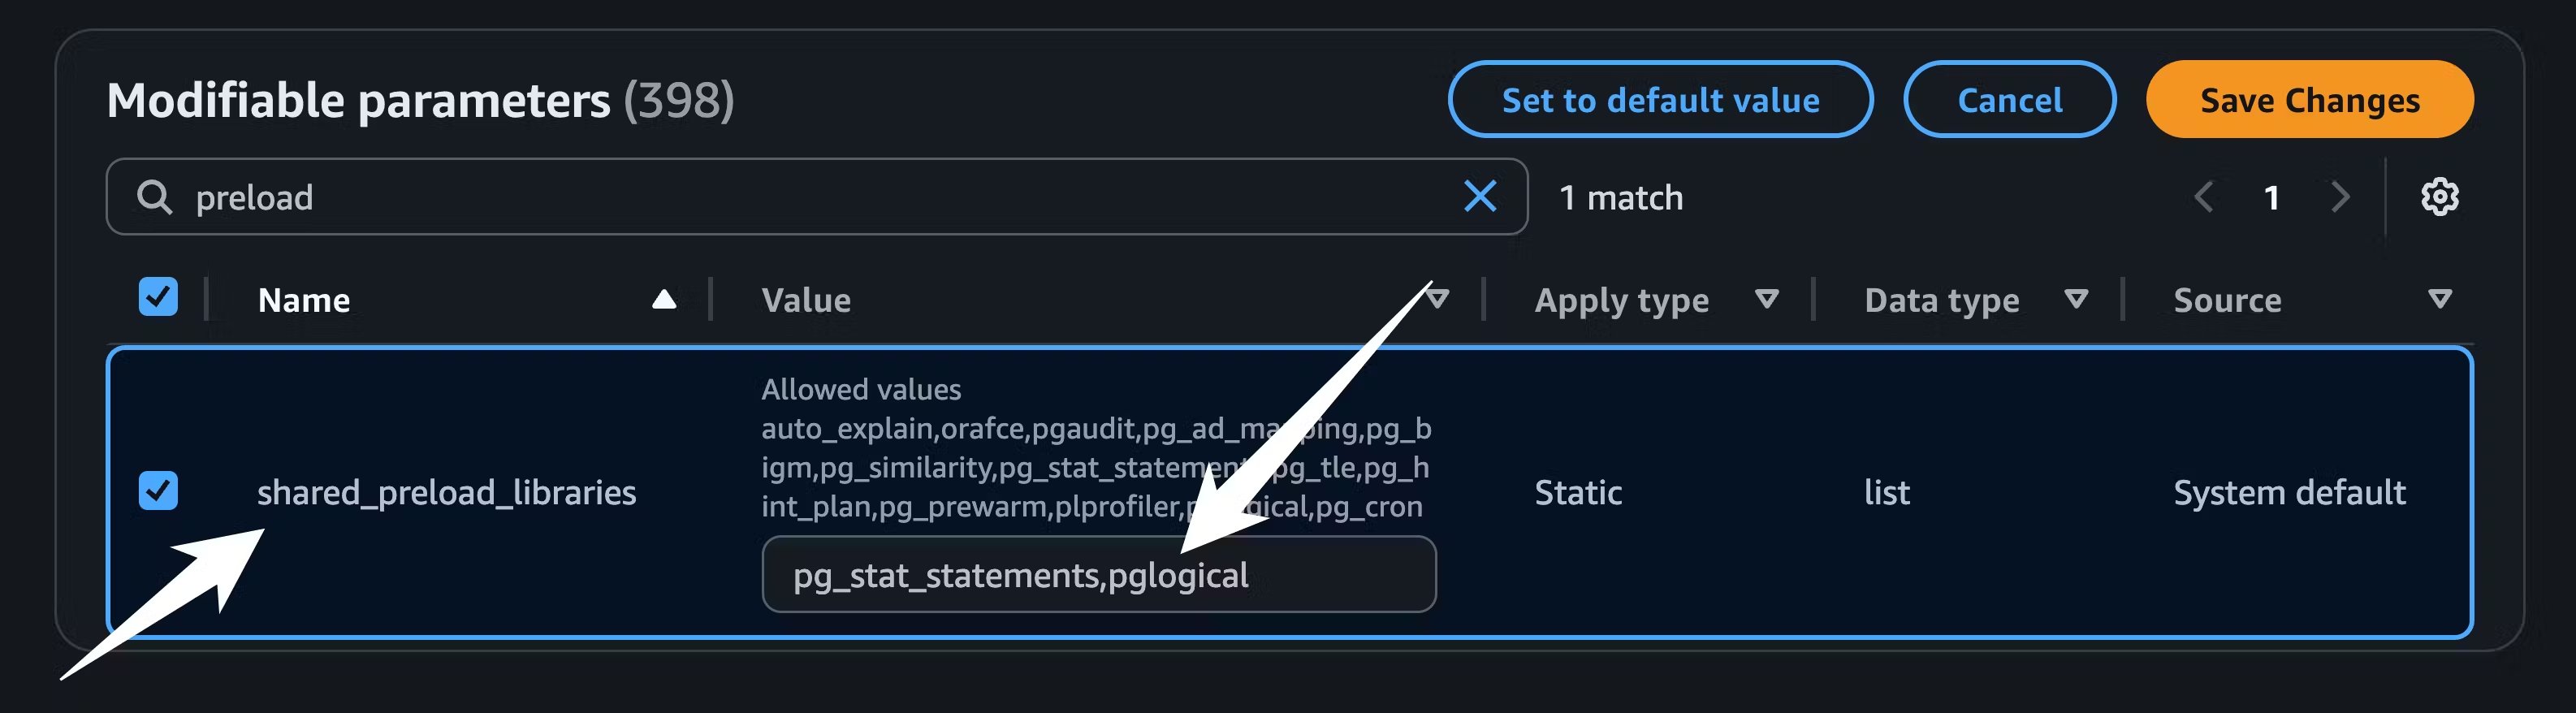
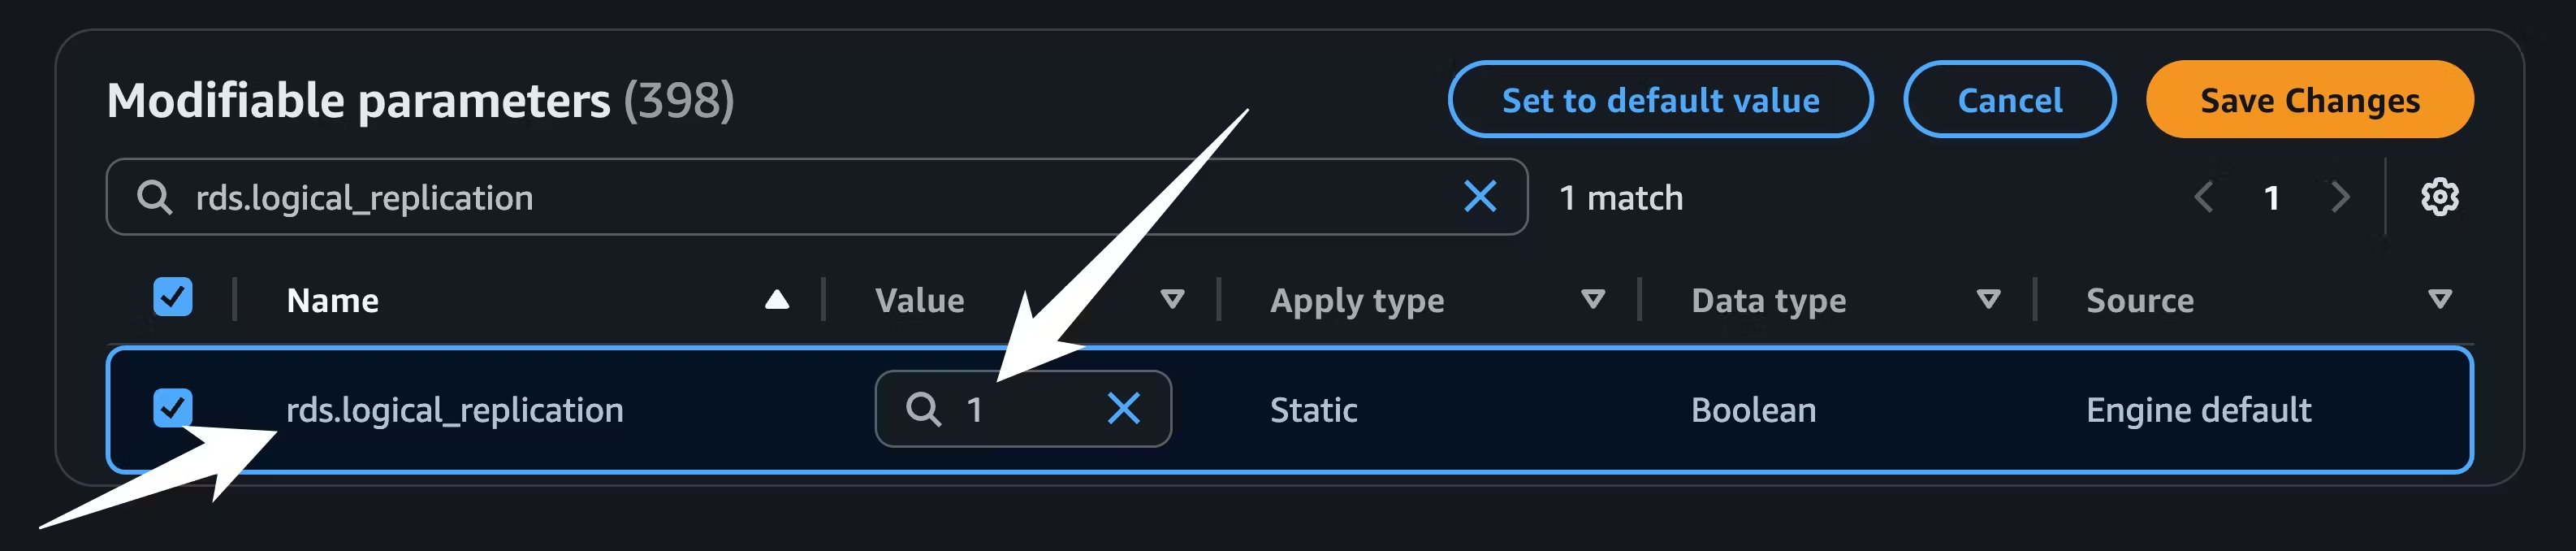
 If you already have a custom parameter group for your cluster, you can use the existing one instead. The two key parameters you need to update are adding `pglogical` to `shared_preload_libraries` and setting `rds.logical_replication` to `1`:
 Once these are set, you need to make sure your Aurora database is configured to use them. Navigate to your Aurora database in the AWS console, click the "Modify" button, and then ensure your database is using the parameter group:
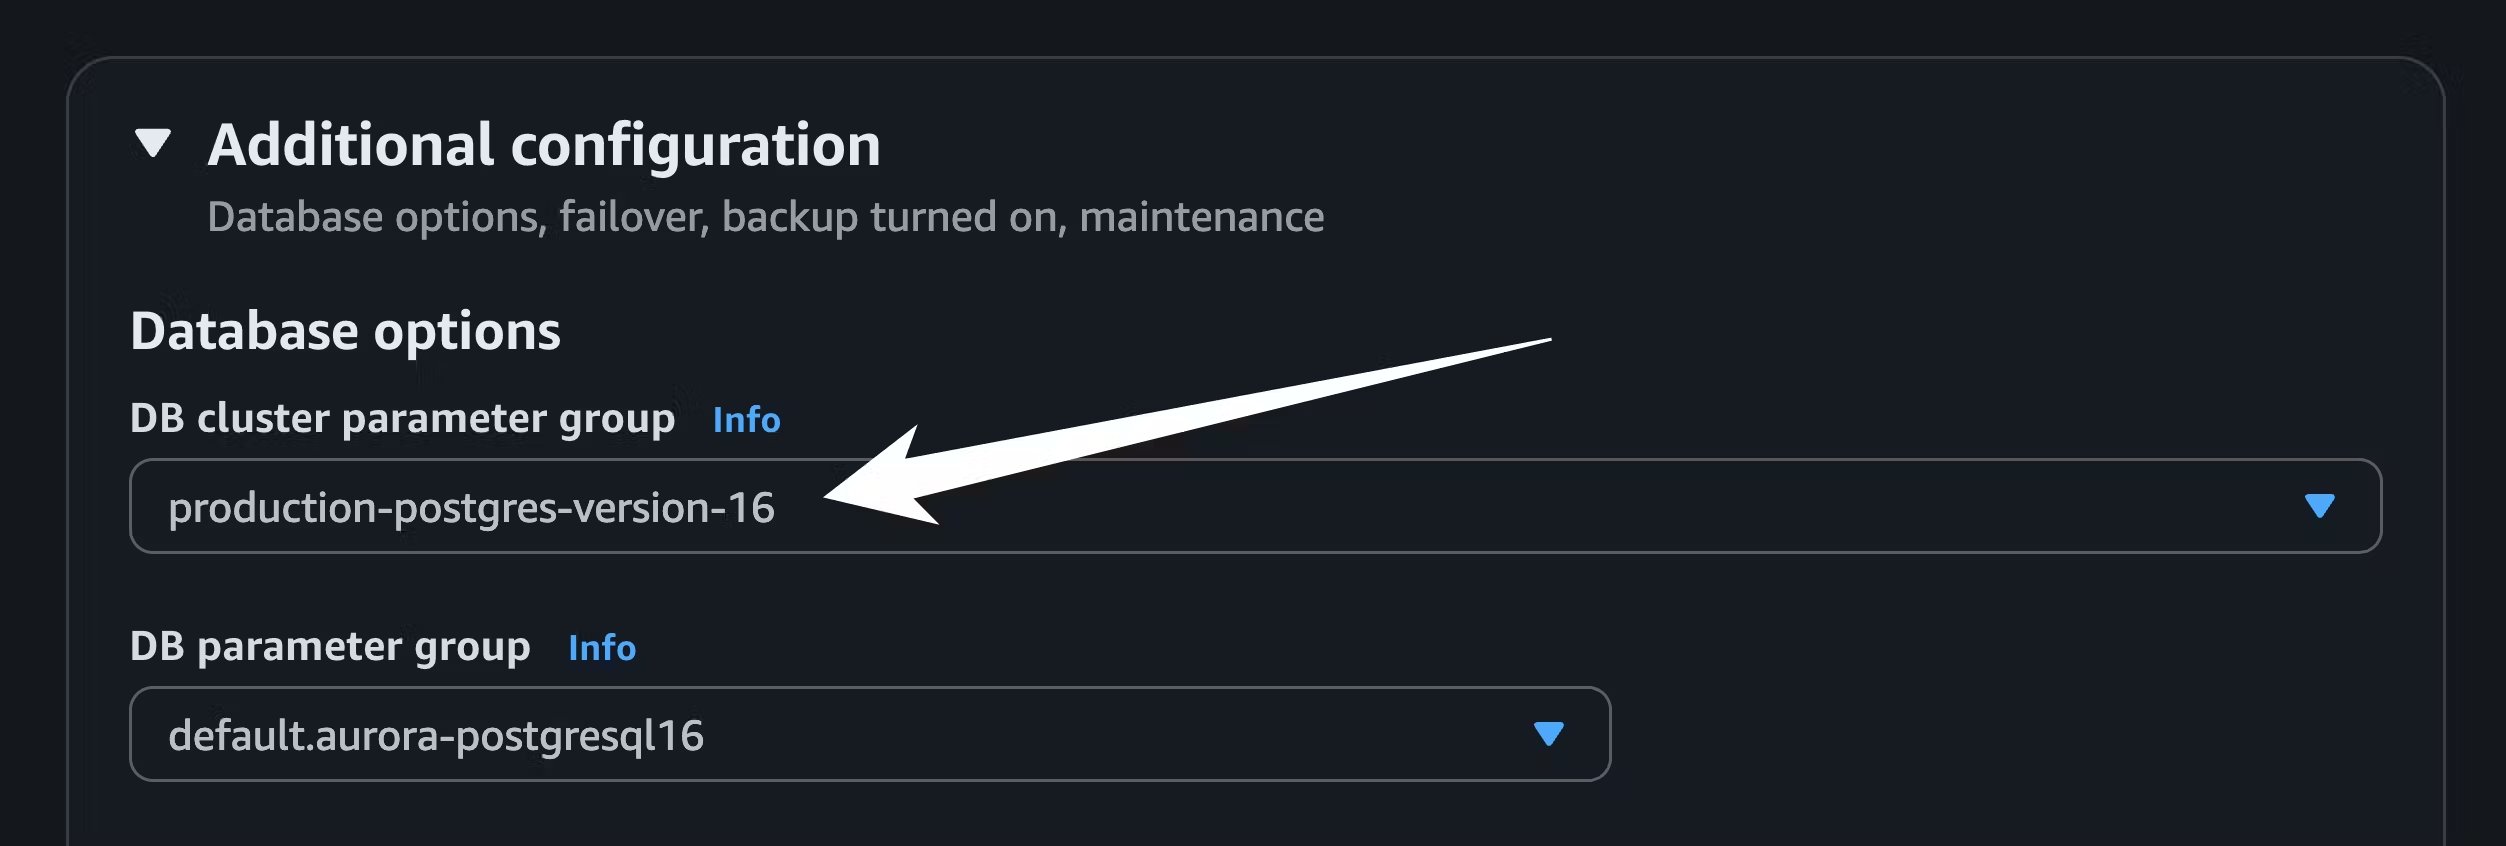 When you go to save the changes, select the option to either apply immediately or during your next maintenance window. The changes may take time to propagate. You can confirm that the `wal_level` is set to `logical` by running `SHOW wal_level;` on your Aurora database:
```sql theme={null}
postgres=> SHOW wal_level;
wal_level
-----------
logical
```
If you see a result other than `logical`, then it is not configured correctly. If you are having trouble getting the settings to propagate, you can try restarting the Aurora instance, though that will cause a period of downtime.
## 4. Copy schema from Aurora to PlanetScale
Before we begin migrating data, we first must copy the schema from Aurora to PlanetScale. We do this as a distinct set of steps using `pg_dump`.
You should not make any schema changes during the migration process. You may continue to select, insert, update, and delete data, keeping your application fully online during this process.
For these instructions, you'll need to connect to Aurora with a role that has permissions to create replication publications and read all data. Your default role that was generated by Aurora when you first created your database should suffice here, but you may also use other roles. We will assume that the credentials for this user and other connection info are stored in the following environment variables.
```bash theme={null}
AURORA_USERNAME=XXXX
AURORA_PASSWORD=XXXX
AURORA_HOST=XXX
AURORA_DBNAME=XXX
```
Run the below command to take a snapshot of the full schema of the `$AURORA_DBNAME` that you want to migrate:
```bash theme={null}
PGPASSWORD=$AURORA_PASSWORD \
pg_dump -h $AURORA_HOST \
-p 5432 \
-U $AURORA_USERNAME \
-d $AURORA_DBNAME \
--schema-only \
--no-owner \
--no-privileges \
-f schema.sql
```
This saves the schema into a file named `schema.sql`.
The above command will dump the tables for all schemas in the current database. If you want to migrate only one specific schema, you can add the `--schema=SCHEMA_NAME` option.
The schema then needs to be loaded into your new PlanetScale database:
```bash theme={null}
PGPASSWORD=$PLANETSCALE_PASSWORD \
psql -h $PLANETSCALE_HOST \
-p 5432 \
-U $PLANETSCALE_USERNAME \
-d $PLANETSCALE_DBNAME \
-f schema.sql
```
In the output of this command, you might see some error messages of the form:
```
psql:schema.sql:LINE: ERROR: DESCRIPTION
```
You should inspect these to see if they are of any concern. You can [reach out to our support](https://planetscale.com/contact) if you need assistance at this step.
## 5. Set up logical replication
We now must create a `PUBLICATION` on Aurora that the PlanetScale database can subscribe to for data copying and replication.
To create a publication for all tables in all schemas of the current database, run the following command on your Aurora database:
```sql theme={null}
CREATE PUBLICATION replicate_to_planetscale FOR ALL TABLES;
```
You should see this if it created correctly:
```sql theme={null}
CREATE PUBLICATION
```
To publish changes for only one specific schema, run the following query:
```sql theme={null}
SELECT 'CREATE PUBLICATION replicate_to_planetscale FOR TABLE ' ||
string_agg(format('%I.%I', schemaname, tablename), ', ') || ';'
FROM pg_tables
WHERE schemaname = 'YOUR_SCHEMA_NAME';
```
This will generate a query that looks like this:
```sql theme={null}
CREATE PUBLICATION replicate_to_planetscale FOR TABLE
public.table_1,
public.table_2,
...
public.table_n;
```
You can then copy/paste this and execute on Aurora. This will create a publication that only publishes changes for the tables in `YOUR_SCHEMA_NAME`
After creating the publication on Aurora, we then need to tell PlanetScale to `SUBSCRIBE` to this publication.
```sql theme={null}
PGPASSWORD=$PLANETSCALE_PASSWORD psql \
-h $PLANETSCALE_HOST \
-U $PLANETSCALE_USERNAME \
-p 5432 $PLANETSCALE_DBNAME \
-c "
CREATE SUBSCRIPTION replicate_from_aurora
CONNECTION 'host=$AURORA_HOST dbname=$AURORA_DBNAME user=$AURORA_USERNAME password=$AURORA_PASSWORD'
PUBLICATION replicate_to_planetscale WITH (copy_data = true);"
```
Data copying and replication will begin at this point. To check in on the row counts for the tables, you can run a query like this on your source and target databases:
```sql theme={null}
SELECT table_name, row_count FROM (
SELECT 'table_name_1' as table_name, COUNT(*) as row_count FROM table_name_1 UNION ALL
SELECT 'table_name_2', COUNT(*) FROM table_name_2 UNION ALL
...
SELECT 'table_name_N', COUNT(*) FROM table_name_N
) t ORDER BY table_name;
```
When the row counts match (or nearly match) you can begin testing and prepare for your application to cutover to use PlanetScale.
## 6. Handling sequences
Logical replication is great at migrating all of your data over to PlanetScale. However, logical replication does *not* synchronize the `nextval` values for [sequences](https://www.postgresql.org/docs/current/sql-createsequence.html) in your database. Sequences are often used for things like auto incrementing IDs, so it's important to ensure we update this before you switch your traffic to PlanetScale.
You can see all of the sequences and their corresponding `nextval`s on your source Aurora database using this command:
```sql theme={null}
SELECT schemaname, sequencename, last_value + increment_by AS next_value
FROM pg_sequences;
```
An example output from this command:
```sql theme={null}
schemaname | sequencename | next_value
------------+------------------+------------
public | users_id_seq | 105
public | posts_id_seq | 1417
public | followers_id_seq | 3014
```
What this means is that we have three sequences in our database. In this case, they are all being used for auto-incrementing primary keys. The `nextval` for the `users_id_seq` is 105, the `nextval` for the `posts_id_seq` is 1417, and the `nextval` for the `followers_id_seq` is 3014. If you run the same query on your new PlanetScale database, you'll see something like:
```sql theme={null}
schemaname | sequencename | next_value
------------+------------------+------------
public | users_id_seq | 0
public | posts_id_seq | 0
public | followers_id_seq | 0
```
If you switch traffic over to PlanetScale in this state, you'll likely encounter errors when inserting new rows:
```sql theme={null}
ERROR: duplicate key value violates unique constraint "XXXX"
DETAIL: Key (id)=(ZZZZ) already exists.
```
Before switching over, you need to progress all of these sequences forward so that the `nextval`s produced will be greater than any of the values previously produced on the source Aurora database, avoiding constraint violations. There are several approaches you can take for this. A simple way to solve the problem is to first run this query on your source Aurora database:
```sql theme={null}
SELECT 'SELECT setval(''' || schemaname || '.' || sequencename || ''', '
|| (last_value + 10000) || ');' AS query
FROM pg_sequences;
```
This will generate a sequence of queries that will advance the `nextval` by 10,000 for each sequence:
```sql theme={null}
query
--------------------------------------------------
SELECT setval('public.users_id_seq', 10104);
SELECT setval('public.posts_id_seq', 11416);
SELECT setval('public.followers_id_seq', 13013);
```
You would then execute these on your target PlanetScale database. You need to ensure you advance each sequence far enough forward so that the sequences in the Aurora database will not reach these `nextval`s before you switch your primary to PlanetScale. For tables that have a high insertion rate, you might need to increase this by a larger value (say, 100,000 or 1,000,000).
## 7. Cutting over to PlanetScale
Before you cutover, it's good to have confidence that the replication is fully caught up between Aurora and PlanetScale. You can do this using Log Sequence Numbers (LSNs). The goal is to see these match up between the source Aurora database and the target PlanetScale database exactly. If they don't, it indicates that the PlanetScale database is not fully caught-up with the changes happening on Aurora.
You can run this on Aurora to see the current LSN:
```sql theme={null}
postgres=> SELECT pg_current_wal_lsn();
pg_current_wal_lsn
--------------------
0/703FE460
```
Then on PlanetScale, you would run the following query to check for a match:
```sql theme={null}
postgres=> SELECT received_lsn, latest_end_lsn
FROM pg_stat_subscription
WHERE subname = 'replicate_from_aurora';
received_lsn | latest_end_lsn
--------------+----------------
0/703FE460 | 0/703FE460
```
Once you are comfortable that all your data has successfully copied over and replication is sufficiently caught up, it's time to switch to PlanetScale. In your application code, prepare the cutover by changing the database connection credentials to go to PlanetScale rather than Aurora. Then, you can deploy this new version of your application, which will begin using PlanetScale as your primary database.
After doing this, new rows written to PlanetScale will not be reverse-replicated to Aurora. Thus, it's important to ensure you are fully ready for the cutover at this point.
Once this is complete, PlanetScale is now your primary database! We recommend you keep your old database around for at least a few days, just in case you discover any data or schemas you forgot to copy over to PlanetScale.
## Need help?
Get help from [the PlanetScale Support team](https://planetscale.com/contact?initial=support), or join our [Discord community](https://pscale.link/community) to see how others are using PlanetScale.
When you go to save the changes, select the option to either apply immediately or during your next maintenance window. The changes may take time to propagate. You can confirm that the `wal_level` is set to `logical` by running `SHOW wal_level;` on your Aurora database:
```sql theme={null}
postgres=> SHOW wal_level;
wal_level
-----------
logical
```
If you see a result other than `logical`, then it is not configured correctly. If you are having trouble getting the settings to propagate, you can try restarting the Aurora instance, though that will cause a period of downtime.
## 4. Copy schema from Aurora to PlanetScale
Before we begin migrating data, we first must copy the schema from Aurora to PlanetScale. We do this as a distinct set of steps using `pg_dump`.
You should not make any schema changes during the migration process. You may continue to select, insert, update, and delete data, keeping your application fully online during this process.
For these instructions, you'll need to connect to Aurora with a role that has permissions to create replication publications and read all data. Your default role that was generated by Aurora when you first created your database should suffice here, but you may also use other roles. We will assume that the credentials for this user and other connection info are stored in the following environment variables.
```bash theme={null}
AURORA_USERNAME=XXXX
AURORA_PASSWORD=XXXX
AURORA_HOST=XXX
AURORA_DBNAME=XXX
```
Run the below command to take a snapshot of the full schema of the `$AURORA_DBNAME` that you want to migrate:
```bash theme={null}
PGPASSWORD=$AURORA_PASSWORD \
pg_dump -h $AURORA_HOST \
-p 5432 \
-U $AURORA_USERNAME \
-d $AURORA_DBNAME \
--schema-only \
--no-owner \
--no-privileges \
-f schema.sql
```
This saves the schema into a file named `schema.sql`.
The above command will dump the tables for all schemas in the current database. If you want to migrate only one specific schema, you can add the `--schema=SCHEMA_NAME` option.
The schema then needs to be loaded into your new PlanetScale database:
```bash theme={null}
PGPASSWORD=$PLANETSCALE_PASSWORD \
psql -h $PLANETSCALE_HOST \
-p 5432 \
-U $PLANETSCALE_USERNAME \
-d $PLANETSCALE_DBNAME \
-f schema.sql
```
In the output of this command, you might see some error messages of the form:
```
psql:schema.sql:LINE: ERROR: DESCRIPTION
```
You should inspect these to see if they are of any concern. You can [reach out to our support](https://planetscale.com/contact) if you need assistance at this step.
## 5. Set up logical replication
We now must create a `PUBLICATION` on Aurora that the PlanetScale database can subscribe to for data copying and replication.
To create a publication for all tables in all schemas of the current database, run the following command on your Aurora database:
```sql theme={null}
CREATE PUBLICATION replicate_to_planetscale FOR ALL TABLES;
```
You should see this if it created correctly:
```sql theme={null}
CREATE PUBLICATION
```
To publish changes for only one specific schema, run the following query:
```sql theme={null}
SELECT 'CREATE PUBLICATION replicate_to_planetscale FOR TABLE ' ||
string_agg(format('%I.%I', schemaname, tablename), ', ') || ';'
FROM pg_tables
WHERE schemaname = 'YOUR_SCHEMA_NAME';
```
This will generate a query that looks like this:
```sql theme={null}
CREATE PUBLICATION replicate_to_planetscale FOR TABLE
public.table_1,
public.table_2,
...
public.table_n;
```
You can then copy/paste this and execute on Aurora. This will create a publication that only publishes changes for the tables in `YOUR_SCHEMA_NAME`
After creating the publication on Aurora, we then need to tell PlanetScale to `SUBSCRIBE` to this publication.
```sql theme={null}
PGPASSWORD=$PLANETSCALE_PASSWORD psql \
-h $PLANETSCALE_HOST \
-U $PLANETSCALE_USERNAME \
-p 5432 $PLANETSCALE_DBNAME \
-c "
CREATE SUBSCRIPTION replicate_from_aurora
CONNECTION 'host=$AURORA_HOST dbname=$AURORA_DBNAME user=$AURORA_USERNAME password=$AURORA_PASSWORD'
PUBLICATION replicate_to_planetscale WITH (copy_data = true);"
```
Data copying and replication will begin at this point. To check in on the row counts for the tables, you can run a query like this on your source and target databases:
```sql theme={null}
SELECT table_name, row_count FROM (
SELECT 'table_name_1' as table_name, COUNT(*) as row_count FROM table_name_1 UNION ALL
SELECT 'table_name_2', COUNT(*) FROM table_name_2 UNION ALL
...
SELECT 'table_name_N', COUNT(*) FROM table_name_N
) t ORDER BY table_name;
```
When the row counts match (or nearly match) you can begin testing and prepare for your application to cutover to use PlanetScale.
## 6. Handling sequences
Logical replication is great at migrating all of your data over to PlanetScale. However, logical replication does *not* synchronize the `nextval` values for [sequences](https://www.postgresql.org/docs/current/sql-createsequence.html) in your database. Sequences are often used for things like auto incrementing IDs, so it's important to ensure we update this before you switch your traffic to PlanetScale.
You can see all of the sequences and their corresponding `nextval`s on your source Aurora database using this command:
```sql theme={null}
SELECT schemaname, sequencename, last_value + increment_by AS next_value
FROM pg_sequences;
```
An example output from this command:
```sql theme={null}
schemaname | sequencename | next_value
------------+------------------+------------
public | users_id_seq | 105
public | posts_id_seq | 1417
public | followers_id_seq | 3014
```
What this means is that we have three sequences in our database. In this case, they are all being used for auto-incrementing primary keys. The `nextval` for the `users_id_seq` is 105, the `nextval` for the `posts_id_seq` is 1417, and the `nextval` for the `followers_id_seq` is 3014. If you run the same query on your new PlanetScale database, you'll see something like:
```sql theme={null}
schemaname | sequencename | next_value
------------+------------------+------------
public | users_id_seq | 0
public | posts_id_seq | 0
public | followers_id_seq | 0
```
If you switch traffic over to PlanetScale in this state, you'll likely encounter errors when inserting new rows:
```sql theme={null}
ERROR: duplicate key value violates unique constraint "XXXX"
DETAIL: Key (id)=(ZZZZ) already exists.
```
Before switching over, you need to progress all of these sequences forward so that the `nextval`s produced will be greater than any of the values previously produced on the source Aurora database, avoiding constraint violations. There are several approaches you can take for this. A simple way to solve the problem is to first run this query on your source Aurora database:
```sql theme={null}
SELECT 'SELECT setval(''' || schemaname || '.' || sequencename || ''', '
|| (last_value + 10000) || ');' AS query
FROM pg_sequences;
```
This will generate a sequence of queries that will advance the `nextval` by 10,000 for each sequence:
```sql theme={null}
query
--------------------------------------------------
SELECT setval('public.users_id_seq', 10104);
SELECT setval('public.posts_id_seq', 11416);
SELECT setval('public.followers_id_seq', 13013);
```
You would then execute these on your target PlanetScale database. You need to ensure you advance each sequence far enough forward so that the sequences in the Aurora database will not reach these `nextval`s before you switch your primary to PlanetScale. For tables that have a high insertion rate, you might need to increase this by a larger value (say, 100,000 or 1,000,000).
## 7. Cutting over to PlanetScale
Before you cutover, it's good to have confidence that the replication is fully caught up between Aurora and PlanetScale. You can do this using Log Sequence Numbers (LSNs). The goal is to see these match up between the source Aurora database and the target PlanetScale database exactly. If they don't, it indicates that the PlanetScale database is not fully caught-up with the changes happening on Aurora.
You can run this on Aurora to see the current LSN:
```sql theme={null}
postgres=> SELECT pg_current_wal_lsn();
pg_current_wal_lsn
--------------------
0/703FE460
```
Then on PlanetScale, you would run the following query to check for a match:
```sql theme={null}
postgres=> SELECT received_lsn, latest_end_lsn
FROM pg_stat_subscription
WHERE subname = 'replicate_from_aurora';
received_lsn | latest_end_lsn
--------------+----------------
0/703FE460 | 0/703FE460
```
Once you are comfortable that all your data has successfully copied over and replication is sufficiently caught up, it's time to switch to PlanetScale. In your application code, prepare the cutover by changing the database connection credentials to go to PlanetScale rather than Aurora. Then, you can deploy this new version of your application, which will begin using PlanetScale as your primary database.
After doing this, new rows written to PlanetScale will not be reverse-replicated to Aurora. Thus, it's important to ensure you are fully ready for the cutover at this point.
Once this is complete, PlanetScale is now your primary database! We recommend you keep your old database around for at least a few days, just in case you discover any data or schemas you forgot to copy over to PlanetScale.
## Need help?
Get help from [the PlanetScale Support team](https://planetscale.com/contact?initial=support), or join our [Discord community](https://pscale.link/community) to see how others are using PlanetScale.